
A little over a week now, we had our first chance to use Apple Pencil with forScore and came away impressed by the automatic palm rejection technology. Since then, we’ve managed to get our very own Pencil and have been working furiously over the past few days to take full advantage of its unique technologies and to tackle some issues we hadn’t seen during that first demo. Today we’re ready to give you a sneak peek at forScore 9.3 and some of the changes we’re making.
First, we’ve spent a ton of time working to make forScore’s annotation engine even faster. As of iOS 9, newer iPads deliver twice as much drawing information and iPad Pro with Apple Pencil delivers four times as much; this provides greater detail but requires more time to render. As soon as we started using Pencil we noticed some slowdowns, especially when erasing, drawing longer marks, or when using larger drawing presets. For a system as highly optimized as ours is, quadrupling performance is a huge undertaking but we’re always up for a challenge and after lots of late nights we’ve significantly improved things. Best of all, these optimizations will benefit all forScore users, not just those with the latest hardware.
If you’ve got an iPad Pro with Apple Pencil, though, you’ll get some other nice big upgrades. For instance, you can now start annotating by simply drawing on the page with Apple Pencil—there’s no need to enter annotation mode first. Once forScore detects Pencil input, it’ll activate annotation mode automatically and draw your marks without missing anything. Annotation mode stays on so you can undo any mistakes, switch tools, and save or cancel your changes. This works everywhere except when you’re using two-page mode in landscape orientation. We’ve also added support for Pencil’s pressure sensitivity, so your drawings will look a little more natural and nuanced.
Finally, we’re adding a feature we’ve spent a lot of time trying to figure out: you can now use links or buttons with your page turner, keyboard, MIDI controller, or Bluetooth Smart device. There are two new options in the “Page Turners & Shortcuts” section of the settings panel called “Select Control” and “Activate Control.” The first allows you to move focus between any of the currently visible links or buttons on your page, and the second simulates a tap on the currently selected control. You can also skip the first step to immediately activate the first (or only) control on the page.
We’re excited to deliver all of these new features and enhancements with forScore 9.3 just as soon as it’s ready, and our beta testers are already hard at work looking for bugs and sending us their feedback. We’re hoping to release it in the next few weeks, so stay tuned!
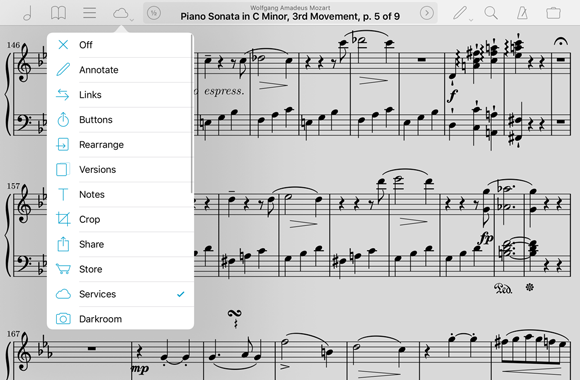
The control bar along the top of forScore’s main view is the central hub for most of the app’s features. Six buttons—three on either side—give you quick access to scores, bookmarks, setlists, search, audio utilities, and just about everything else in the catch-all Tools menu.
If you’re using the new iPad Pro, however, you’ve got more room to work with and if you’ve installed our 9.2 update, we help you use that space more effectively by adding a fourth item to either side of the control bar. These items look and work a lot like the other control bar items, but they have a small arrow below them. That’s because they’re customizable: by default, the left side lets you access the Services panel and the right side lets you annotate, but if you tap and hold either of them you’ll be able to choose a different function or disable the button entirely. Most of the items in the tools menu are available here, so you can pick the one you use most often.
In many cases, there are several different ways you can access forScore’s features. Gestures, shortcuts, the search panel, the tools menu, the info zone in the center of the control bar, and now these two customizable items give you the flexibility you need to work quickly and efficiently. Find the way that works best for you, and ignore the rest.
Either we missed this last week at the Apple store or they just weren’t up yet, but forScore is being featured on one of the banners at the retail stores that use them. The image is part of Apple’s holiday gifts marketing series, and more can be found on their website. Check it out below, and special thanks to twitter user @RealAppleNerd for letting us know!
In our fifth and final post exploring the various ways forScore can connect to MIDI devices and provide some unique capabilities, we’ll be looking at one last feature that exposes a fundamental detail of MIDI: the ability to produce sound.
MIDI messages describe musical events like when you’ve pressed a note and how hard, but these messages don’t transmit any actual sounds. That’s why many MIDI devices are called “controllers” and only describe how you’ve played, not what it sounds like. A synthesizer is the piece of equipment or software that actually produces notes based on those instructions.
Since forScore already includes a software instrument, the piano keyboard, it can fulfill that role and play notes as you use your MIDI device. Of course, your device may already produce sounds or you may have a different synthesizer you’d prefer to use. In that case, just open the MIDI section of forScore’s settings panel and uncheck the “Synthesizer” option. You can also disable the ability to send commands or receive shortcuts here if needed.
That wraps up our exploration of forScore’s MIDI integration. As we said way back in part one, MIDI is much more than a single feature, it’s a full language that can be used to enable a whole lot of interesting capabilities. If we missed one, let us know so we can keep building useful features! Thanks for reading, and we’ll be back next week with a completely unrelated Feature of the Week.
Today we’re happy to announce the immediate availability of forScore 9.2 and forScore mini 2.2. These updates contain a bunch of improvements, fixes, and changes, but for iPad Pro users the biggest news is the addition of an optional, customizable fourth menu item on either side of the control bar. This provides a great way for power users to access the features they use most frequently like Links, Services, Dashboard, and Groups.
Speaking of Groups, the member limit has been raised with this update from ten to thirty. We’re still taking a conservative approach to the service, but we’re excited to continue rolling it out so more and more groups can leave the pain of manual file and setlist coordination behind.
As always, these updates are completely free for existing users, so be sure to check out forScore 9.2 and forScore mini 2.2 today!