At A Glance
If your question is about one of these interface elements, click the image to learn more:
Editing Your Scores
Why is there a gray bar in annotation mode?
In annotation mode, forScore can display a ruler that helps you draw straight lines or better align elements like stamps or shapes. You can drag the ruler around on the screen with one finger to reposition it, or place two fingers on it and rotate them to adjust its angle. Tap this icon in the annotation toolbar to control whether or not the ruler is visible (the icon is outlined when the ruler is hidden and filled when it is shown):

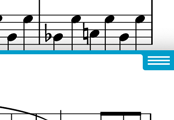
Annotating near the top of a page
While you’re annotating, forScore displays a toolbar so you can change drawing presets, tools, save or cancel your changes, or move between pages. This toolbar covers up part of the page, so you’ll need to move it when you want to annotate near the top of the screen.

On either side of the toolbar you’ll see a set of three horizontal lines. This is a standard iOS control that signifies when something can be moved up or down, for instance when reordering items in a list. Tap and drag this control up or down to move the annotation controls out of the way and they’ll stay there until you move them again (even if you exit and re-enter annotation mode later).
Can I copy and paste parts of my PDF?
PDF files aren’t designed to be edited, but with forScore 11.2 and a forScore Pro subscription you can make structural changes to your scores using Page Copy & Paste. To manipulate the contents of a page, open the Layers panel and choose the “PDF” layer, then use the selection tool to copy, cut, and paste measures as needed. You can copy and paste page contents on the same page, between pages of the same document, and even between documents.
- Navigate to the page containing elements you’d like to copy and enter annotation mode.
- Open the layers panel and choose the “PDF” entry at the top of the list.
- Tap to activate the Selection tool, if needed, and tap it again to switch between freeform (circle) or rectangular modes.
- Select a portion of the page and tap the clipboard icon to copy the outlined contents of the page, or tap the scissors icon to “cut” it.
- If pasting on another page, exit annotation mode, navigate to the target page, and enter annotation mode again.
- Choose the layer you want to paste your elements into (this can be any layer, not just the PDF layer).
- Ensure that the selection tool is still active (if an area is currently selected, tap the dimmed portion of the page to deselect it).
- Tap the page to place the Paste indicator, then tap the clipboard icon to paste your contents into the highlighted area.
- Drag your pasted selection to reposition it, if needed, then tap outside of it to finish this process.
Page Copy & Paste is currently available exclusively to forScore Pro subscribers. If you’re a forScore Pro subscriber and you make structural edits to a document, you can still share it with colleagues—either send an annotated PDF file with permanently embedded annotations, or share a 4SC file (the receiver can show, hide, or clear the PDF layer but can not make any changes of their own).
Note: forScore cannot copy vector information stored within a PDF file, it can only copy a high-resolution image of the selected portion of a page. If you’re working with vector-based files (which can be enlarged without limit), changes made using Page Copy & Paste will appear pixelated at higher zoom levels. Whenever possible, permanent or archival changes should be made using the same source material and application that was used to create the original PDF file in the first place.
Cropping pages to enlarge your music
Although margins can be helpful for printed sheet music, they’re much less useful on a screen and can affect your ability to see the music by making it too small to read comfortably. There are three ways to enlarge a page of music, but the most flexible and powerful option is Cropping. Cropping lets you adjust the position, zoom, and rotation of a page as displayed within forScore without making any permanent edits to the PDF file itself. You can learn more about cropping in our online user guide.
Margin adjustment is a simpler alternative to cropping: it lets you magnify all pages of a document by the same amount. It’s much quicker to adjust, but it can only zoom in towards the center of each page—it can’t reposition or rotate the page in any way. It works well when every page of your document has similar margins.
Finally, if you just need to get a better look at a specific portion of the page temporarily, you can zoom in on the page by placing two fingers on the screen and moving them apart. While zoomed in, you can drag the page around to see a different portion but you won’t be able to turn pages until you zoom back out again.
Using Links to handle repeats
Create a link (Tools menu) between two points in your score to handle repeats with a single tap. Every link that you create consists of two components: a blue circle and an orange circle (an activation point and a target point). Blue circles are visible at all times and act like buttons, taking you to the correct location when tapped. When you do, the corresponding orange circle flashes twice, showing you where to begin playing, but remains invisible the rest of the time.
Note: Links don’t have to be on different pages, they can also be used as visual cues on the same page. If you’re using forScore in landscape mode, it even scrolls up or down if necessary.
To create a link, select “Link” from the tools menu, and you’ll see a new screen appear with two copies of the current score displayed side-by- side. You can use the seek bar or swipe to flip through the pages of either stack.
Tap anywhere on the left-hand page to create a blue circle, and tap anywhere on the right-hand page to create a corresponding orange circle. Both points are required to create a link. If you need to adjust the placement of a link point, simply tap the screen again in the correct position and the circle will move.
Tip: Tap and hold the page for a moment and a magnifying glass will pop up just above your finger, letting you position your links more precisely.
Tip: If you’re using a foot pedal to turn pages, use the Rearrange tool instead to duplicate and re-order your pages for a linear play-through of the song.
Adding or creating new stamps
forScore’s annotation stamps include a general set for music markup, but we’ve also included the ability for users to create and add their own stamps to further customize the stamps palette and tailor it to their individual needs. In the stamps panel, tap the ellipsis (…) button in the top left-hand corner and choose from the available options. Tap Draw to create a new stamp by hand or tap and hold an existing stamp and choose “edit” to launch the stamp editor, where you can draw or edit your design.
You can also create stamps from images imported from your device’s photo library, the Files app (and any configured cloud storage services), or from forScore’s documents directory if you’ve added any images using File Sharing. First, find or create a PNG image (for best results it should be 144×144 pixels), then create a new stamp and press the “Import” button to select an input method. Select your image to place it on the canvas and continue to edit it or save it as is. forScore Pro users can also create new stamps by typing the name of a symbol in Apple’s SF Symbols library.
Tip: The “Browse Images” list allows you to delete images you no longer need—swipe from left to right over an item and tap “delete” to confirm.
On iPad, Drag and Drop gestures make this process even simpler. Use Safari or any other app that supports Drag and Drop to find or create an image, open forScore’s Stamp creator, then drag the image onto the stamp creator’s canvas.
If you created a stamp you no longer need, you can delete it by selecting it and then tapping the trash can button at the bottom of the panel.
Can I brighten a bad scan or copy and paste measures between pages?
PDF files are designed to display their information predictably and to look the same no matter which device or operating system you use to view it. The file extension stands for “portable document format,” and it’s generally only meant to be read, not modified (except for in certain specific cases, like forms with fields).
Although PDF files can be created from images, you can’t work with them the same way you might work with an image file. Instead of pixels, PDF files think in terms of vectors and points—relative measurements rather than concrete ones. They often include highly specific data that can’t be conveyed through an image, like web links, multimedia, or computer-readable text.
What this means for apps like forScore is that while we can allow users to take photos and make adjustments to brightness and contrast, once those images are saved into a PDF file those kinds of changes can no longer be made safely. As a result, any issues with your scans must be corrected before you create your PDF file.
For the same reasons, copying and pasting measures isn’t practical with an app like forScore. We provide additional tools that let you augment how your document is displayed (by adding annotations, for example), but we can’t modify the document itself in the same ways.
Using the Clone feature to create multiple versions of a score
forScore 11 includes a Clone feature that allows you to duplicate scores in your forScore library without using up any additional storage space. This is possible because of a file system-level feature that allows multiple documents to share the same data whenever possible. They’re completely independent and work just like any other files in your library. They can be modified at any time, at which point iOS will separate their data and use up more of your storage space.
To clone a document, open the score menu and tap Edit, select your document, tap “Clone” and supply a name for your copy.
Using Indexes to create bookmarks
About Indexes
When you’re using one long PDF file with multiple pieces within it, bookmarks are an essential part of ensuring that forScore can be at its best, giving you all of the great features you’d get with individual PDF files for each score.
Since adding bookmarks can be a daunting and time-consuming task, use the Indexes feature to create bookmarks from a comma-separated value (CSV) file. To begin, import a CSV file by downloading it through the Services panel, copying it to forScore from another app (or using Drag and Drop), or by adding it to your forScore library from a computer using Apple’s File Sharing panel.
Importing Data From Indexes
While viewing your score, open the Bookmarks menu and tap “Indexes” in the top left-hand corner and choose your CSV file. Values found in each column are listed in the “values” section—tap any of them to assign their information to specific types of forScore metadata, then browse through each record to make sure things look right. The minimum values to create bookmarks are title and starting page; if you want to be able to add individual metadata or add bookmarks to setlists, you’ll also need to set an end page. Set a page offset value, if necessary, and check the thumbnail preview to make sure each bookmark lines up correctly. Skip any header or footer rows as needed, then tap “save” when you’re ready.
If you have multiple CSV files that are structured similarly, you can save and reuse your current value mapping in the future by selecting “default to these settings.” Each time you repeat this process, those settings will be applied by default and you can make any changes, if necessary, before importing the data.
About the CSV Format
CSV files are text documents whose contents follow certain rules. Each line of text (with a newline or carriage return character at the end) contains one or more values separated by a comma. Since newline characters and commas are both used structurally, there are certain rules for how they must be used within values (e.g. if the name of a bookmark is supposed to contain a comma it should be surrounded by double quotes).
In most cases, using a spreadsheet editor is easier and will ensure your data fully conforms to the CSV specification. A CSV file that contains the text shown below, when opened in a program like Excel or Numbers, will be properly formatted and editable without worrying about specific rules or scenarios:
Name,Artist,Year,Start,End
The First Song,”A value, with a comma”,2012,1,2
Another Song,”A value with “”quotes”””,1976,3,5
| Name | Artist | Year | Start | End |
|---|---|---|---|---|
| The First Song | A value, with a comma | 2012 | 1 | 2 |
| Another Song | A value with “quotes” | 1976 | 3 | 5 |
Editing a CSV file directly is as easy as opening a text file, but ensuring that it can be parsed correctly is another story. Whenever possible, we recommend that you rely on spreadsheet editors to do that work for you.
Using the Rearrange tool
Take charge of your music by reordering, duplicating, rotating, or removing pages. When you’re done, save the results to a new file or replace the original. (Note: Rearrange is not available for password-protected files.)
Editing a Score
While links are a great visual way of dealing with repeats, they still require that you reach up and tap on the screen. Rearranging a score in advance, however, ensures that the next page is always the correct one—it’s great for musicians who use the autoturn feature or a foot pedal to turn pages.
While viewing the score you’d like to edit, choose “Rearrange” from the tools menu. The system will take a few moments to generate thumbnails for each page, and then you’ll be ready to customize your score’s layout. Drag pages around on the screen to rearrange them, and use the toolbar along the bottom of each page to remove it, rotate it 90° clockwise, duplicate it, or to create a new section beginning with it (use sections to split up large files into multiple documents). You can also rotate all pages at once using the arrow buttons at the bottom of the screen.
If you’re using forScore 10.5 or later, drag one page and then tap additional pages to move them all at once. If you drop them in a new location, they’re placed there in the order they were picked up. While dragging multiple pages, tap the Cancel button in the top right-hand corner to release all pages and place them back in their original locations, if needed.
Merging Files & Inserting Pages
With forScore 10 or newer, you can tap the “+” button at the bottom of the screen to add all of the pages from another score or bookmark to your Rearrange workspace. When you save, the pages will all be merged into one continuous PDF file. You can also insert one or more pages from a template, including blank pages—they’re fully annotatable so you can use them for just about anything.
Saving a Score
When you’re done adjusting your score’s layout, tap “Save As…” to create a new file or “Save” to permanently overwrite the original file. “Save As” copies the original score’s information but does not duplicate its versions. “Save” overwrites the original file and cannot be undone, and all score information (including versions) is updated as needed. In both cases, Links and Bookmarks are preserved and updated as long as their start and end pages haven’t been removed and, in the case of Bookmarks, that they haven’t been inverted (a bookmark’s start page must precede its end page).
Note: Rearrange was updated to preserve bookmarks and links with forScore 10.4. If you’re using an older version, your bookmarks and links will not be preserved when saving a rearranged file.
Keep in mind that some files use special fonts that iOS cannot reproduce, and in some cases this can result in missing text or blank pages. Before overwriting any file, we strongly recommend that you save a copy first to ensure that the results are usable.
If you’ve split the file into multiple sections, the “Save” button won’t be available, but you can use the “Save As…” button to create a set of new, sequentially numbered files.
Tip: Use the “white marker” annotation preset or the rectangle shape to cover up the portions of repeated pages that you don’t need to play again. Since each page includes its own annotations, you will still be able to see that information on other copies of the page.
Adding text annotations
Text annotations can be used to display custom text directly on the page at all times. With the “type” mode selected, tap anywhere to create a text box. You’ll see two small handles on either side of the box: the left handle allows you to move the text box around the screen, while the right handle allows you to change the width of the box. When you do so, the text box automatically adjusts its height to ensure that all of the text is visible.
Tap inside the text box to edit it, and you’ll notice a toolbar appear with several buttons on it. The “Format” button allows you to change the font, size, and color of the current annotation (save them as the default settings for any new text boxes if you like). The “Delete” button removes the current text box, and the “Done” button completes the edit. You can also tap anywhere on the page outside of the text box to finish editing and dismiss the virtual keyboard.
Tip: We do not recommend using multiple spaces in between text to create exact spacing across a page. (Example: entering chord markings across the top of a line of music.) Due to text scaling differences and font characteristics, the spacing can change when rotating from portrait to landscape or when printing or exporting an Annotated PDF. Instead, try creating a separate text field for each set of text, or, if you’re marking chords, try using stamps instead.
Working with annotation layers
Introduced with forScore 10.4, annotation layers allow you to separate your markings so you can organize them, show or hide them, and edit some of them without affecting others. All drawn markings (including stamps and shapes) and text annotations belong to a layer, while links and buttons are separate and always appear above other annotations on the page.
The Layers panel
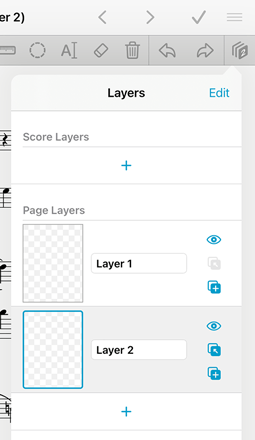
The Layers button in the annotation toolbar allows you to view and manage layers, and to select one layer to make it active. Every page always has at least one layer and can have up to eight page layers in total.
Tap the Layers button and then use the + button to create a new layer. Your new layer is given a default name and automatically made active (represented by a slightly darker background), and you can tap its title to rename it or tap other layers in the list to change the active layer at any time. Any markings you create are placed within the layer that’s currently active.
Items shown in this list from top to bottom represent layers from back to front (the layer at the top of the list contains annotations shown behind all others, and annotations within the layer at the bottom of the list are displayed in front all others). To the right of each layer in the list you’ll find three icons for toggling its visibility, merging it with the one behind it (above it in the list), and duplicating it. Use drag and drop gestures or tap the “Edit” button and drag the reorder control on the right-hand side of a layer to move it up or down.
Deleting or clearing layers
To delete a layer, tap “Edit” and then tap the red button on the left-hand side of a cell to confirm and remove it and all of its associated markings. Without activating edit mode, you can also remove a layer by swiping over it from right to left in the list view. This action also gives you a quick way of clearing all of the annotations on a particular layer without removing it entirely.
Moving annotations between layers
If you’ve made markings on one layer and want to move it to another layer, the Selection tool can help. Its copy and paste functions work within whichever layer is currently active, so you can select annotations in one layer, copy and then clear them, choose another layer, and paste them there. You can also move text annotations between layers: while editing a text annotation, tap “Layers” in the toolbar just above the keyboard (or along the bottom of the screen if you’re using an external keyboard) to move that annotation to a different layer.
Score layersforScore 11
Score layers are linked annotation layers that are available on every page of a score. Each page has its own unique annotations, but if you delete, hide, show, or rearrange score layers on one page those changes will take effect on all other pages as well. You can create up to four of these layers per score.
Note: to ensure page turns are as fast as possible, forScore flattens annotation layers into a single working copy when you save your changes. If needed, forScore also regenerates the working copy for every page affected by changes you’ve made to score layers. This can take a little bit of time, so consider splitting up very long files into smaller collections, if appropriate, to minimize this delay.
Page Copy & PasteforScore Pro
Exclusively for forScore Pro subscribers using forScore 11.2 or later, the PDF layer allows you to copy and paste the contents of a PDF page. For step-by-step instructions, please visit this knowledge base article.
Organization Basics
The score menu organizes your files by Composers, Genres, Tags, and Labels. These lists are generated dynamically, so they’ll only show values currently being used by one or more items in your library. (Learn more about changing an item’s properties using the Metadata panel.)
Tap any of these entries and you’ll see a new list containing all of the scores that pertain to that category. A single score may be visible in several different lists, so long as it matches the corresponding category or setlist. (For example, a score with “Johann Sebastian Bach” as its composer and “Romantic” as its genre will be listed under both of these categories.) Most submenus can be sorted by date added, rating, difficulty, reference, time, key, or alphabetically.
Note: By default, forScore sorts Composers alphabetically by last name and ignores common words like “the,” “a,” and “and” when sorting categories, scores, bookmarks, and setlists. You can adjust these behaviors within forScore’s settings panel to better suit your needs.
The setlist menu lets you create lists and group things manually so you can play through them in any order you need. Setlists even allow you to place the same item in a list more than once. Learn more about setlists here.
Using stamps and shapes for common markings
Some musical symbols cannot be typed into a text box or drawn precisely, but with the “Stamps” and “Shapes” presets you can place these kinds of annotations on the page quickly and easily. Stamps is the first item on the second line of the annotation toolbar (a flat symbol by default), and shapes is the second item (a slur tool by default). Tap on either tool to select it, and tap again to see all of the available options. Drag the size slider at the bottom of either panel left or right to adjust stamp size or shape thickness.
Stamps
Tap the “tint” button at the top of the Stamps palette to color your stamps on the fly. Set a preferred color and enable tinting by tapping the switch in the top right-hand corner, then use the stamp tool like you normally would. Tinting only affects new annotations; existing ones are unaffected. On iPad, the arrow button in the top left-hand corner of the Stamps palette lets you collapse the view into a single column so you can see more of the page.
Shapes
The Shapes panel also allows tinting but on a per-shape basis. Tap the arrow button to the right of any shape to adjust its color and, in some cases, additional settings. For instance, the oval and rectangle tools can be filled or outlined, and the staff shape can be customized to draw a different number of lines. (Shape settings are available with forScore 10.5 or newer.)
Preventing finger input while drawing
If you’re using Apple Pencil (1st or 2nd generation) or Logitech Crayon to annotate, iOS provides great palm rejection right out of the box. While the system is good at ignoring unintentional touches, there’s still a chance that your fingers can make stray markings while you draw with one of these styluses. If that’s the case, the “prevent finger drawing” option in the Apple Pencil section of forScore’s settings panel may help. When this setting is enabled and active, you’ll be able to use your fingers to interact with forScore normally (switch tools, zoom in on the page, and tap other interface elements), but only your stylus will be able to draw markings on the page.
Because your stylus isn’t always around, and because Apple doesn’t give developers an efficient way of checking whether or not a stylus is currently connected, forScore uses different techniques to determine when to apply this setting or not. In previous versions of forScore (10.0-10.4.9), this setting only worked if you entered annotation mode by tapping the page with your stylus.
As of forScore 10.5, forScore simply tracks the last time the stylus touched the screen. As long as you’ve used your stylus within the last 15 minutes, finger drawing will be prevented no matter how you activate annotation mode. If you need to re-enable finger drawing because your stylus is out of reach or out of power, tap the new hand icon in the center of the annotation toolbar. If you do, you’ll be able to continue drawing with your fingers until the next time you use your stylus.
What happened to Notes?
Notes is still available in forScore 13 but it is no longer visible in the tools menu by default. To re-enable it, open forScore’s Settings panel and tap “advanced options,” then tap “notes” to turn it back on. To learn more about this change, please visit: forScore.co/legacy
Fixing crooked scans
With forScore 10 you can use the Crop tool to not only remove excess margins around the page, you can also correct crooked scans by precisely adjusting the angle of the page. The slider near the bottom of the screen can be dragged left or right, rotating the page by up to 20° in either direction (press the rotate button in the bottom toolbar to show or hide this slider).
Note that while your annotations, links, and buttons will all be updated to align properly with the page, these changes are not backwards-compatible with forScore 9 or earlier. If you need to share files with colleagues using an older version of forScore, sending an annotated PDF is the best way to keep your edits intact.
How do I reuse metadata values or edit text annotations?
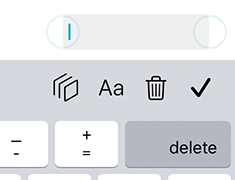
Keyboard Buttons
While editing certain text fields, keyboard buttons allow you to perform actions related to that field. When you’re editing metadata, these buttons let you reuse existing values or import (“fetch”) a PDF file’s metadata. If you’re editing a text annotation, these buttons let you move it to another layer, change its formatting, or delete it.
These buttons appear at the top of the virtual keyboard or, if the virtual keyboard isn’t visible on screen (because you’re using a physical keyboard or certain page turners), they appear along the bottom of the screen instead. On iPadOS they’re shown as icons as shown below, while on iPhone you’ll see text labels instead.
Note: these keyboard may not appear on some versions of iPadOS 13 if “shortcuts” is disabled in the Settings app. We notified Apple of this bug and they have since fixed it with iPadOS 14.0. To work around this issue on iPadOS 13, ensure that the Shortcuts item is enabled in the Settings app.
forScore 12
forScore 12 introduces several new alternative methods to access these functions. A circled downward arrow that appears to the right of most text fields in the Metadata panel gives you quick access to all existing values for that category (filtered by any text you’ve already typed in, if applicable). If you’re using iPadOS 14 or macOS, tap the ellipsis button to the right of the active text annotation to access the formatting panel, change layers, or delete that text annotation.
Opening and Editing Files In-Place
With iOS 11 and forScore 10.4 or later, the contents of forScore’s documents directory are now available through the Files app and you can view or edit them directly through other apps on your device. If you share files from forScore to other apps, it’s important to understand what features they offer and whether you may be permanently altering your files. Visit this page to learn more about in-place editing.