September 13, 2016
| News
Later today, Apple is expected to release iOS 10. As with any notable iOS update, we’ve started to get questions from customers about whether or not they should install it. The short answer is: if you have a recent, complete manual backup of your library and you don’t depend on forScore professionally, then go ahead and update.
The longer answer is that iOS 10 is a brand new operating system, and the version released later today will be slightly different from any version we’ve tested since the first beta back in June. There’s always a chance that something can go wrong, even though at this point we have no evidence of issues with either the current version of forScore (10.0.4) or the next update (10.1) that’s due for release later today.
Perhaps better questions to ask are these: is there anything in iOS 10 that I need or want to try today, and could I live without forScore and my iPad for a few days? If not, wait a week and let us and others kick the tires before you jump in.
September 12, 2016
| News
Today we’re happy to announce the immediate availability of Pitch, Please! 2.5, an exciting and totally free update that adds a brand new Apple Watch app and updates the widget for iOS 10’s beautiful new style and sizes.
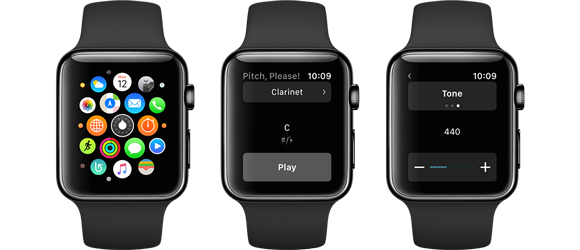
Since the original Apple Watch announcement we knew the wrist could be the perfect place for a utility like this, but unfortunately Apple’s frameworks didn’t do what we needed until now. That’s why Pitch, Please! for Apple Watch requires watchOS 3, due for release tomorrow. Of course, if you’re part of Apple’s public beta program you can get an early peek right now.
Get Pitch, Please! 2.5 today, free for existing users and just $0.99 (USD) on its own. Or, for an even better deal, get the whole Music Box for $3.99 (pro-rated for any previous purchases).
Find your starting pitch with our universal app, widget and watch app.
Get our four utility apps or complete your collection with this app bundle.
September 9, 2016
| Feature of the Week
As we’ve discussed over the past several weeks, forScore 10 brought a lot of big improvements to the Darkroom feature. First, we took a look at the Crop tool which allows you to get the best possible view of your page by accounting for margins, rotation, and shifted perspective. Then we discussed the Enhance tool which gives you better results by adjusting brightness, contrast, tone, and more with just a single tap. Finally, today we’ll be taking a look at the Adjust tool which lets you modify your images even more granularly: it’s like the Enhance tool in manual mode.
Like Enhance, the Adjust tool can be used to modify one specific image or all of your images at once: tap the Adjust icon (three overlapping circles) in the toolbar at the bottom of Darkroom’s main view or tap an image to show the full-screen preview and use it there to adjust only that specific image.
When you tap the Adjust tool, a new view appears with controls for saturation, contrast, and brightness. Drag these sliders back and forth to see how they change your image: the preview updates instantly while the full image is only updated when you dismiss the panel. Tap the preview image at any time to switch between a thumbnail image or a zoomed in closeup.
Darkroom’s three new tools work together to help you get even better results when digitizing your scores on the go. So next time someone hands you paper and there’s no flatbed scanner to be found, don’t forget to put them to good use.
When iOS 7 came out, it was a striking pivot from every version that came before it. Its redesign ended the era of realistic imitation and ushered in the stark, layered interface we’ve all become so familiar with. Love it or hate it, it made its mark.
It’s hard to believe that iOS 7 was released almost three years ago now, and although we know there are still people out there who are using it, we cannot continue to support it effectively. Later this month, when we release version 10.1, forScore will require iOS 8 or later.
There’s no perfect time to end support for older versions of an operating system, and we appreciate that there are valid reasons to not want to upgrade. Sadly, Apple’s latest developer tools (the ones required to support iOS 10) cannot compile and run code on devices using iOS 7 or earlier, so we’d be selling a product we can’t test. We won’t take that risk.
Fortunately, every device that can run iOS 7 can also run iOS 9 (and most will be capable of running iOS 10 as well), so we’re not ending support for any iPad hardware. Older versions of forScore will continue to run as is, of course, and Apple will even allow users who purchased forScore 10.0.4 or earlier to re-download and install that version on their iOS 7 devices at any time.
We’re excited to continue pushing forward, to take advantage of all the latest and greatest features, to benefit from critical security and stability improvements, and to support incredible new hardware on day one. Closing the chapter on iOS 7 lets us do exactly that.
September 2, 2016
| Feature of the Week
Last week we began our discussion of the major improvements made to forScore’s Darkroom feature in 10 with the Crop tool (read more about that here if you haven’t had a chance to already). Today we’re looking at another new tool, Enhance.
The Enhance tool is easy to use: tap the magic wand icon in the toolbar at the bottom of Darkroom’s main view to use it for all of the photos in your workspace, or tap an image to show the full-screen preview and use it there to affect only that particular image. In short, it makes your images better.
Behind the scenes, iOS scans your photo and creates a customized set of filters that are designed to give you the best possible results by adjusting brightness, contrast, tone, and more. Then, since we know we’re working with images of printed paper rather than portraits or scenic landscapes, we remove color information and increase the contrast a little more (both of these changes are editable since they’re made using the Adjust tool, which we’ll be discussing next week).
Easy to use, and a little more complicated to explain, the end result is that your images generally look clearer and more like they were made on a flatbed scanner than with a point-and-shoot.

