 We introduced forScore 10 almost three months ago now, and we’ve spent each week since then diving in to some of the great new features and enhancements it brought with it. Next week we’ll move on some of the more recent changes we’ve made, but today’s last look at 10.0 is a neat one: the Goals widget.
Goals, introduced in forScore 9 as part of the Dashboard feature, help you stay on track by letting you set a certain amount of practice time and/or number of views per day, week, month, or all time. They can be specific to a particular piece you’re working on, or they can be the total amount of time you’ve spent playing.
With forScore 9, the only way to check up on your goals was to visit the full Dashboard interface. Now, with forScore 10, you can easily track your progress live, right from the title display in the main control bar. It’s on the second page by default, but like the rest of the icons in the title display you can rearrange them and put your two most important ones on the first page. Put it front and center, then get to playing!
September 30, 2016
| Feature of the Week
 One of several big advantages digital sheet music has over the old paper variety is the ease with which you can share copies with colleagues. No more hunting down a photocopier, files can be transferred from one iPad to another in seconds.
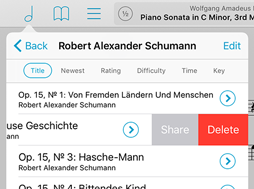
That gets even easier with forScore 10, because now you can swipe from right to left over a score or setlist in your library to share it. If you’ve ever used this gesture to delete something from your library then you already know how it works: the item slides off to the left exposing a red “Delete” button, now joined by a gray “Share” button. Simply tap that Share button and you’ll be asked to pick which format you want to share, just like when you use any of the other existing methods to share a file or setlist. It’s easy, flexible, and now quicker than ever.
September 23, 2016
| Feature of the Week
One popular feature in forScore is the ability to open multiple scores or bookmarks in tabs. We discussed this feature in our second ever Feature of the Week, so feel free to check that out for a quick refresher.
With forScore 10, we added a simple but important enhancement: the ability to rearrange your tabs. To do so, just tap and hold your finger on a tab until it animates, then drag it left or right as needed. When it’s in the right spot, just let go. Some features are complex and take a lot of words to explain. Rearranging tabs isn’t one of them, but that doesn’t make this enhancement any less useful!
September 16, 2016
| Feature of the Week
 While the big news this week is the release of iOS 10 and forScore 10.1, we’ve still got a few features introduced earlier this year that we just can’t skip! Today’s is an extremely helpful addition to the Rearrange tool that combines its flexible features with the merge function to create an even more powerful tool. In fact, if we were naming it today, we’d probably call it the Layout tool instead.
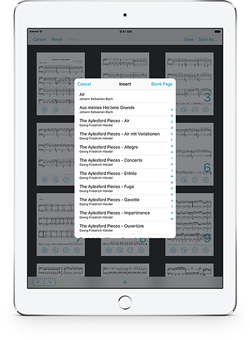
Using this new functionality is easy, just pick a file you want to edit and choose “Rearrange” from the tools menu. The new + button at the bottom of the screen lets you add the pages of any other score in your library to your current workspace. Pick the file you want, and its pages will be added to the bottom of the grid view. You can duplicate them, delete them, rotate them, and arrange them any way you like. It’s a great way of solving some common problems, like when a file you’ve scanned ends up missing a page or when one or more pages are changed later on and need to be replaced.
That’s not all, though, because you can also use this new feature to insert one or more blank pages. These blank pages can be placed anywhere you like, and once you save your changes you can even annotate on them. It’s Rearrange, and it’s Merge, and it’s even more—all in one easy place.
September 13, 2016
| News
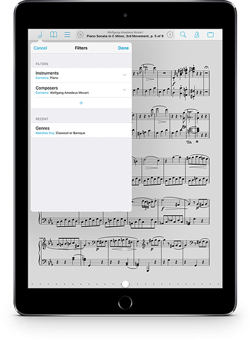 Today we’re extremely proud to announce the release of forScore 10.1 and forScore mini 3.1 on the App Store. These updates add some key new features like Filters, which let you browse more effectively by cross-referencing your metadata categories with advanced rules. They improve support for iOS 10 by doing things like reworking the style and layout of the pitch pipe widget. They add a new option to hide the status bar, giving you the clearest view yet of your music.
And, on iPad, forScore adds a setting to automatically exit annotation mode after a short delay, putting an important capstone on our Apple Pencil support and realizing the possibilities of a completely mode-free annotation experience.
These updates are completely free for existing users, as always, and we think they’re really going to take things even further. For newcomers, forScore is still just $9.99 (USD) and forScore mini is the same $6.99, so now is a great time to check them out if you haven’t had a chance to already.
Available now for iPad
Available now for iPhone and iPod Touch
