Last week we began our discussion of Dashboard with the Analytics tab, which shows you how forScore can collect data to give you insights into your playing habits. That’s just the start of what it can do, though, and today we’ll be discussing Goals, the second of three tabs within the Dashboard interface.
The Goals tab lets you to create goals to track your progress per day, week, month, or all-time. The main view shows all of your goals in a list, and gives you a quick overview of your progress towards each of them.
Tap on any of your goals to see a more detailed view and get more information about your goal or change its settings. You’ll also see a timeline along the top that shows your statistics for each day, week, or month: these aren’t just helpful for you, you can also tap on any of them to share your results with friends or colleagues via email, iMessage, Twitter, Facebook, and more. That shared experience really adds a new dimension to your forScore experience, and can provide some helpful accountability if needed.
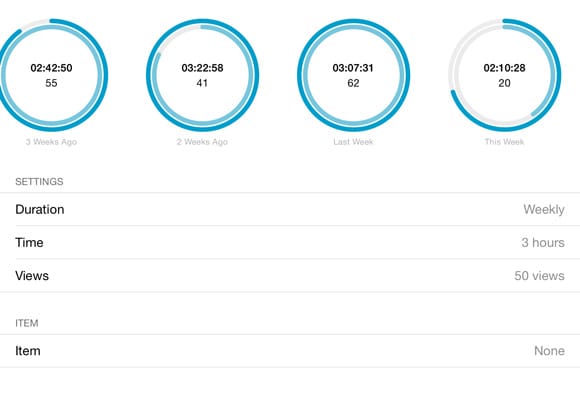
Goals can be defined by number of views or time spent playing, and they can be general or focused on a specific piece or setlist. For example, you could set a goal to ensure that you play for thirty minutes a week, or use another goal to ensure that you’re practicing one particular score at least three times a day to get ready for an upcoming recital.
That’s the second of three tabs in the Dashboard, so check back next week to find more about the last one—Reports—or catch up by reading last week’s overview of Analytics.
This Sunday’s print edition of the New York Times will feature an article discussing the shift from paper to digital sheet music, but a version of the article is already available online. We were interviewed for the article, and while none of our comments made it into the final piece, it’s a great look at the transition and especially the impact it can have on annotation.

When we introduced Dashboard last year with forScore 9, we knew it was unlike any feature we had ever created. It required secure data collection and brand new interface elements that could present complex data in a logical, useful way.
To achieve this, we designed Dashboard with three specific uses in mind. Goals, Analytics, and Reports. Over the next few weeks we’ll be taking a look at each, and we’ll start with Analytics.
If you allow it, forScore collects information about which setlists, scores, and bookmarks you view and for how long. This data collection is secure (never stored anywhere other than on your own device) and strictly opt-in, so the first time you open Dashboard you’ll be asked to agree to allow forScore to begin collecting data. Once you’ve done so, you’ll see the Analytics tab; it’ll be empty since there’s no data yet, 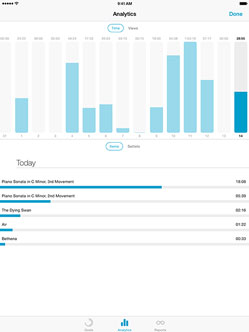 but after you’ve spent some time playing you’ll be able to come back and see what Dashboard can do.
In the top section, you can see a daily total of your play time and number of views. Below that, you’ll see a list of the items or setlists you played, sorted from most played to least. Tap on any of those items to see the day-to-day play time and number of views (like the same chart at the top of the screen, but just for that specific item).
These graphs already give you a lot of insight into your playing habits, but there’s a lot more you can do with it. Be sure to check back next week when we’ll be discussing the Goals tab!
Last week, with the release of forScore 9.4, we introduced a new feature that lets you download a file from the Services panel and add it to a setlist in one step. Previously, you’d need to open the Services panel, locate and download the file you want, then close the panel and open the Setlists menu, select your setlist, tap the “+” button, and find the new file in the list (the “Newest” sort option really helps here) to add it to your setlist.
Now, things are a lot simpler. In the Services panel, tap and hold a PDF or 4SC file with two fingers and—assuming you have some setlists in your library—you’ll be prompted to either download it normally, download it to the current setlist (see below), or download it to any setlist in your library. You can also tap the “Edit” button and select multiple files, then tap and hold the download icon in the toolbar, and your selection will apply to all of those files. If you’re using iOS 8 or newer, you can swipe from right to left over an item and choose “Download…” as well.
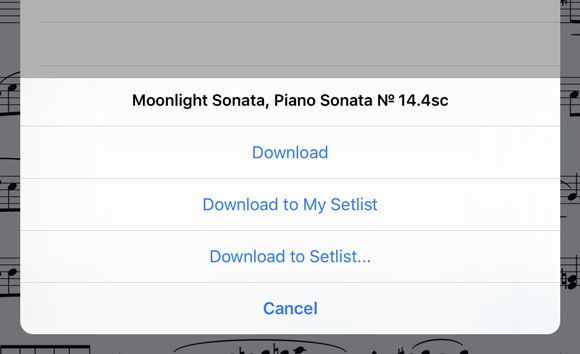
The “current setlist” is either the setlist you’re currently playing from, if applicable, otherwise it’s the setlist that’s currently selected in the Setlists menu. If neither of these is true, you’ll only be prompted to download the file normally or to choose from a list of setlists.
So quit jumping back and forth and save yourself some time by using this new feature the next time you’re setting up your setlists!
 This week we released forScore 9.4, so today we wanted to discuss one of the new features added with this update—the ability to control how forScore remembers your last-used tool when entering annotation mode.
With earlier versions, the last selected tool always remained active between annotation sessions. So if you had been placing stamps on one page and then started annotating a few pages later, the Stamps tool would still be active. That includes shapes, each of your drawing presets, as well as other tools like Type or Erase.
This worked well enough for a long time, but with the introduction of the Apple Pencil and forScore’s live annotations things have gotten a little more complicated. Since the annotation controls are hidden until you start drawing, it can be frustrating if the last thing you did was erase something and you want to take notes instead.
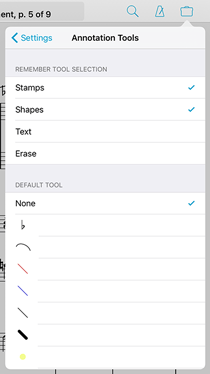
Now, with forScore 9.4, you can control how this works in two different ways (visit the new “Annotation tools” section of forScore’s settings panel to view and change these options). Set a default drawing tool—stamps, shapes, or any one of your freeform drawing presets—and that tool will always be active every time you start annotating. Or, if you need a more nuanced solution, check and uncheck tool types instead to either allow them to be saved between annotation sessions or not.
For instance, say you’ve highlighted a few things on a page and you dragged your finger a little too far over; tap the Eraser tool and clean up your markings, then tap the “Done” button to save your changes. If you’ve unchecked the “Erase” tool in the new settings panel, the next time you begin annotating the highlighter will be selected.