 Today we released forScore 9.4 and forScore mini 2.4, kicking off the start of what’s sure to be a busy summer for us. We’re working hard on a big new update and, with Apple presumably set to announce and start publicly testing iOS 10 next month at their annual developer’s conference, there’s a lot to get excited about.
Of course, it takes a lot of work to refine a beta version and turn it into something that’s ready for release. Often the only way to find and fix bugs and usability issues is to get it into the hands of as many people as possible. That’s why we use TestFlight—Apple’s beta testing service—to work through those problems. Beta testing is more than just getting a sneak peek at new features and updates, it requires attentive and communicative users who are passionate about helping to make forScore the best app it can be. If you’re up to the challenge, consider becoming a beta tester. Our beta testers provide invaluable feedback and their participation is sincerely appreciated.
Today we’re proud to announce the immediate availability of forScore 9.4 and forScore mini 2.4. These updates includes some new enhancements designed to improve usability in two key areas:
First, we’ve added a new section in forScore’s settings panel called “annotation tools” that gives you more control over how annotation mode saves your last-used tool or preset. 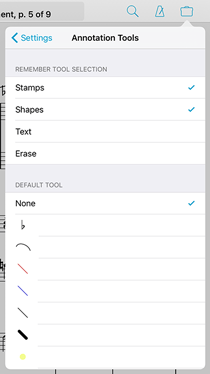 Choose which tools can be saved between annotation sessions and which should not, or specify one particular drawing preset that will always be active every time you begin annotating. The new settings are available for all devices, but should be especially helpful for users with Apple Pencil and forScore’s live annotations enabled.
We’ve also made it easier to download scores from a cloud service directly to a setlist. Either tap and hold an item or use the “Edit” button to select multiple items and then tap and hold the download button in the toolbar. Or, if you’re using iOS 8 or higher, you can also swipe left over an item and select the new “Download…” option. Once you do, you can choose to download the item(s) to your library like you normally would, download them to the current setlist (if you’re playing or viewing one), or download them to any setlist in your library.
These specific enhancements really boost productivity in key areas, and we think they’ll make a big difference. Thanks as always to our customers—and especially our beta testers—for helping us continue to make forScore the best app it can be. These updates are free for all existing users and still just $9.99 and $6.99 (USD) for newcomers, so be sure to check them out today!
 Organization is personal—what makes sense to one person may seem completely backwards to others. That’s especially true for musicians and while some types of information are used more commonly to categorize sheet music than others, we know there’s just no perfect set that will work for everyone.
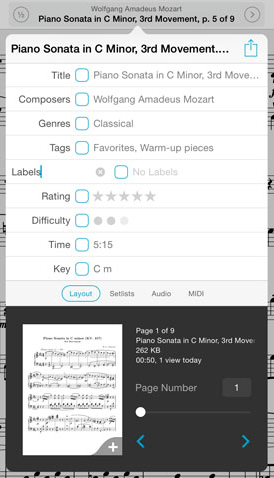
That’s why forScore lets you tap to rename most of the metadata panel’s fields so they can better fit your needs. Names like “tags” and “labels” are meant to be generic because they’re so flexible, so go ahead and change them!
In fact, each of the following field names can be changed: composers, genres, tags, labels, rating, difficulty, time, and key. So now you can set everything up just how you like it (you could even use emoji characters instead of text if you really want to get fancy).
Over the past two weeks we’ve explored forScore’s metronome, from the basics like setting the time signature and BPM values, to more specialized features like count in and autoturn.
All of these functions are great, but the best part is that once you’ve set them up, you can use them all without even opening the metronome panel. As we discussed in some of last year’s Feature of the Week articles, you can use special gestures, a Bluetooth device, or a MIDI device to toggle the metronome. Whichever mode you used most recently—audible, visible, or both—is activated with just one quick action.
You can also use Buttons to toggle the metronome, but they’re even more powerful than gestures or shortcuts because they can also be used to adjust the metronome’s BPM partway through a score. If you haven’t had a chance to check them out yet, you can read all about them here.
And finally, wrapping up our grand tour of the Metronome, we take a moment to discuss those sound effects. Let’s face it, they’re just not for everyone—no one set of sounds could be—and if that’s you, then be sure to check out the “Accessibility” feature of forScore’s settings panel. There, you can replace the two default sounds with two WAV files of your choosing—just add them to your forScore library first via iTunes’ File Sharing panel and they’ll be available in that menu.
So that concludes our journey through the various features of forScore’s metronome. We hope you enjoyed it and perhaps learned something new, and we’ll be back next week with something completely different!
Last week we took a look at the most basic functions of forScore’s built-in metronome. We discussed its various modes and the essential time signature and BPM values. Be sure to check it out if you haven’t had a chance to yet.
Just below the metronome’s center dial, two other settings may be of use to you: autoturn and count in. Both of these settings have a value and a toggle button (a blue border and blue text when it’s disabled, and a solid blue color with white text when it’s enabled). Autoturn turns the page for you automatically once the metronome reaches a certain number of beats or measures. Count in plays the metronome for just as long as you need it to, then shuts off automatically. Just like the time signature and BPM values, Count In is saved automatically per score so you only need to set it once. Autoturn values are also saved automatically, per page instead of per score since the number of beats per page may vary.
When you’re using an auxiliary audio output (headphones, a receiver, or wireless speakers), an icon will show up just above the top of the dial in the metronome panel. This control lets you choose whether to play the metronome out of the left channel only, the right channel only, or both channels. Tap it to toggle between these three modes.
That completes our discussion of the metronome panel and its various controls, but there’s more to come—next week we’ll be talking a little bit about the various features of the metronome that you won’t find in the metronome panel itself, so stay tuned!