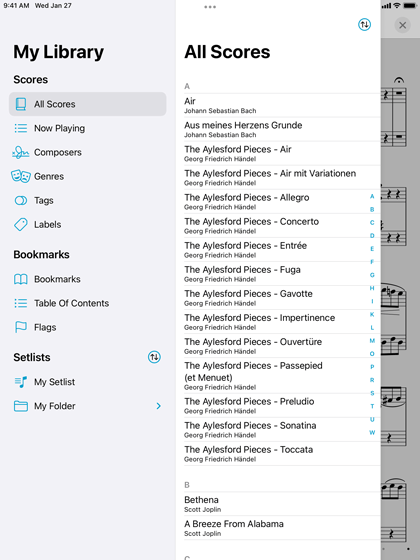
At A Glance
If your question is about one of these interface elements, click the image to learn more:
Working with Setlists
Rearranging Setlists
In the Setlists menu, with Manual sort order selected, you can arrange your setlists or their contents by tapping the Edit button and using the control on the right-hand side of each item (three horizontal lines). Tap and hold the control until the row pops out of the table view, and then drag the score upward or downward. You can also do this from within the full screen setlist editor, where the gray bars are always visible in the setlist column.
Understanding the setlist menu
Unlike the score menu, which automatically generates and sorts its contents, the setlist menu is completely manual. Create a setlist by tapping the + button and supplying a title, and rename or move it up or down at any time by tapping the “edit” button. Tap on any setlist to view or edit its contents.
The main list of setlists and the contents of each individual setlist can be sorted manually, alphabetically, or by least-recently played (fresh). In addition, individual setlists can be sorted randomly and shuffled at any time: drag the list downward until you see the refresh control, then let go to re-shuffle the queue.
Sharing a setlist
If you’re using setlists as a group, forScore makes it easy to share them with your colleagues, even if they’re using another app. Setlists can be shared from the root view of the setlist menu (that’s the list of all of your setlists, not the contents of a specific setlist). If you’re using forScore 10 or newer, swipe from right to left over the setlist you want to share and choose the Share action that appears. If you’re using an earlier version of forScore, tap the “Edit” button on the right-hand side of the menu’s navigation bar, then select your setlist and tap “Share” from the options at the top of the list. forScore’s sharing interface allows you to share a setlist in a variety of formats:
Setlist Only: If your colleagues are using forScore and already have the PDF files they’ll need, this choice is best. It’s a forScore-specific file type (4SS), and it includes all of the information about your setlist but does not contain the setlist’s scores or bookmarks.
Include Scores: This also creates a forScore-specific .4SS file, but includes the necessary PDF files as well. Use this format’s “include extras” option to choose whether or not to include each file’s editable annotations, metadata, and more.
Merged PDF: You can also merge the scores in your setlist into one long PDF file. This option is great for colleagues who are using another music reader.
Annotated Merged PDF: Like the last choice, this merges your setlist’s scores into one long PDF file, but this time also includes permanent annotations. Specify whether to use forScore’s standardized aspect ratio or use each file’s original aspect ratio instead.
Text List: For colleagues using paper, a text list might be the best choice. Use this format’s options to specify if you’d like to number your list, include composer information, and whether or not to sort the items alphabetically.
Tap a thumbnail icon to share your setlist using the default options, or tap the ellipsis (…) button to configure additional options first and then tap “share” in the top right-hand corner to continue. Once you do, you’ll see a standard iOS Share Sheet appear which gives you options like AirDrop, email, and more. If you’re using iOS 11 or later, choose “Save to Files” to copy your setlist to iCloud Drive or any other third-party cloud storage provider you’ve configured for use with iOS’ Files app.
Note: If you’re planning on sharing your setlist via email, you may need to check that the combined file sizes of all the scores in the setlist are smaller than any attachment limit your email provider may have.
Sharing Setlists via forScore’s Services panel
If you’d like to upload your setlist to one of the cloud storage providers supported by forScore’s Services panel, do the following:
- Open the Tools menu and choose Services.
- Navigate through your cloud service’s folders until you’re viewing the folder you’d like to send the file to.
- Tap the + button at the bottom of the panel.
- Choose the Setlists view.
- Tap to select one or more setlists.
- Tap the Format button in the lower right corner to toggle between the options. In the services panel, only Setlist Only, Include Scores, and Include Scores & Extras are available options.
- When ready, tap the Upload button in the upper right corner and the upload will begin.
- Use your cloud service’s sharing functions to share the file or folder with other forScore users, if necessary.
Using the Clone feature to create multiple versions of a score
forScore 11 includes a Clone feature that allows you to duplicate scores in your forScore library without using up any additional storage space. This is possible because of a file system-level feature that allows multiple documents to share the same data whenever possible. They’re completely independent and work just like any other files in your library. They can be modified at any time, at which point iOS will separate their data and use up more of your storage space.
To clone a document, open the score menu and tap Edit, select your document, tap “Clone” and supply a name for your copy.
Managing a score’s setlist and library membership
The “setlists” tab in the metadata panel lets you quickly manage which setlists the current score is a part of. Tap a setlist to add the current score to it (a blue check will appear) and tap it again to remove it. If you have multiple libraries set up, a similar “libraries” panel lets you manage library membership in the same manner.
Recovering deleted scores and setlists
forScore 10.5 includes a recovery feature that can help you restore scores or setlists you’ve recently removed from your library. When you use forScore’s menus to delete these items, they’re moved out of your library to a temporary location. If you need to recover one or more items, open forScore’s Tools menu and choose Backup, then tap “Recently Deleted” to access them. Tap an item to recover it, or swipe to delete and permanently erase it. Items are permanently erased automatically after seven days.
Tap the Edit button in this panel to recover or erase multiple items. While in edit mode, you’ll see two additional buttons in the bottom toolbar: a trash can icon and a recover icon. Tap either of these icons to select all items and prompt to recover or permanently erase them, or select one or more items first to recover or erase just those items.
Only items set aside by forScore can be recovered. If you use Apple’s File Sharing panel or iOS’ Files app to delete items, they won’t be moved to this location and you won’t be able to recover them. If you delete forScore from your device, all of your information goes with it and cannot be recovered using this method. We don’t store a copy of your files and can’t help you get them back if they’re erased.
Setlist folders
Setlist folders allow you to organize your setlists into discrete groups. Unlike in the score menu, where an item can appear in multiple category lists based on its attributes, folders are concrete locations: a setlist can only ever be in one folder at a time, just like on a computer.
To create a new empty folder, tap the “edit” button and then tap the new folder icon with a “+” symbol inside it. Supply a name and your folder will appear at the bottom of the list. Folders can be rearranged and mixed in with your other setlists, so you can put them anywhere in your list.
Use the setlist metadata panel to move a setlist into or out of a folder. Tap the circled “i” button next to any setlist or use edit mode to select multiple setlists and batch edit them to change their folder location. Select any existing folder, create a new one, or select “no folder” to move your setlist or setlists.
Note: Setlist folders are available in forScore 10 or later.
Using Multiple Windows
forScore supports multiple windows on iPadOS and macOS, allowing you to work with multiple scores or setlists simultaneously. The core music reading experience in secondary windows is very similar, giving you access to familiar features like annotation, page turning modes, editing functions, layout options, and more.
Secondary windows offer a unique browsing experience that combines most of forScore’s menus into a single unified hierarchy. The sidebar allows you to navigate between general sections, while the submenu lets you access the items within that section. Swipe from the left or tap the left-most icon in the title bar to access this interface. You can learn more about secondary windows in the user guide.
The easiest way to create a new window is by browsing for a score or setlist in the menu, then using its contextual menu to open it in a new window. On iPadOS, you can also use drag and drop gestures or the system’s multitasking interface, and on macOS you can use the menu bar or keyboard shortcuts.
Each device and operating system works a little differently, so be sure to consult Apple’s user guides for the most up to date information.
Moving setlists between libraries
With forScore 10 or later, use these instructions to manage a single setlist’s library membership:
- Open the main setlist menu and tap the circled “i” button next to the setlist you want to edit
- Tap to select a library from the list and a check mark will appear next to it
- The app will prompt you to move all associated files from that setlist to the corresponding library if applicable
- Tap the back arrow to return to the setlist menu
If you want to edit multiple setlists at once, or if you’re using forScore 9 or earlier, use these instructions:
- Open the main setlist menu and tap Edit in the upper right corner
- Tap to select one or more setlists, then tap the Edit option that appears at the top of the menu
- Tap to select a library from the list and a check mark will appear next to it
- The app will prompt you to move all associated files from that setlist to the corresponding library if applicable
- Tap the back arrow to return to the setlist menu
Adding and removing setlists
To delete an entire setlist, swipe your finger across it from right to left and confirm by pressing the “delete” button. You can also tap the “edit” button and select one or more setlists, then choose “delete” from the options along the top.
Use the same process to remove one or more entries from a setlist (note that the buttons will read ‘remove’ instead of ‘delete’ since removing an item from a setlist doesn’t affect the original item).
While viewing a setlist, use the + button to add new items to it. A full- screen editor will appear, showing you the current setlist on the left and your library on the right. Tap on any item in your library to add it to your setlist—a dot will appear next to items that already belong to the setlist. You can also delete items from the setlist or rearrange them at any time.
Three buttons along the bottom of the editor give you additional options: add the current score to your setlist, create a placeholder with a custom name, or add all of the items listed on the right to your setlist at once.
Using menu search and filters
In many of forScore’s menus, you can drag the list downward to reveal a search bar that allows you to quickly find exactly what you’re looking for in that list by showing items whose title or certain metadata match your query.
When you’re viewing a list of items, you’ll often also be able to use filters to narrow down that list of items by more advanced rules. When available, tap the menu (circled ellipsis) button in the navigation bar or toolbar and choose “Filter” to show the filter panel.
This interface features two sections: the Filters section contains any rules you’ve set up and allows you to add new ones, and the Recent section allows you to quickly reuse recent rules. Tap the + button to create a new rule, then tap to select one or more Composers, Genres, Tags, Labels, or Setlists. At the bottom of the panel, you’ll see the “matching rule” which defines how forScore should interpret your rule.
With only one category or setlist selected, you’ll be able to tap here to toggle between two modes: Contains (shows items that belong to that category or setlist) and Not (shows items that don’t belong to that category or setlist). With multiple categories or setlists selected, these modes change to Matches Any (shows items that belong to at least one category or setlist), Matches All (only shows items that match all of the selected categories or setlists), and Not (shows items that do not belong to all of the selected categories or setlists).
Tap the Done button when you’re finished setting up your rules and you’ll be returned to your list with the results now narrowed down accordingly. When filters are active, the menu button in the navigation bar or toolbar changes to a tinted circular filter icon—tap here to edit or reset all filters.