We’re taking a break from this column to work on our next big thing, but there are almost two hundred features here to catch up on if you haven’t read them all. If there’s a topic you’re interested in, you can also try searching for it.
September 30, 2016
| Feature of the Week
 One of several big advantages digital sheet music has over the old paper variety is the ease with which you can share copies with colleagues. No more hunting down a photocopier, files can be transferred from one iPad to another in seconds.
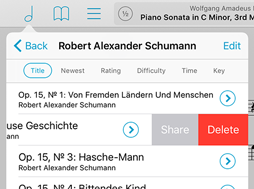
That gets even easier with forScore 10, because now you can swipe from right to left over a score or setlist in your library to share it. If you’ve ever used this gesture to delete something from your library then you already know how it works: the item slides off to the left exposing a red “Delete” button, now joined by a gray “Share” button. Simply tap that Share button and you’ll be asked to pick which format you want to share, just like when you use any of the other existing methods to share a file or setlist. It’s easy, flexible, and now quicker than ever.
September 23, 2016
| Feature of the Week
One popular feature in forScore is the ability to open multiple scores or bookmarks in tabs. We discussed this feature in our second ever Feature of the Week, so feel free to check that out for a quick refresher.
With forScore 10, we added a simple but important enhancement: the ability to rearrange your tabs. To do so, just tap and hold your finger on a tab until it animates, then drag it left or right as needed. When it’s in the right spot, just let go. Some features are complex and take a lot of words to explain. Rearranging tabs isn’t one of them, but that doesn’t make this enhancement any less useful!
September 16, 2016
| Feature of the Week
 While the big news this week is the release of iOS 10 and forScore 10.1, we’ve still got a few features introduced earlier this year that we just can’t skip! Today’s is an extremely helpful addition to the Rearrange tool that combines its flexible features with the merge function to create an even more powerful tool. In fact, if we were naming it today, we’d probably call it the Layout tool instead.
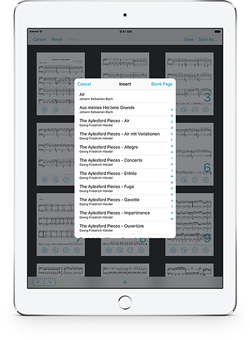
Using this new functionality is easy, just pick a file you want to edit and choose “Rearrange” from the tools menu. The new + button at the bottom of the screen lets you add the pages of any other score in your library to your current workspace. Pick the file you want, and its pages will be added to the bottom of the grid view. You can duplicate them, delete them, rotate them, and arrange them any way you like. It’s a great way of solving some common problems, like when a file you’ve scanned ends up missing a page or when one or more pages are changed later on and need to be replaced.
That’s not all, though, because you can also use this new feature to insert one or more blank pages. These blank pages can be placed anywhere you like, and once you save your changes you can even annotate on them. It’s Rearrange, and it’s Merge, and it’s even more—all in one easy place.
September 9, 2016
| Feature of the Week
As we’ve discussed over the past several weeks, forScore 10 brought a lot of big improvements to the Darkroom feature. First, we took a look at the Crop tool which allows you to get the best possible view of your page by accounting for margins, rotation, and shifted perspective. Then we discussed the Enhance tool which gives you better results by adjusting brightness, contrast, tone, and more with just a single tap. Finally, today we’ll be taking a look at the Adjust tool which lets you modify your images even more granularly: it’s like the Enhance tool in manual mode.
Like Enhance, the Adjust tool can be used to modify one specific image or all of your images at once: tap the Adjust icon (three overlapping circles) in the toolbar at the bottom of Darkroom’s main view or tap an image to show the full-screen preview and use it there to adjust only that specific image.
When you tap the Adjust tool, a new view appears with controls for saturation, contrast, and brightness. Drag these sliders back and forth to see how they change your image: the preview updates instantly while the full image is only updated when you dismiss the panel. Tap the preview image at any time to switch between a thumbnail image or a zoomed in closeup.
Darkroom’s three new tools work together to help you get even better results when digitizing your scores on the go. So next time someone hands you paper and there’s no flatbed scanner to be found, don’t forget to put them to good use.
September 2, 2016
| Feature of the Week
Last week we began our discussion of the major improvements made to forScore’s Darkroom feature in 10 with the Crop tool (read more about that here if you haven’t had a chance to already). Today we’re looking at another new tool, Enhance.
The Enhance tool is easy to use: tap the magic wand icon in the toolbar at the bottom of Darkroom’s main view to use it for all of the photos in your workspace, or tap an image to show the full-screen preview and use it there to affect only that particular image. In short, it makes your images better.
Behind the scenes, iOS scans your photo and creates a customized set of filters that are designed to give you the best possible results by adjusting brightness, contrast, tone, and more. Then, since we know we’re working with images of printed paper rather than portraits or scenic landscapes, we remove color information and increase the contrast a little more (both of these changes are editable since they’re made using the Adjust tool, which we’ll be discussing next week).
Easy to use, and a little more complicated to explain, the end result is that your images generally look clearer and more like they were made on a flatbed scanner than with a point-and-shoot.
When adding new music to your library, digitally-produced PDF files are certainly best. They feature the highest quality and lowest file sizes. For paper scores, a flatbed scanner is a decent option for archival digitization: you’ll get full control over color, resolution, and more.
But, like they say, the best camera is the one you have with you. If you need to digitize a score on the go, Darkroom is the way to do it. It lets you snap photos with your iPad’s camera or import images from your device’s Photos library, then turn them into a PDF in minutes. It’s a feature that’s been around for a while now, but with forScore 10 it takes a big leap forward with several major improvements. Today we’ll take a quick look at cropping, a feature that lets you remove the edges of a photo and get the best possible view of a page.
After adding a photo to your workspace, tap on it to see a larger preview, then tap the Crop icon at the bottom of the screen (the second-to-last icon). First, forScore will scan your image to try and find the edges of your page. If it can, it’ll set the crop box to the area it thinks you’ll want to keep. Otherwise, it’ll start you off with a 10% margin on each side. Drag the edges or corners of the crop box to fit your page, then tap “Crop” in the top right-hand corner of the screen. Anything outside of the selected area will be removed, accounting for shifted rotation and perspective if needed.
It’s a quick and easy way of getting great results, especially for files you’ll only be using temporarily. That’s just the start of what’s new in Darkroom in forScore 10, though, so be sure to check back next week for more!
Setlists are a popular and flexible way for users to organize their music exactly how they need it, and we’ve often heard from people who keep those lists around so they can duplicate and tweak them as needed to suit their weekly events. After a few weeks, that list of setlists can grow and really start to get out of hand. That’s why we introduced setlist folders in forScore 10: they let you group and organize your setlists much like files on a computer, so you can separate them into groups as needed or archive them after each performance.
When you tap the “Edit” button in the Setlists menu, the “+” button that normally lets you create a new setlist changes to let you create a new folder instead (the icon changes to a folder with a plus symbol inside of it). Tap here and supply a name to create a new folder. All of the different ways you can sort your setlists work the same way with folders: use Manual mode to arrange them any way you like, sort them alphabetically, or sort them by least-recently played.
To move a setlist into your new folder, tap the circled “i” button to the right of the setlist to show the setlist panel. Select any folder in the “Folders” section to move your setlist into that folder, or tap the “New Folder…” item at the bottom of the list to create a new one (creating a folder here works exactly the same way as it does in the main Setlists menu, this way just saves you a few taps). Use the Setlist menu’s edit mode to select multiple items and move them all into a folder at once.
Now you don’t have to choose whether you want to keep your older setlists or sacrifice them to clean up a cluttered list—get the best of both worlds by organizing them into folders instead.
 Since they were first introduced, forScore’s annotation tools have been largely static and cumulative: once you hit that save button the only option to change a specific drawing was to erase and redo it. In forScore 10, the new selection tool changes all of that.
Now you can use your finger or Apple Pencil to select a specific area of drawn annotations (including stamps and shapes) and then move, duplicate, or clear them without affecting any of your other annotations. There’s also an adjustment tool that lets you re-color annotations by adjusting their hue, saturation, brightness, and opacity. You can even copy and paste drawn annotations, and it works between pages or between completely different files. It’s a powerful tool that can save you a lot of time and effort, so be sure to check it out the next time your annotations need a little tweaking.
Some of the new features in forScore 10 are complex, but others—like the new ruler annotation tool—are very straightforward (pardon the pun). While annotating, tap the new ruler icon to show or hide it. It’s semi-transparent and, most importantly, straight.
Use two fingers to rotate it, or drag it around on the screen to place it exactly where you need it. It works with your drawing presets and the Stamp and Shape tools. Start drawing near either side and forScore will lock your input to the ruler’s edge. Or start drawing out in the open and the ruler will stop your drawings from going too far if needed.
And, well, that’s about it. You don’t always need precision, but when you do the new Ruler tool is there for you.
For an app designed to give you the best, clearest possible view of your music, cropping is an essential part of the equation. It helps you remove unnecessary margins, zooming and repositioning each page until it fits perfectly on the screen.
Now, with forScore 10, the Crop tool can do even more: it can now help you fix crooked scans by tilting the page up to twenty degrees in either direction. It’s not a separate function, it’s part of the cropping process so you can line up your page once and never have to think about it again. Just drag the slider at the top of the page left or right until everything looks good (if you’ve already cropped your page you’ll need to un-crop it first).
Your annotations, links, and buttons are all adjusted to line up properly with the page, but since things like text annotations need to stay horizontal there may be some subtle differences. For the best possible results, be sure to crop and de-skew any problem pages first.