We’re taking a break from this column to work on our next big thing, but there are almost two hundred features here to catch up on if you haven’t read them all. If there’s a topic you’re interested in, you can also try searching for it.
December 25, 2015
| Feature of the Week
After more than five years of development now, forScore has become a very powerful application with a wide-ranging set of features and tools. As we’ve built out these features we’ve also restructured menus and panels, striving always to create a hierarchy so that the things you need seem to be right where you’d expect once you think to look for them, rather than simply presenting you with an overwhelming wall of options.
Of course, that’s not always possible which is why we have this series, the Feature of the Week. Alas, after eight months of writing these, even this series of posts has traded discovery for abundance. So for this week’s article, we wanted to provide a round-up of the year’s features so people just getting started can browse through them all and take a deeper look at the ones that sound like they might be useful to them. So without further ado:
December 18, 2015
| Feature of the Week
Many of our readers are just now getting their hands on an Apple Pencil, so today we wanted to do a recap of how this slick new device works with iPad Pro and forScore.
Unlike most of the other Bluetooth styluses (or styli, we don’t take sides) out there, Apple Pencil doesn’t feature any buttons or lights, so the experience of using it and setting it up can be a little opaque. Essentially, if its battery is charged then it’s ready to use—whether or not it’s connected is really more of a system-level detail than an explicit user action. You can charge it by removing the end where an eraser would be (we don’t know why there isn’t one either) and plugging the Lightning connector into the bottom of your iPad Pro. It’s a little precarious, but it works. You can also use the adapter that comes with it to connect it to any of the other Lightning cables you may have lying around.
To use Apple Pencil with forScore, just start drawing on the page. Annotation mode is activated automatically and kept on so you can switch tools, undo any accidental marks, and finalize your drawing before tapping the “Done” button. If you instead prefer to use the Pencil just like you use your finger, an option in the settings panel called “Automatically enter annotation mode” allows you to disable this functionality.
Behind the scenes, Apple Pencil adds a lot to the drawing experience. It works with iPad Pro to gather four times as many touch points as with older iPad models, so drawings are significantly more accurate (especially when drawing quickly). The Pencil also features a pressure sensitive tip, so your drawings will become more pronounced the harder you press.
One helpful tip regarding the Pencil’s tip: it will eventually wear out and need to be replaced, which you do by twisting it off counter-clockwise. If you’re using your Pencil vigorously or drawing lots of counter-clockwise spirals, the tip can start to unwind itself and you may start to experience sporadic drawing behavior. Just twist the tip back on tightly and you should be good to go.
The Apple Pencil is an incredible tool for anyone who uses forScore’s annotation capabilities, and we hope that iPad Pro is simply the first member of the iPad lineup to support it rather than the only. It’s a great experience, and there’s no reason we can see why it wouldn’t work just as well on smaller iPads once Apple builds in the necessary screen technologies.
December 11, 2015
| Feature of the Week
No matter how good the iPad gets, data entry can be a pain. The virtual keyboard covers up part of the screen and requires guessing or looking to find the right keys. External keyboards help a lot, as do forScore’s batch editing and PDF metadata importing features, but many people will still be more comfortable using their computer to do this kind of work (especially when starting out and categorizing their entire music collection).
Way back in 2010 we created a Mac application that allowed forScore users to edit files individually, but it was inadequate and we ended up having to scrap it so we could devote all of our time to improving forScore instead. The urge to find a better solution never left, though, so with forScore 6 we took another stab at it. We knew we wanted to add batch editing functionality, but our bigger goal was to create something that was cross-platform while also being relatively easy to maintain. The solution was a little out of the box but awesome: we realized we could embed a web server into forScore and use it to serve web pages to your browser over a local wi-fi network.
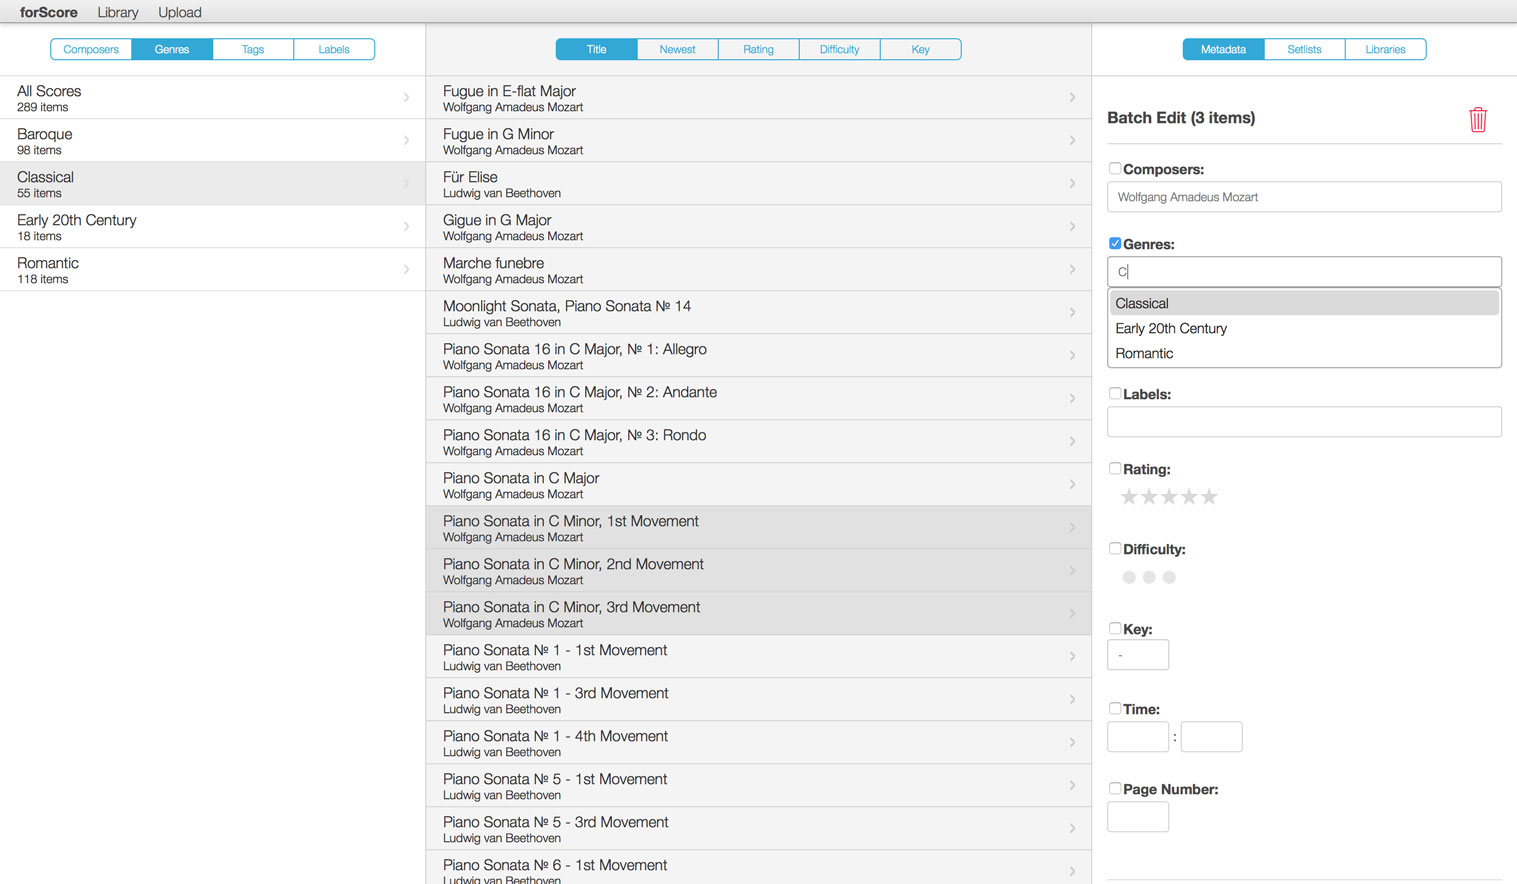
We called it Console (both the idea and the name have since been, ahem, appropriated by some less scrupulous apps) and it achieved all of our goals and then some. The layout splits your screen into three columns—categories on the left, scores and bookmarks in the middle, and a metadata panel on the right. Click to select a category on the left and the middle zone will reload to show you all of the pertinent pieces in your library. Click to select one and edit it, or use your system’s modifier keys to select multiple items and batch edit them.

From the metadata panel, you can edit fields like title, composers, genres, tags, label, rating, difficulty, key, time, or page number offset. You can also choose which setlists or libraries your piece is part of, and you can add, remove, or edit a score’s bookmarks. You can even view the original PDF file in your browser, download it, or delete it from forScore.
Use the toolbar along the top of the screen to choose which library you want to work with or to create a brand new one. The “upload” button even lets you add new PDF files to forScore from your computer wirelessly—definitely our favorite part.
So how can we allow you to make all of these changes without also letting those other, less scrupulous folks out there come along and appropriate your library? Well, forScore’s web server is only activated when you choose “Console” from the tools menu and any new computer or device that tries to connect to it will prompt you first on your iPad or iPhone. Until you explicitly allow that computer to access your library, it won’t be able to see or change anything. So pull up a chair, grab that keyboard and mouse (or trackpad), and get organized!
December 4, 2015
| Feature of the Week
Last week we discussed half-page turns, a feature that’s available when you’re using your device in portrait orientation. That feature is activated by tapping a button just to the left of the current score’s title in the main control bar, but this button changes when you’re using landscape orientation and serves a different purpose: toggling two-up view which allows you to see two pages at once, side by side.

Pages turn two at a time when you’re using this mode, so you’ll see pages 1-2, then 3-4, 5-6, etc. You can control this with the “two-up page advance” option in the settings panel—choose “1 page” and you’ll move through your files one page at a time starting with pages 1-2, then 2-3, 3-4, and so on.
Two-up view works not only with scores, but with bookmarks as well (pages beyond the scope of a bookmark appear faded out so you can clearly see what’s currently relevant). You can even use the tap-and-hold gesture on either page to annotate it!
November 27, 2015
| Feature of the Week
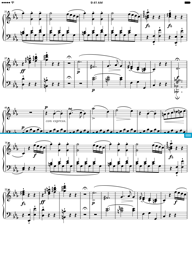 Since its introduction way back in forScore 2.0, half-page turns have been one of our app’s most popular features. It allows users to turn pages in two halves like a farmhouse door: tap once to see the bottom half of the current page along with the top half of the next page, and tap again to finish flipping over to the complete next page.
A blue horizontal divider shows you where the page is split so you don’t get lost, and you can reposition this divider vertically by dragging the three horizontal lines up or down. The divider’s position is saved per page of score, so you can set it once to the most convenient location for each turn and it’ll always split in that same spot.
This feature was originally available as an option in the settings panel, but many people wanted easier access to it so they could change it more frequently if needed. So we moved it to the central portion of the main control bar, just to the left of the current item’s title and composer:

Tap this ½ button and it’ll turn blue, meaning half-page turns are enabled. Tap it again to turn it gray, and pages will turn one at a time. One important thing to remember is that half turns are only available in portrait orientation (or in Split Screen views that can display an entire page). Otherwise, this button will allow you to switch between one- and two-page views. It’s not called “features of the week,” though, so that’s a topic for another day!
November 20, 2015
| Feature of the Week
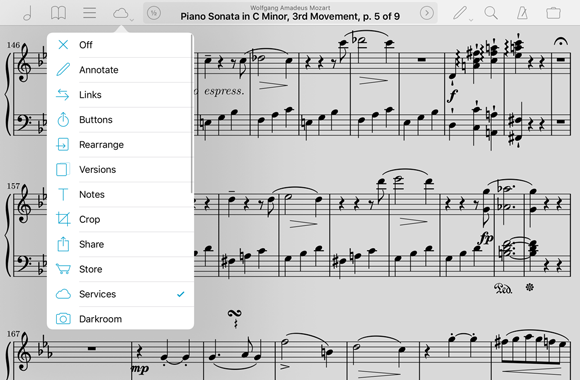
The control bar along the top of forScore’s main view is the central hub for most of the app’s features. Six buttons—three on either side—give you quick access to scores, bookmarks, setlists, search, audio utilities, and just about everything else in the catch-all Tools menu.
If you’re using the new iPad Pro, however, you’ve got more room to work with and if you’ve installed our 9.2 update, we help you use that space more effectively by adding a fourth item to either side of the control bar. These items look and work a lot like the other control bar items, but they have a small arrow below them. That’s because they’re customizable: by default, the left side lets you access the Services panel and the right side lets you annotate, but if you tap and hold either of them you’ll be able to choose a different function or disable the button entirely. Most of the items in the tools menu are available here, so you can pick the one you use most often.
In many cases, there are several different ways you can access forScore’s features. Gestures, shortcuts, the search panel, the tools menu, the info zone in the center of the control bar, and now these two customizable items give you the flexibility you need to work quickly and efficiently. Find the way that works best for you, and ignore the rest.
November 13, 2015
| Feature of the Week
In our fifth and final post exploring the various ways forScore can connect to MIDI devices and provide some unique capabilities, we’ll be looking at one last feature that exposes a fundamental detail of MIDI: the ability to produce sound.
MIDI messages describe musical events like when you’ve pressed a note and how hard, but these messages don’t transmit any actual sounds. That’s why many MIDI devices are called “controllers” and only describe how you’ve played, not what it sounds like. A synthesizer is the piece of equipment or software that actually produces notes based on those instructions.
Since forScore already includes a software instrument, the piano keyboard, it can fulfill that role and play notes as you use your MIDI device. Of course, your device may already produce sounds or you may have a different synthesizer you’d prefer to use. In that case, just open the MIDI section of forScore’s settings panel and uncheck the “Synthesizer” option. You can also disable the ability to send commands or receive shortcuts here if needed.
That wraps up our exploration of forScore’s MIDI integration. As we said way back in part one, MIDI is much more than a single feature, it’s a full language that can be used to enable a whole lot of interesting capabilities. If we missed one, let us know so we can keep building useful features! Thanks for reading, and we’ll be back next week with a completely unrelated Feature of the Week.
November 6, 2015
| Feature of the Week
In our previous posts exploring forScore’s MIDI integration, we’ve seen how you can send a series of MIDI messages automatically when you open a score, or you can choose to send them at a specific time by pressing a button. Often times, the messages you’re sending configure your devices and you’ll be reusing the same ones frequently. For those sets of messages, we created Presets.
To create a preset, open the Metadata panel and choose “Presets” at the bottom of the MIDI section. Tap the + button to create a new preset with the name you supply, then tap the circled “i” button to add some messages. The interface here works just like it does when you’re adding MIDI messages to a score or button. You can add a program change or song select message, type in raw hexadecimal codes, or let forScore listen for incoming signals and save them automatically. Tap the “Done” button or close the MIDI panel to save your changes.
If you’ve already set up outgoing MIDI messages for the current score or bookmark, creating a new preset will prompt you to do one of two things: you can either create a new blank preset and add messages from scratch, or you can turn those messages you’ve already set up into a new preset. If you choose the latter, forScore will remove all outgoing messages for the current score or bookmark and replace them with the new preset instead.
One last detail—MIDI presets are referenced, not copied, so if you change which messages a preset sends you’ll be changing them for every score or button that uses that preset.
Next week we’re wrapping up our discussion of MIDI features with one last post, so don’t miss out!
October 30, 2015
| Feature of the Week
Over the past few weeks we’ve been exploring how forScore uses MIDI in all sorts of different ways. First, we detailed the process for setting up shortcuts so you can trigger any of forScore’s most popular functions from your MIDI device. Then, we discussed using an incoming message to open a particular score. Finally, we showed you how to set up MIDI messages to be sent automatically when you open a score. That last example is particularly powerful, but it has one drawback: as soon as you change songs your MIDI setup will change. That can be a problem if you’re using a setlist and you accidentally flip over to the next song, or if you’d just like to take a look at the next piece before the current one is finished.
That’s why we introduced Buttons in forScore 9. Buttons can do a lot (if you haven’t had a chance to use them yet be sure to check out the user guide for complete instructions), but today we’ll focus on their MIDI capabilities. Just like scores can send messages immediately when they’re opened, buttons can send messages when they’re tapped. They can be set up to send program change messages, song select messages, or raw hexadecimal codes, and they can even memorize incoming commands or add a delay between messages.
Since Buttons wait to send their messages until they’re tapped, you can even use them to change your settings partway through a piece. They’re incredibly flexible, and next week we’ll be discussing Presets which make sending common MIDI messages even easier, so be sure to check back next Friday for even more!
October 23, 2015
| Feature of the Week
As we discussed last week, MIDI is much more like a language than a single-purpose tool. It can be used in a variety of situations to convey a lot of information, and for this Feature of the Week we’ll be looking at the most flexible application of MIDI in forScore: score-specific MIDI commands.
While editing information for a score or bookmark in your library, the bottom portion of the metadata panel splits up a lot of valuable options into a few different sections. One of those sections is called “MIDI”, and that’s what we’ll be talking about today. The MIDI section of the metadata panel gives you access to three different features: Open, Send, and Presets. We’ll save Presets for another day, but lets start with a quick overview of the first two.
Open
Last week we showed you how to use incoming MIDI messages as shortcuts to forScore’s most popular functions. In the “Open” section of the metadata panel, you can set up a similar shortcut but instead of triggering a tool or menu, the MIDI message you use here will always open that particular score or bookmark.
Send
In the “Send” section, you can set up one or more MIDI messages to be broadcast immediately when you open an item. This can be useful if you need to change some of your MIDI device’s settings for a particular piece.
Messages
On a technical level, MIDI messages consist of hexadecimal codes. These codes use numbers (0-9) and letters (A-F), pairing any two for a total of 128 combinations. Fortunately, you don’t generally need to know what they mean, just what they do. And, since you’ll usually be working with one of two common message types, forScore makes entering this information a little easier.
The first type of message is a Program Change. This message tells your MIDI device which instrument or voice to use. It’s specific to one device, so you’ll need to specify which channel to use to send the message. The rest of the message must consist of at least one single number between 0 and 127, and it may also allow for additional MSB or LSB values in order to provide a wider range of possible sounds.
The other type of message you may need to use is called a Song Select message. This message consists of a single value between 0 and 127, and is sent to all connected devices so no channel number is required.
For everything else, you can type in actual hexadecimal codes for complete control.
Adding Codes
Tap the “+” button in the lower right-hand corner of the metadata panel to add a message to the current score (one incoming “Open” message, and as many outgoing “Send” messages as you need). You can choose from the three message types we’ve already discussed—Program Change, Song Select, or Hex Codes—or you can use the “Learn…” option to listen for incoming commands and save them automatically. For sent messages, you can also add a delay in case your device needs a moment to process incoming signals.
So that’s an overview of forScore’s ability to use MIDI messages in score-specific ways. If you missed last week’s introduction to MIDI and app-wide shortcuts, be sure to check it out, and stay tuned as we continue our exploration of forScore’s MIDI integration next week!