We’re taking a break from this column to work on our next big thing, but there are almost two hundred features here to catch up on if you haven’t read them all. If there’s a topic you’re interested in, you can also try searching for it.
Over the past two weeks we’ve explored forScore’s metronome, from the basics like setting the time signature and BPM values, to more specialized features like count in and autoturn.
All of these functions are great, but the best part is that once you’ve set them up, you can use them all without even opening the metronome panel. As we discussed in some of last year’s Feature of the Week articles, you can use special gestures, a Bluetooth device, or a MIDI device to toggle the metronome. Whichever mode you used most recently—audible, visible, or both—is activated with just one quick action.
You can also use Buttons to toggle the metronome, but they’re even more powerful than gestures or shortcuts because they can also be used to adjust the metronome’s BPM partway through a score. If you haven’t had a chance to check them out yet, you can read all about them here.
And finally, wrapping up our grand tour of the Metronome, we take a moment to discuss those sound effects. Let’s face it, they’re just not for everyone—no one set of sounds could be—and if that’s you, then be sure to check out the “Accessibility” feature of forScore’s settings panel. There, you can replace the two default sounds with two WAV files of your choosing—just add them to your forScore library first via iTunes’ File Sharing panel and they’ll be available in that menu.
So that concludes our journey through the various features of forScore’s metronome. We hope you enjoyed it and perhaps learned something new, and we’ll be back next week with something completely different!
Last week we took a look at the most basic functions of forScore’s built-in metronome. We discussed its various modes and the essential time signature and BPM values. Be sure to check it out if you haven’t had a chance to yet.
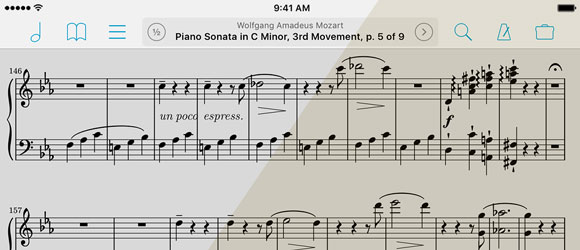
Just below the metronome’s center dial, two other settings may be of use to you: autoturn and count in. Both of these settings have a value and a toggle button (a blue border and blue text when it’s disabled, and a solid blue color with white text when it’s enabled). Autoturn turns the page for you automatically once the metronome reaches a certain number of beats or measures. Count in plays the metronome for just as long as you need it to, then shuts off automatically. Just like the time signature and BPM values, Count In is saved automatically per score so you only need to set it once. Autoturn values are also saved automatically, per page instead of per score since the number of beats per page may vary.
When you’re using an auxiliary audio output (headphones, a receiver, or wireless speakers), an icon will show up just above the top of the dial in the metronome panel. This control lets you choose whether to play the metronome out of the left channel only, the right channel only, or both channels. Tap it to toggle between these three modes.
That completes our discussion of the metronome panel and its various controls, but there’s more to come—next week we’ll be talking a little bit about the various features of the metronome that you won’t find in the metronome panel itself, so stay tuned!
Today we take a moment to discuss that trusty timekeeper, the metronome. Although there are many versions out there for you to try, both physical and digital, we built one right into forScore so you don’t have to leave your music to use one. It’s accurate (trust us—we went through a lot of takes to find the impeccable iteration you see today) and there’s a lot more to it than you may notice at a glance, but for now we’ll stick with the basics.
The metronome’s most important value is the BPM, or Beats Per Minute. This value is shown in the top right-hand corner of the screen, and you can change it one of three different ways: tap the BPM value in the corner to type in a new one, slide the circular dial around, or tap twice in the center of the panel to set it by the timing of your taps. The BPM value is saved automatically for each item in your library, so you only need to set it once and it’ll adjust as needed.
In the top right-hand corner of the screen, you’ll find the time signature. Tap here to change it by picking from a few common values or by typing in a new one (use the “/” key in the keypad to move from the top of the time signature to bottom). This is also saved automatically per score or bookmark, so you just need to set it once for each of your scores.
And, of course, right at the bottom of the screen, you can use the segmented control to turn the metronome’s various modes on and off. The “audible” mode uses sounds to guide you, with a “tick” upbeat and a “tock” downbeat. The “visible” mode flashes a black border around the page so you can see the timing instead. Use “both” to play sounds and flash the border simultaneously.
That’s just the start, though, so be sure to check back next week and onward as we continue this series and explore forScore’s modestly monochromatic metronome.
Although you can customize them and create your own, forScore includes several drawing presets and a wide range of stamps by default. If you ever accidentally make a permanent change and want to reset them all back to their original state, you can do so by visiting forScore’s settings panel. Right at the bottom, tap “Reset” and choose to reset either stamps or drawing presets. Keep in mind that this will undo any changes you’ve made, removing any custom stamps or drawing presets you may have created.
As your setlists get longer, rearranging items can get a little more cumbersome. Since any item you add to a setlist is automatically appended to the end of the list, moving it up to (or near) the top can take a little longer than smaller adjustments.
If you tap the Edit button and select your item, however, you’ll see an option called “move” which lets you instantly relocate that item to either the top or the bottom of your setlist. It also works with multiple items so you can select a few, tap that move button, and put them all in the right place. Even if you need to move them around a little more from there, this feature can definitely save you some time.
Precise annotation requires more than just responsiveness or flexibility, it requires the careful employment of highly specialized tools that make common tasks far simpler. You can draw letters with your fingers, but typing is generally a better option. You can draw small symbols like sharps and flats, but the Stamps tool will save you lots of time and hand cramps.
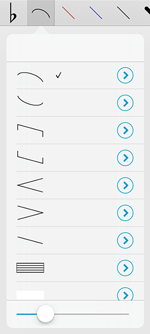 In forScore 7, we added a “Shapes” annotation tool that makes it much easier to add dynamically-sized elements to a page. Drag your finger from one spot on the page to another to draw a perfect slur, tie, tuplet, crescendo, line, or staff between them. You can also drag the size slider in the shapes panel left or right to decrease or increase each shape’s thickness.
The Shapes panel also includes a rectangle tool so you can easily block out large sections of a page. Unlike the other shapes, this one is white by default, but each shape can be tinted independently. Just tap the circled arrow button to the right of a shape to pick a different color for it.
Not everyone needs to draw these kinds of shapes, but for those who do it makes all of the difference.
Although there are lots of helpful concepts that can be taken from paper sheet music and translated into the digital realm, one of the more annoying carryovers is the standardized use of margins. This whitespace around each page improves legibility but makes the content smaller—an important consideration on iPads since their screens are smaller than a typical sheet of paper.
With forScore’s crop tool, you can adjust pages individually to get the best possible view of your music, but this can take some time and must be done one page at a time.
Some files (especially those that are digitally created) use similar margins on every page and are centered properly. For these files, using the margin adjustment slider in the Layout tab of the metadata panel is a better option. It lets you increase the size of all of the pages of a piece of music by the same amount, zooming in towards the center and eliminating those excess margins quickly and easily. Best of all, you can still crop individual pages if they require more precise adjustments.
So stop squinting and give your eyes a break! Take a few seconds to set it up, and you’ll never have to worry about it again.
When you need to group and play through some of your music in a specific order, Setlists are the perfect tool for the job. But did you know you can also insert placeholders into a setlist? In the setlist creator, tap the “Placeholder” button at the bottom of the screen and supply a name. Now, when you’re playing through your setlist and you get to that spot, you’ll see a single page with just that title centered on-screen. It’s perfect for songs you know by heart, songs you sit out, or program notes like an intermission.
Of course, it can also be used as a placeholder for music you just don’t have yet. In the Setlists menu, you can tell that something is a placeholder because the arrow button to the right of it will have a dotted circle around it rather than the normal solid one. Tap this dotted button to open the setlist creator and replace the placeholder with your score or bookmark once you’ve got it.
Last week we took a look at forScore’s Sepia effect which gives your screen a warmer tone, reducing eye strain and promoting a healthy complexion in low-light situations.
This week’s feature is another visual tweak, and it can be toggled by selecting “Gradient Effect” in forScore’s settings panel. With this option enabled, forScore will darken the edges of the page slightly to mimic more natural lighting. This effect can also help reduce eye strain, and it can be used in conjunction with the Sepia effect if you like. It’s easier to see than explain, so be sure to check it out for yourself!
Apple will finally be bringing screen color control to users with their upcoming iOS 9.3 update, but long before Apple even considered what’s now called Night Shift we had a solution of our own.
The iPad’s big, backlit screen is a wonder for performing in many different environments, but the unearthly glow it creates in low-light situations can create both a strain on your eyes and an awkward look from your audience’s perspective. That’s why we added a “Sepia” option to the settings panel way back in forScore 3.2. Flip this switch and your page, menus, and everything else in forScore will have a warmer tone instead of the stark white that it normally uses. It’s a quick and easy solution that lets you perform in comfort.