September 23, 2016
Feature of the Week
One popular feature in forScore is the ability to open multiple scores or bookmarks in tabs. We discussed this feature in our second ever Feature of the Week, so feel free to check that out for a quick refresher.
With forScore 10, we added a simple but important enhancement: the ability to rearrange your tabs. To do so, just tap and hold your finger on a tab until it animates, then drag it left or right as needed. When it’s in the right spot, just let go. Some features are complex and take a lot of words to explain. Rearranging tabs isn’t one of them, but that doesn’t make this enhancement any less useful!
September 16, 2016
Feature of the Week
 While the big news this week is the release of iOS 10 and forScore 10.1, we’ve still got a few features introduced earlier this year that we just can’t skip! Today’s is an extremely helpful addition to the Rearrange tool that combines its flexible features with the merge function to create an even more powerful tool. In fact, if we were naming it today, we’d probably call it the Layout tool instead.
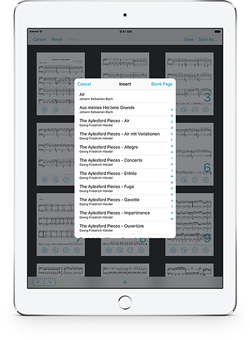
Using this new functionality is easy, just pick a file you want to edit and choose “Rearrange” from the tools menu. The new + button at the bottom of the screen lets you add the pages of any other score in your library to your current workspace. Pick the file you want, and its pages will be added to the bottom of the grid view. You can duplicate them, delete them, rotate them, and arrange them any way you like. It’s a great way of solving some common problems, like when a file you’ve scanned ends up missing a page or when one or more pages are changed later on and need to be replaced.
That’s not all, though, because you can also use this new feature to insert one or more blank pages. These blank pages can be placed anywhere you like, and once you save your changes you can even annotate on them. It’s Rearrange, and it’s Merge, and it’s even more—all in one easy place.
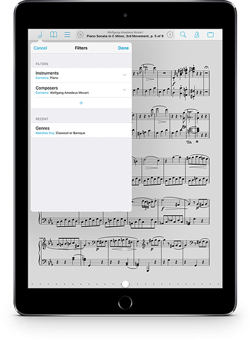
 Today we’re extremely proud to announce the release of forScore 10.1 and forScore mini 3.1 on the App Store. These updates add some key new features like Filters, which let you browse more effectively by cross-referencing your metadata categories with advanced rules. They improve support for iOS 10 by doing things like reworking the style and layout of the pitch pipe widget. They add a new option to hide the status bar, giving you the clearest view yet of your music.
And, on iPad, forScore adds a setting to automatically exit annotation mode after a short delay, putting an important capstone on our Apple Pencil support and realizing the possibilities of a completely mode-free annotation experience.
These updates are completely free for existing users, as always, and we think they’re really going to take things even further. For newcomers, forScore is still just $9.99 (USD) and forScore mini is the same $6.99, so now is a great time to check them out if you haven’t had a chance to already.
Available now for iPad
Available now for iPhone and iPod Touch
Later today, Apple is expected to release iOS 10. As with any notable iOS update, we’ve started to get questions from customers about whether or not they should install it. The short answer is: if you have a recent, complete manual backup of your library and you don’t depend on forScore professionally, then go ahead and update.
The longer answer is that iOS 10 is a brand new operating system, and the version released later today will be slightly different from any version we’ve tested since the first beta back in June. There’s always a chance that something can go wrong, even though at this point we have no evidence of issues with either the current version of forScore (10.0.4) or the next update (10.1) that’s due for release later today.
Perhaps better questions to ask are these: is there anything in iOS 10 that I need or want to try today, and could I live without forScore and my iPad for a few days? If not, wait a week and let us and others kick the tires before you jump in.
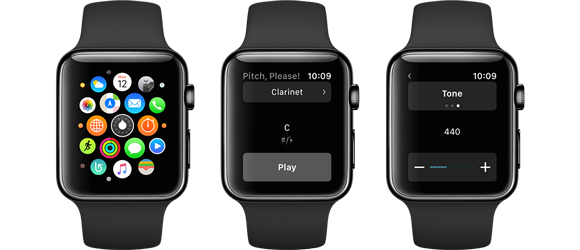
Today we’re happy to announce the immediate availability of Pitch, Please! 2.5, an exciting and totally free update that adds a brand new Apple Watch app and updates the widget for iOS 10’s beautiful new style and sizes.

Since the original Apple Watch announcement we knew the wrist could be the perfect place for a utility like this, but unfortunately Apple’s frameworks didn’t do what we needed until now. That’s why Pitch, Please! for Apple Watch requires watchOS 3, due for release tomorrow. Of course, if you’re part of Apple’s public beta program you can get an early peek right now.
Get Pitch, Please! 2.5 today, free for existing users and just $0.99 (USD) on its own. Or, for an even better deal, get the whole Music Box for $3.99 (pro-rated for any previous purchases).
Find your starting pitch with our universal app, widget and watch app.
Get our four utility apps or complete your collection with this app bundle.
 While the big news this week is the release of iOS 10 and forScore 10.1, we’ve still got a few features introduced earlier this year that we just can’t skip! Today’s is an extremely helpful addition to the Rearrange tool that combines its flexible features with the merge function to create an even more powerful tool. In fact, if we were naming it today, we’d probably call it the Layout tool instead.


