
Over the past several weeks we’ve taken a look at forScore 9’s new Dashboard feature. If you missed them, be sure to check out our previous articles discussing the Analytics and Goals tabs in the Dashboard interface. Today we’ll be discussing the third and final tab, Reports.
While Analytics offer you a way to view your statistics, and Goals guide you to a specific outcome, Reports are used to collate and share information about your practice habits with others (or to archive them for your own purposes). The Reports tab lets you create templates based on certain criteria, then generate a PDF file from that template at any time and share it however you like.
Tap the + button to create your first report template, and tap the circled arrow button on the right-hand side to view and edit its settings. Give it a name, make it item- or setlist-specific if you like, and set a time interval: daily, weekly, or monthly. Choose how far back the report should go (i.e. the last three days, the last four weeks, or two months) and whether or not to include the current day, week or month. Finally, if you haven’t picked a specific item or setlist to focus on, you can choose whether or not your report should include statistics for items, for setlists, or for both.
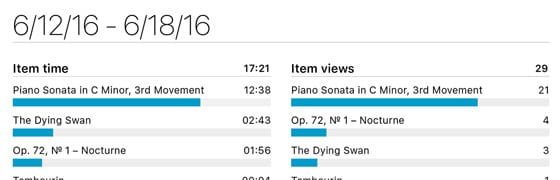
Back in the main Reports view, tap your report to generate a PDF file and see how all of your data is tallied up and presented. Tap the share icon in the top right-hand corner of the screen to share or print your report.
That completes our tour of Dashboard, so now you’re ready to practice armed with more data than ever before and the right tools to take full advantage of it.
After many months of hard work, today we’re very excited to give you a first look at our next major update, forScore 10. In lieu of our typical series of smaller sneak peeks, we’ve put together a huge preview page that gives you a great look at much of what’s coming later this summer.
It’s hard to believe we’re here putting the final touches on the tenth major version of forScore, and we couldn’t have done it without the tremendous support of our customers. As always, thank you.
Last week we began our discussion of Dashboard with the Analytics tab, which shows you how forScore can collect data to give you insights into your playing habits. That’s just the start of what it can do, though, and today we’ll be discussing Goals, the second of three tabs within the Dashboard interface.
The Goals tab lets you to create goals to track your progress per day, week, month, or all-time. The main view shows all of your goals in a list, and gives you a quick overview of your progress towards each of them.
Tap on any of your goals to see a more detailed view and get more information about your goal or change its settings. You’ll also see a timeline along the top that shows your statistics for each day, week, or month: these aren’t just helpful for you, you can also tap on any of them to share your results with friends or colleagues via email, iMessage, Twitter, Facebook, and more. That shared experience really adds a new dimension to your forScore experience, and can provide some helpful accountability if needed.
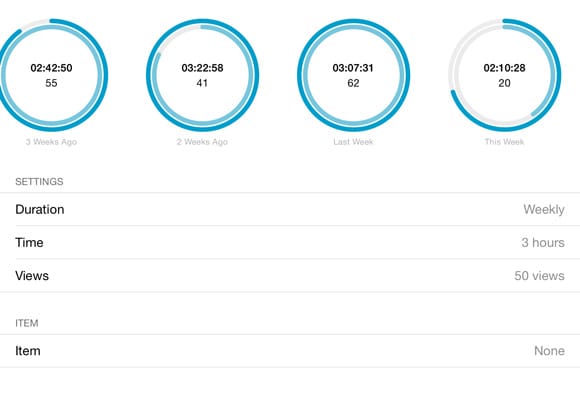
Goals can be defined by number of views or time spent playing, and they can be general or focused on a specific piece or setlist. For example, you could set a goal to ensure that you play for thirty minutes a week, or use another goal to ensure that you’re practicing one particular score at least three times a day to get ready for an upcoming recital.
That’s the second of three tabs in the Dashboard, so check back next week to find more about the last one—Reports—or catch up by reading last week’s overview of Analytics.
This Sunday’s print edition of the New York Times will feature an article discussing the shift from paper to digital sheet music, but a version of the article is already available online. We were interviewed for the article, and while none of our comments made it into the final piece, it’s a great look at the transition and especially the impact it can have on annotation.

When we introduced Dashboard last year with forScore 9, we knew it was unlike any feature we had ever created. It required secure data collection and brand new interface elements that could present complex data in a logical, useful way.
To achieve this, we designed Dashboard with three specific uses in mind. Goals, Analytics, and Reports. Over the next few weeks we’ll be taking a look at each, and we’ll start with Analytics.
If you allow it, forScore collects information about which setlists, scores, and bookmarks you view and for how long. This data collection is secure (never stored anywhere other than on your own device) and strictly opt-in, so the first time you open Dashboard you’ll be asked to agree to allow forScore to begin collecting data. Once you’ve done so, you’ll see the Analytics tab; it’ll be empty since there’s no data yet, 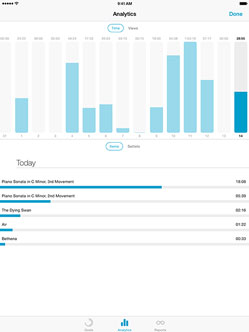 but after you’ve spent some time playing you’ll be able to come back and see what Dashboard can do.
In the top section, you can see a daily total of your play time and number of views. Below that, you’ll see a list of the items or setlists you played, sorted from most played to least. Tap on any of those items to see the day-to-day play time and number of views (like the same chart at the top of the screen, but just for that specific item).
These graphs already give you a lot of insight into your playing habits, but there’s a lot more you can do with it. Be sure to check back next week when we’ll be discussing the Goals tab!