February 27, 2019
Uncategorized
General
- Auto-lock: Disable this setting to prevent your device from sleeping automatically while forScore is open.
- Search: Adjust which kinds of results are shown and in which order, how many recent items are listed, and more.
- Show recent items: Choose how many recent items to show in the search panel before you’ve typed anything into the search field (enter 0 for none).
- Search results: Check or uncheck specific result types and reorder them to prioritize those you want to see first.
- Bookmarks: When creating a bookmark, as you type in the title field this feature can offer page number suggestions based on occurrences of that text within the PDF file (not available for image-based files).
- MIDI: Toggle the ability to send and receive MIDI commands or use the piano keyboard as a synthesizer.
- Send commands: Allow forScore to send signals you’ve added to specific scores each time you open them (see Metadata)
- Receive shortcuts Allow forScore to interpret some incoming MIDI signals as score shortcuts (see the Metadata section) or action shortcuts (see Page Turners & Shortcuts)
- Synthesizer: Allow forScore to play piano sounds in response to incoming note messages.
- MIDI network setup: Connect to a nearby network MIDI session.
- Bluetooth MIDI devices: Connect to nearby Bluetooth LE-enabled MIDI devices.
- forScore Pro: Get more out of forScore with this optional, auto-renewing subscription.
- Manage subscription: Learn more about, and sign up for, the forScore Pro service.
- Pop-up menus: Enable or disable popup menus and manage your pinned tools.
- Face gestures: If your device supports it, choose which face gesture mode to use and calibrate its sensitivity.
Navigation
- Up next: See the next queued item’s title in the status bar when you reach the last page of the current item.
- Gestures: Configure forScore’s taps, swipes, and shortcuts to better suit your needs.
- Page turners & shortcuts: Use keyboard shortcuts, MIDI signals, page turner pedal presses, or an Apple Pencil 2 double tap gesture to trigger certain actions.
- Page transitions: This setting affects the transition animation that is used when turning pages.
- Flip between scores: Choose when to advance from the end of one score to the beginning of the next, like a book.
- Page advance: Choose whether to advance one or multiple pages at a time when using multi-page layouts.
Appearance
- Show status bar: Controls whether the system status bar along the top of the screen is visible while using forScore.
- Split view: Choose whether the main view should use a split view (default) or use the original popover-based layout instead.
- Controls: Prevent the seek bar from hiding when the title bar is dismissed, show the tab bar when a single tab is open, and control how the title bar behaves (if your device supports resizable windowing).
- Menus: Enable or disable section headers and control which kinds of metadata are shown below items and setlists.
- Theme: Adjust the look and feel of forScore’s interface.
- Colors: Change forScore’s primary interface colors or choose from a list of built-in themes.
- Interface style: Choose to always use light mode, always us dark mode, or follow the system setting instead.
- Icon weight: Choose a bolder or lighter style for most icons and buttons.
- Background color: Control whether the main view’s navigation bar is tinted slightly to match your current color theme.
- Page dimming: When using dark mode, forScore can dim your pages to reduce contrast in low light environments.
Metadata
- Use external audio: When forScore launches, it checks to see if iOS’ shared audio system is currently in use. If so, this option will allow you to control playback of that track, temporarily overriding any linked tracks.
- Sorting: Adjust how forScore sorts your composers, scores, and bookmarks.
- Show bookmarks in library: Bookmarks typically appear in two places—the bookmarks menu itself, and alongside other files in the score menu. Disable this to hide bookmarks from the score menu.
- Smart sorting: For checked items, sorting ignores common prefixes like “the,” “a,” or “an.”
- PDF annotations: Choose which kinds of embedded PDF annotations should be visible (and interactive, if applicable).
Annotation
- Exit two-up mode to annotate: If you’re using two-up mode, use this setting to control whether or not forScore should temporarily return to one-up mode and enlarge the current page while annotating.
- Apple Pencil: Adjust how annotation works when using Apple Pencil or the similar Logitech Crayon.
- Automatically enter annotation mode: Allows you to begin drawing at any time without entering annotation mode first.
- Automatically exit annotation mode: Allows forScore to save your work and exit annotation mode after a brief period of inactivity (defaults to Never).
- Prevent finger drawing: Restricts drawing to Apple Pencil in order to prevent accidental input.
- Variable width: Choose whether to increase drawing width based on tilt and/or pressure.
- Switch tools: Apple Pencil 2’s double tap gesture can control which annotation tool is currently active, and by default only works while you’re in annotation mode. Enable this setting to allow the gesture to work at all times (if you do, this gesture will no longer be configurable within the Page Turners & Shortcuts panel).
- Annotation tools: Control how forScore saves your last-used preset between annotation sessions.
- Remember tool selection: Allow or prevent forScore from saving your last-used annotation tool.
- Default tool: Choose a specific tool to always be selected when you enter annotation mode. If an item is selected in this section, the previous section has no effect.
- Add period with double-space: iOS automatically adds a period when you type two spaces into a text field. Disable this setting to prevent that behavior while using forScore’s text annotation tool.
- Variable width: Adjust how much forScore should emphasize your drawings based on speed or Pencil pressure and tilt.
More
- Accessibility: Enable or disable certain features, adjust the size of links and buttons, or customize the metronome’s sounds.
- App icon: Change forScore’s app icon.
- Advanced options: Access advanced/older settings and temporarily re-enable retired features that have limited support and may be removed in future updates.
- Restrictions: Set a passcode and hide certain features.
- Reset: Restore default app settings, stamps, or drawing presets, or scan your library and remove any unused data.
February 27, 2019
Uncategorized
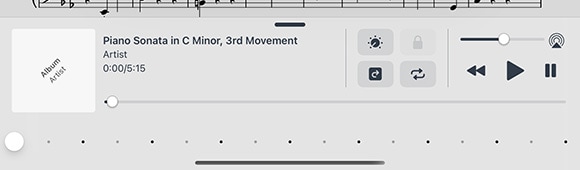
When appropriate, forScore’s audio panel can be found at the bottom of the main view. It appears and disappears along with the rest of forScore’s controls when you tap the center of the screen.
This panel is available if you’re viewing a score that has an audio track or recording associated with it (see the Metadata section for more details on managing audio tracks), or if another app is playing audio and the “use external audio” option is enabled in forScore’s settings panel.
Tip: Tap or drag the pill-shaped control at the top of the media box upward or downward to show or hide it as needed.
Playback
Adjustment:
In most cases you can adjust a track’s playback speed and pitch independently. (See the sidebar for specific examples and restrictions.) These options are saved automatically per score.
Locking:
If your settings allow you to flip between scores, the lock icon in the media box can prevent you from accidentally flipping to the next or previous score as long as the track is still playing.
Replay:
Automate your page turns by recording them in conjunction with a linked audio track. Tap the Replay button in the media box (the page with an arrow in it) and turn pages while the track plays. On subsequent plays, pages will turn themselves at just the right moment.
While replay mode is on, small lines in the seek bar will show you where saved page turns are located. A “···” button will also appear on the right-hand side of the seek bar, allowing you to edit or remove saved page turns.
Looping:
If you’d like to loop a portion of the song, just tap on the repeat symbol and drag the two handles left and right to set the loop time. For more precise control, tap the “···” button.
Recording
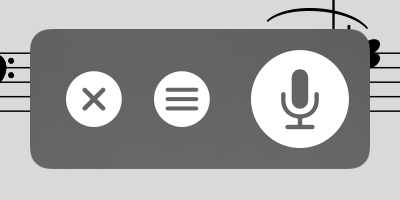
Whether you’d like to review your practice sessions later or share your progress with friends and colleagues, forScore’s recording feature can help. Choose “record” from the tools menu, then tap the microphone icon when you’re ready. You’ll see a red volume meter so you can make sure you’re close enough for the microphone to pick up clear audio. Tap again to stop recording, and then either save or discard it. Saved recordings are automatically linked to the current score so you can review them later.
The list icon next to the microphone lets you view, share, or delete any recordings you’ve made for the current score.
Note: The media box is not visible while recording. Tap the X button when you’re finished recording to continue using the media playback controls.
The recording feature requires access to your device’s microphone and the system will prompt you to allow this the first time you try to record. Use the Settings app (or System Preferences if you’re using a Mac) to grant or revoke this access at any time.
February 27, 2019
Uncategorized
Features
forScore Pro is an optional, auto-renewing subscription that allows us to offer more advanced features, ensures we can be ready for the latest devices, accessories, and software updates on day one, and gives you access to certain features and benefits like the ones described below (the exact list is subject to change; for the most current information visit forScore.co/pro).
Priority Support:
We’re a small team with limited resources, so unfortunately we can’t offer personalized support to every customer in perpetuity. By subscribing to forScore Pro, you allow us to spend more time with you so you can learn how to use the app to its fullest and get quicker answers to any questions that might come up.
Face Gestures:
If your device supports face tracking, you can use facial gestures to turn pages—by turning your head, winking, or moving your lips to the left or right. Activate it by tapping the face icon in the Display Options overlay, and open Tools › Settings › forScore Pro › Face gestures to choose whichever mode works best for you and adjust its sensitivity if needed. For best results, ensure that there’s sufficient lighting and, if using mouth movements, take advantage of the automatic calibration method for easy setup.
Pop-up Menus:
Many of the buttons in forScore’s navigation bar feature pop-up menus to let you quickly perform common tasks related to each of them. Touch the button and drag your finger downward to see the list of shortcuts, or tap and hold an item until the menu appears.
While in annotation mode, use pop-up menus to switch between layers or adjust the size of any drawing preset as well as the stamps, shapes, and eraser tools.
Note: when using a mouse or trackpad, right clicking any of these buttons will immediately present its pop-up menu. You can also click and drag downward to show the menu, but due to conflicts in the way iPadOS and macOS handle Drag and Drop this will not work for buttons that also support rearranging (annotation drawing presets).
Page Copy & Paste:
Each page has a single annotation layer by default, but forScore Pro subscribers will also see an additional “PDF” layer at the top of the Layers list for every page of a score. This layer works much like other layers do, but with one important distinction: when you use the selection tool’s Copy or Cut actions, forScore copies any annotations on that layer as well as the contents of the page itself. This allows you to move measures around or copy and paste them between pages to better suit your needs. Learn more about the selection tool in the Annotation section of this guide, or see this knowledge base article for step-by-step instructions.
If you’re a forScore Pro subscriber and you make structural edits to a document, you can share those changes with colleagues—either send an annotated PDF file with permanently embedded annotations, or share a 4SC file (the receiver can show, hide, or clear the PDF layer but can not make any changes of their own).
Note: forScore cannot copy vector information stored within a PDF file, it can only copy a high-resolution image of the selected portion of a page. If you’re working with vector-based files (which can be enlarged without limit), changes made using Page Copy & Paste will appear pixelated at higher zoom levels. Whenever possible, permanent or archival changes should be made using the same source material and application that was used to create the original PDF file in the first place.
Stamps & Symbols:
Swipe left and right in the Stamps palette to access six additional stamp sets (almost 400 additional symbols) and use them as is or copy any of them to your personal collection to edit or reorder them. Pro users can also create stamps using Apple’s SF Symbols library—just find a symbol using the SF Symbols app and type in its name to add it to your stamp collection. That gives you access to over 6,000 symbols as of iOS 18 and any that are added with future OS updates.
SF Symbols can be used for more than just stamps: open the metadata panel and tap a metadata category to customize it. In addition to the symbols offered there by default, Pro users can add any other SF Symbol by name to perfectly personalize their organizational system.
Apple Pencil:
On supported devices, while holding Apple Pencil near the screen, you can use customizable pinch, swipe, and tap gestures to resize or cycle through presets, undo or redo drawings, or show a rotary preset picker that makes accessing your presets faster and easier than ever. With Apple Pencil Pro, you can even configure the squeeze gesture to show this rotary picker for instant access with one hand.
Profiles:
Create multiple settings profiles for separate forScore users or customize your forScore experience for any situation. When you switch back and forth between profiles they’re updated and restored automatically.
Sharing:
When sharing scores, bookmarks, or setlists, an additional “automation” option allows you to easily copy the relevant URL so you can save it wherever you like.
App Icons:
Customize your home screen by choosing from additional app icon options.
Subscribing
Choose Settings from forScore’s tools menu and select “forScore Pro” to learn more, subscribe, access settings for subscriber-only features, and restore or manage an existing subscription.
Note: if you’re currently subscribed to forScore Pro and you start using forScore on a new device, you may need to use the Restore button found within this panel to start using your membership on that device—your original device(s) will still be able to use forScore Pro.
If you choose to become a forScore Pro subscriber, you’ll not only be getting the benefits outlined above: you’ll also be supporting us and making sure we can keep releasing updates for years to come. After the first year, Apple takes a smaller cut so more of your money goes directly to supporting our app.
And if you’re perfectly happy with forScore just the way it is, there’s no pressure to become a subscriber. No existing features require any further payment, so you can use them forever. If your needs grow, we’ll be ready to serve them.
Complete terms of service are available at forScore.co/terms-of-service and our privacy policy can be found at forScore.co/privacy.
forScore Pro Pass
With forScore 14 we introduced a forScore Pro 30-day pass that unlocks all forScore Pro features for 30 days with no auto-renewal. Although a forScore Pro subscription is more cost-effective, this pass gives you an opportunity to try these features so you can decide if subscribing is right for you.
February 27, 2019
Uncategorized
forScore is designed around the PDF file format and generally works best when each file in your library contains all pages of a single piece of sheet music. If you have separate PDF files or images for each page of a score, you’ll need to combine those into one multi-page PDF file first.
If you’ve got a longer PDF file that you prefer to keep together, bookmarks allow you to easily identify and navigate to specific pieces within the larger compilation. Learn more in the Bookmarks section of this user guide.
Copying Files to forScore
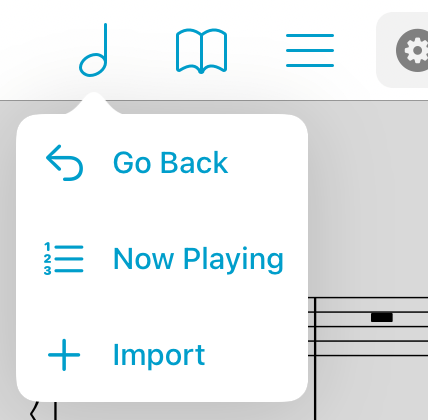
Import: Open forScore’s main menu and tap the import button (a box with a downward arrow pointing into it) or press command-I to browse for any compatible files stored on your device or through any cloud services you’ve configured (learn more in The Files App section of this guide). On a Mac, you can also access the Import function from the menu bar under File › Import. On an iPad or Mac, use Drag & Drop to quickly copy files into your forScore library.
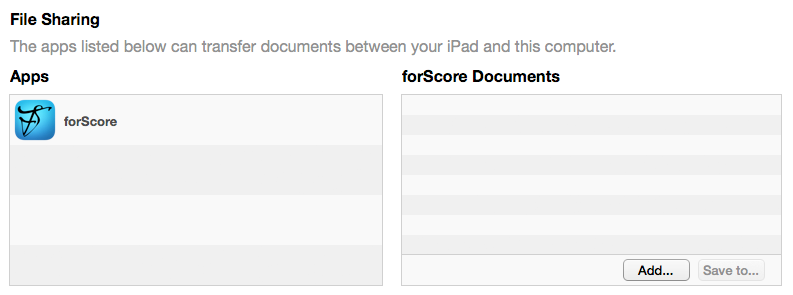
From a computer to an iPad or iPhone: If you already have a PDF sheet music collection on your computer, File Sharing is a great way to get started. On macOS this panel is built into Finder, while on Windows computers it’s built into iTunes instead. Visit support.apple.com/HT201301 for the most up-to-date instructions.
From other apps: Use any app that supports system sharing features to send a copy of a PDF file to forScore. From the Mail app on an iPhone or iPad, for instance, tap and hold your finger down over an attachment until the contextual menu appears, then choose “Share” and tap “Copy to forScore.” In Safari and many other apps, look for the action icon (see the example to the right of this page) while viewing a PDF file. Each app works a little differently, so consult their documentation for explicit instructions.
Services
If you’ve purchased content from digital retailers like Musicnotes, Noteflight and Virtual Sheet Music, or if you use a cloud storage service like Dropbox, use the Services panel to access your files. Visit the Services section of this guide to learn more.
Scan
For paper music you haven’t yet digitized, Scan is a great option. With it, you can snap photos of each page and let forScore turn them into a PDF file for you. Learn more about this feature in the Scan section of this guide.
Text Files
You can also add text files (TXT, RTF, DOC, or DOCX) to your forScore library and they will be automatically converted to PDF files for you. Some formatting may be lost, however, so for the best results consider exporting those documents as PDFs first.
Deleting Files
To remove a score from forScore, swipe across it from right to left in the menu or right click and tap the red Delete (trash can) action—it’ll ask you to confirm so you don’t delete anything by accident. You can also tap on the “Edit” button to select multiple items from the list and delete them all at once.
If you’ve deleted something and need to get it back, you may be able to retrieve it by choosing “backup” from the tools menu and tapping “recently deleted.”
February 27, 2019
Uncategorized
forScore includes several Accessibility options in the settings panel that can help you get more out of the app.
Reflow
Although forScore can’t interpret the notes in a PDF file, it can detect where important information is generally on each page. With Reflow, forScore takes that information, magnifies and redraws it, then lays it out end-to-end so you can read your music in one long line—like a horizontal teleprompter. Reflow gets you most of the way there with its smart detection, and if it gets something wrong you can correct it quickly and never worry about it again.
Reflow is available by default on iPhone but on other devices it must first be enabled for use through the ‘Accessibility’ section of forScore’s settings panel. To activate it, select the Reflow (zig-zag arrow) icon from the Display Options overlay.
Reflow mode features several buttons along the top of the screen: Edit, zoom, navigation mode, and an exit button. Learn about each of their functions below.
Editing Zones:
The Edit button allows you to adjust Reflow’s zones if needed. You’ll see them as gray rectangles—tap once to see its resize controls, and tap again to show the delete option. Drag the green control at the top of each rectangle to downward to split it horizontally into two new areas.
You’ll see a control bar along the bottom of the screen: use the + button at the bottom of the screen to create a new zone, use the arrows to move between pages, and drag the set of three lines on either end of the control bar to drag it up or down and out of your way. If you’d like forScore to reset all zones and re-scan the page, tap the Reset button.
Zoom:
Zoom in or out to find the best magnification for you—up to three times as large as the original page.
Navigation:
Choose to page or scroll through your music. In Page mode, tapping on either side of the screen will shift the music over by half of your screen’s width. In Scroll mode, your music will scroll by continuously: tap the left side of the screen repeatedly to slow it down or the right side to speed it up. Tap in the center of the screen to pause or resume scrolling.
More
Other Accessibility settings allow you to disable Drag & Drop and Contextual Menu gestures, change the metronome’s sounds, adjust the default size of links and buttons, or use full-screen menus.