Today we take a moment to discuss that trusty timekeeper, the metronome. Although there are many versions out there for you to try, both physical and digital, we built one right into forScore so you don’t have to leave your music to use one. It’s accurate (trust us—we went through a lot of takes to find the impeccable iteration you see today) and there’s a lot more to it than you may notice at a glance, but for now we’ll stick with the basics.
The metronome’s most important value is the BPM, or Beats Per Minute. This value is shown in the top right-hand corner of the screen, and you can change it one of three different ways: tap the BPM value in the corner to type in a new one, slide the circular dial around, or tap twice in the center of the panel to set it by the timing of your taps. The BPM value is saved automatically for each item in your library, so you only need to set it once and it’ll adjust as needed.
In the top right-hand corner of the screen, you’ll find the time signature. Tap here to change it by picking from a few common values or by typing in a new one (use the “/” key in the keypad to move from the top of the time signature to bottom). This is also saved automatically per score or bookmark, so you just need to set it once for each of your scores.
And, of course, right at the bottom of the screen, you can use the segmented control to turn the metronome’s various modes on and off. The “audible” mode uses sounds to guide you, with a “tick” upbeat and a “tock” downbeat. The “visible” mode flashes a black border around the page so you can see the timing instead. Use “both” to play sounds and flash the border simultaneously.
That’s just the start, though, so be sure to check back next week and onward as we continue this series and explore forScore’s modestly monochromatic metronome.
Although you can customize them and create your own, forScore includes several drawing presets and a wide range of stamps by default. If you ever accidentally make a permanent change and want to reset them all back to their original state, you can do so by visiting forScore’s settings panel. Right at the bottom, tap “Reset” and choose to reset either stamps or drawing presets. Keep in mind that this will undo any changes you’ve made, removing any custom stamps or drawing presets you may have created.
As your setlists get longer, rearranging items can get a little more cumbersome. Since any item you add to a setlist is automatically appended to the end of the list, moving it up to (or near) the top can take a little longer than smaller adjustments.
If you tap the Edit button and select your item, however, you’ll see an option called “move” which lets you instantly relocate that item to either the top or the bottom of your setlist. It also works with multiple items so you can select a few, tap that move button, and put them all in the right place. Even if you need to move them around a little more from there, this feature can definitely save you some time.
Precise annotation requires more than just responsiveness or flexibility, it requires the careful employment of highly specialized tools that make common tasks far simpler. You can draw letters with your fingers, but typing is generally a better option. You can draw small symbols like sharps and flats, but the Stamps tool will save you lots of time and hand cramps.
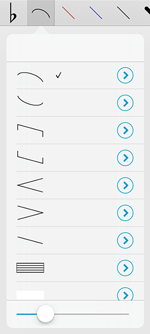 In forScore 7, we added a “Shapes” annotation tool that makes it much easier to add dynamically-sized elements to a page. Drag your finger from one spot on the page to another to draw a perfect slur, tie, tuplet, crescendo, line, or staff between them. You can also drag the size slider in the shapes panel left or right to decrease or increase each shape’s thickness.
The Shapes panel also includes a rectangle tool so you can easily block out large sections of a page. Unlike the other shapes, this one is white by default, but each shape can be tinted independently. Just tap the circled arrow button to the right of a shape to pick a different color for it.
Not everyone needs to draw these kinds of shapes, but for those who do it makes all of the difference.
Although there are lots of helpful concepts that can be taken from paper sheet music and translated into the digital realm, one of the more annoying carryovers is the standardized use of margins. This whitespace around each page improves legibility but makes the content smaller—an important consideration on iPads since their screens are smaller than a typical sheet of paper.
With forScore’s crop tool, you can adjust pages individually to get the best possible view of your music, but this can take some time and must be done one page at a time.
Some files (especially those that are digitally created) use similar margins on every page and are centered properly. For these files, using the margin adjustment slider in the Layout tab of the metadata panel is a better option. It lets you increase the size of all of the pages of a piece of music by the same amount, zooming in towards the center and eliminating those excess margins quickly and easily. Best of all, you can still crop individual pages if they require more precise adjustments.
So stop squinting and give your eyes a break! Take a few seconds to set it up, and you’ll never have to worry about it again.