February 27, 2019
Uncategorized
Our remote control system, Cue, allows you connect multiple devices together wirelessly to coordinate your page turns and program changes. It uses both Wi-Fi and Bluetooth to discover and communicate with nearby devices, and performance may vary based on environmental factors.
Note: Although Wi-Fi must be enabled for the app to discover nearby devices, an internet connection is not required when using Cue.
Roles
In order to properly coordinate your actions, Cue requires you to pick a role when initiating or joining a session. A “Leader” is responsible for turning pages and navigating between different scores or bookmarks in their library. A “Follower” lets their device follow along automatically, either by responding to page turns, program changes, or both.
Note: A Program Change is how we refer to navigation between songs. When a leader opens a new score or bookmark from their library or flips from the end of one piece to the beginning of the next, that’s a Program Change.
Tap the Cue icon in the Display Options overlay to choose your role: “Lead,” “Follow Page Turns,” “Follow Program Changes,” “Follow Both,” or pick “Dual Page mode” (discussed later in this section). Tap “open panel” or select Cue from the Tools menu to open the Cue connection panel which lists available and connected devices and lets you change your role or disconnect from the current session.
Device-Specific Considerations
Page turns work differently depending on your device’s orientation and settings. If a leader is using their device in landscape orientation, forScore will send page up and down messages but only other landscape-oriented devices will respond. Similarly, half-page turn messages can be sent by a leader who uses them, and only the connected devices who are using portrait mode and who have half-page turns enabled will see the effect.
Dual Page Mode
When using forScore on one device and the standalone Cue app on another, a special Dual Page mode lets you view two full pages side-by-side. One page appears on the primary device, and Cue displays the next page wirelessly. Tap or swipe on either screen to advance, two pages at a time. Links and buttons are also supported on either screen, so you don’t have to worry about which device you need to tap.
The standalone Cue app is currently available on the App Store worldwide.
Cue 2
With forScore 14.4 we introduced a new version of the Cue remote control protocol called Cue 2 which uses Apple’s modern networking frameworks to provide faster and more reliable connections. Cue 2 is compatible with forScore 14.4 or later and the standalone Cue app (version 2.4 or later). You can switch back to the original Cue 1 protocol if needed to connect to devices running older versions of either app: tap the circled ellipsis button in the top left-hand corner of the Cue panel to switch between protocol versions.
Group ID
If you’re working in close proximity to other groups, setting a group ID can ensure you only connect to the devices you intend to coordinate with. Using forScore 15.2 or later and the standalone Cue app version 3.0 or later, set a group ID and these devices will only connect to other devices that use the same ID. If you need to connect with devices running older versions of these apps, you should not use this feature.
February 27, 2019
Uncategorized
If you allow it, forScore can track which scores, bookmarks, and setlists you view and for how long. With this information collected, the Dashboard feature in the tools menu can give you valuable insights into your playing habits and helps keep you on track. Three tabs along the top or bottom of the screen (shown on the left of the screen in a sidebar when space allows) give you different ways of viewing and using this information:
Analytics
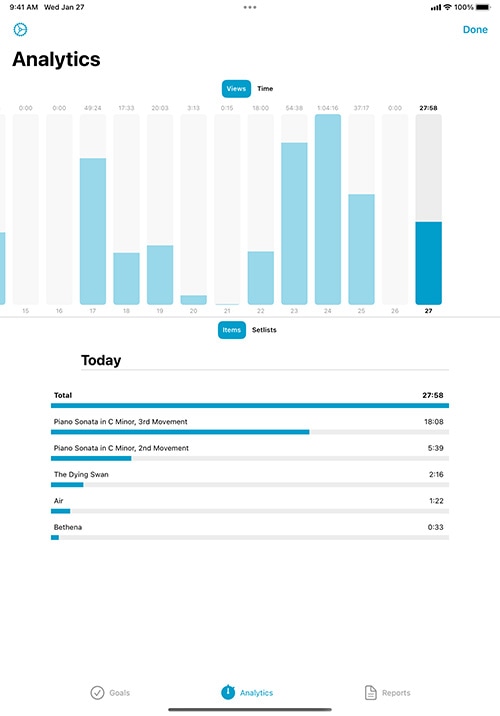
The Analytics tab shows information collected over the past ninety days. It can show you statistics for either items (scores and bookmarks) or setlists, and displays either the total amount of time you spent playing or the number of views.
Tap on any day to see a detailed list of items or setlists in the lower portion of the screen. This list shows everything you viewed on that particular day and is sorted from most played or viewed to least. You can tap on any item or setlist in this list to see how often you’ve viewed or played it over the past ninety days.
Goals
The Goals tab helps you reach a minimum number of views or amount of play time for each day, week, month, or all time. Goals can be item- or setlist-specific, or they can be more general.
The main list of goals shows your current progress as a circular view and, if your goal is time-specific, uses an additional view in the lower left-hand corner to show your results for the previous term. For instance, a weekly goal would prominently display this week’s progress with a smaller view for last week’s results.
Tap a goal to edit it or to view your results for the past ninety days. The timeline along the top of the screen shows your results for the past ninety days: tap on any of these graphics to share your progress with friends or colleagues via email, message, Twitter, Facebook, and more. It’s a great way to hold yourself accountable or to share your success.
Reports
The Reports tab lets you periodically share more detailed information with a colleague or instructor as a PDF document. To begin, create a new report template and tap the circled arrow button to edit it.
Here, you can customize your report to display progress for all items and/or setlists or for one in particular. Select day, week, or month, and choose how far back you’d like the report to go. Once you’re done, tap the back button and tap the report to view its results and use the action button in the top right-hand corner to share it.
Note: The information forScore collects is stored locally on your device. It doesn’t get sent to any servers, and won’t be shared with anyone unless you specifically choose to do so. Visit forscore.co/privacy to learn more.
February 27, 2019
Uncategorized
February 27, 2019
Uncategorized
On iOS and iPadOS devices, Apple provides a standard system interface that any app can use to help you work with documents, also available through the standalone “Files” app. It lets you access and work with your documents whether they’re stored in iCloud Drive, third party cloud storage services, or within apps like forScore that choose to make their documents available in this way.
File Providers
The Files interface lets you access documents stored in iCloud Drive, other apps, or dozens of third-party cloud storage services like Google Drive or Dropbox. Learn more about configuring the Files interface to work with your favorite cloud storage provider at forscore.co/files.
Importing Files
Use the import button in the main menu to copy files to your forScore library. Tap a single file or use the Select button (only available in the Browse tab) to import multiple files at once. Use the Locations sidebar to switch between cloud storage providers, including iCloud Drive, or to view files stored locally on your device.
Sharing Files
Any time you share files from forScore, you’ll see iOS’ native sharing interface appear which includes an option called “Save to Files.” Use this action to copy your files to other apps or upload them to any of the cloud storage services you’ve configured.
On iPads, Drag and Drop gestures make importing and sharing content even easier, especially when using iOS’ multitasking modes. Learn more about these gestures in the Drag and Drop section at the end of this guide.
The Services Panel
If you prefer, you can also access the Files interface using forScore’s Services panel. If it’s not already shown in the list of Services, tap the + button to select it, then tap it to view the splash screen and choose to either upload or download content.
forScore’s Documents
Every app has its own Documents directory where they can store a user’s information. This is where forScore stores all of your PDF files; if you’ve ever used the File Sharing interface, this is the directory you were working with.
forScore’s Documents directory can also be accessed directly through the Files interface and standalone app. Choose “On My iPad” (or iPhone) from the Locations list in the app’s sidebar to see app folders for forScore and any other apps on your device that store data in their own Documents directories.
Working within forScore’s Documents directory through the Files app carries the same implications as working within the File Sharing interface does—delete files here and they’ll be permanently removed from forScore. We do not recommend renaming PDF files through this interface as doing so will remove that file’s metadata, annotations, and more.
Note: If you want to rename PDF files stored in forScore’s Documents directory, use the metadata panel to change its title instead and the filename will be updated to match it as closely as possible.
February 27, 2019
Uncategorized
Adding information to each item in your music library allows you to easily search for a piece, browse through your library, and sort items in various ways.
You can view and edit an item’s metadata by tapping the title of the current item in the center of the main toolbar, by tapping the circular button to the right of any item in most menus, or by using edit mode in a menu to select multiple items and batch edit their properties at once.
The panel is divided up into sections, using either a sidebar when space permits or a tab bar along the bottom of the screen.
Properties
Layout:
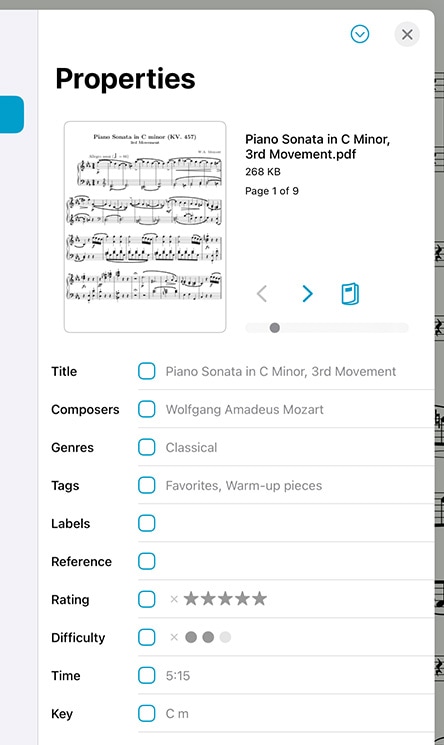
The Properties tab shows a thumbnail image of the current item along with info about the item or items you’re editing. You can swipe or use the arrow buttons to turn pages, and you can tap a page to open it (any changes you’ve made will be saved automatically).
If you’re editing a score, you’ll see a book icon on the right that allows you to adjust your page numbers to match printed copies, if needed. You’ll also see a margin adjustment slider that lets you increase the size of all pages in a score by the same amount at once. This is useful for removing uniform margins, but consider using the “Crop” function in the tools menu to adjust or re-center individual pages more precisely. Cropping takes precedence, so the margin adjuster won’t affect cropped pages.
When you’re editing a bookmark, this portion of the screen allows you to view and change its start and end page numbers.
Metadata:
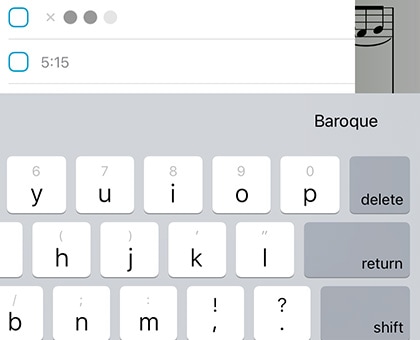
Each score and bookmark can be tagged with a title, rating, difficulty, reference, time, duration, tempo, key, and multiple composers, genres, tags, and labels. While typing in a new composer, genre, tag, or label, you may see a suggestion appear in the toolbar at the top of the keyboard. These suggestions, already in use elsewhere in your library, are updated automatically as you type and let you quickly reuse values and save time. You can also access these values by tapping the three horizontal lines to the right of the active text box.
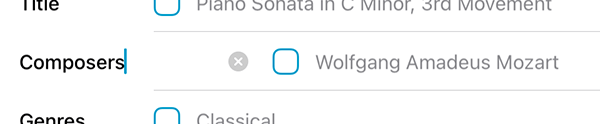
A box on the left-hand side of each text field shows you what will happen when you close the metadata panel. A check mark indicates that the changes will be saved, while an empty box indicates that any changes will be discarded. If you’re batch editing files, a check mark indicates that the current value will replace any existing values for each file while a plus symbol indicates that new values will be added to each file’s existing information if it’s not already included. These boxes are updated automatically as you type, but you can tap them at any time to change them.
To add multiple composers, genres, tags, or labels to your score, use a comma to separate each phrase (i.e. “Favorites, Warm-up pieces”). Your score will then be listed under each of those items in the menu.
When you change the title of a score, forScore renames the PDF file to match as closely as possible. If you prefer, you can disable this behavior in the “advanced options” section of forScore’s settings panel (this adds a “rename PDF” option to the metadata panel’s title bar menu so you can still rename a PDF manually).
Customization:
Customize metadata types by renaming them or changing their icon. Tap a metadata label on the left side of the row to edit these attributes (all types shown in this list can be customized, however Title cannot be renamed).
PDF Info Fetching:
PDF files sometimes contain their own information for title, author, subject, and keywords, which can be used by forScore as values for title, composer, genre, and tags respectively. While editing any of these fields, choose “Fetch…” from the title bar menu to see if any of this information exists and then decide if you’d like to use it or not.
Setlist and Libraries
The “setlists” tab lets you quickly manage which setlists the current item is a part of. Tap a setlist to add the current item to it (a blue check mark will appear) and tap it again to remove it. If you have any libraries set up on your device, an additional “libraries” tab allows you to make similar changes.
Audio
If you have an audio track of a particular piece, you can link that track to the corresponding sheet music in forScore and control playback directly from within the app. Select the “Audio” tab and tap the + button to select tracks from the Music app, or tap the document button to view files stored in the app’s documents directory. (Audio files can be created using the record feature, imported from other apps, or added via the Files app or File Sharing interface.)
The media box updates every time you turn the page, disappearing if there is no track associated with the current score or bookmark, so you don’t have to spend time looking through your audio library every time you want to listen to it—just press play.
If multiple tracks are associated with the current score, swipe left and right over the album artwork to move between them.
Learn more about working with audio tracks in the next section.
MIDI
In the “MIDI” section of the metadata panel, you can assign a unique command to each score and open it with some MIDI devices. You can also save a list of commands to be sent out each time that score is opened. If you plan to use the same set of commands more than once, presets make it easy to save them and assign them to other scores later.
Note: USB-enabled MIDI devices can often connect to an iOS device via Apple’s Camera Connection Kit, while others may require an adapter like the iRig Midi.