We’re taking a break from this column to work on our next big thing, but there are almost two hundred features here to catch up on if you haven’t read them all. If there’s a topic you’re interested in, you can also try searching for it.
February 17, 2017
| Feature of the Week
As we’ve seen over the last few weeks, many of forScore’s menus include a set of controls just below the navigation bar that lets you find things by changing how that menu’s contents are presented. In most cases this means altering the sort order, which is why we’ve referred to it as the “sort” bar so far, but that’s actually not entirely accurate. In some cases, this bar changes what you see, rather than how it’s ordered. Consider the main menu’s initial Category view: tap Composers, Genres, Tags, or Labels and the list below will change entirely.
The Bookmarks menu is unique in that its sort bar includes both kinds of options. You can sort your bookmarks by starting page or alphabetically by title, and it works just like it does when you’re sorting scores or bookmarks in the Score and Setlist menus as we’ve discussed. But there’s a third option here, “TOC,” which shows you the current PDF file’s table of contents, if it has one. It’s not a different way of sorting the bookmarks you’ve already created, its a way of viewing a distinct set of information. (What you can do with that information is a topic for another week.)
In practice, this distinction between presentation and content is fairly obvious. Pick the right option for the content you’re looking at and the different sorting options in each of forScore’s menus will help you find what you’re looking for even faster.
February 10, 2017
| Feature of the Week
Last week we took a look at the different ways you can sort your scores in the main menu by using the controls just below the menu’s navigation bar. There are similar controls in many of forScore’s menus, and they do subtly different things depending on what makes the most sense for the content you’re viewing.
For instance, in the Setlist menu there are actually two places you can change the sorting behavior. While viewing the list of setlists, forScore can display them manually (however you’ve explicitly arranged them), sorted (alphabetically), and a “fresh” option that lets you rediscover setlists you haven’t played in a while by putting the least-recently played items at the top.
If you tap on a setlist, you can also arrange the contents within that setlist in similar ways: manually, sorted, fresh, and—one that isn’t available in the previous screen—shuffle. Shuffle randomizes your list and keeps that shuffled order around until you drag the menu down to randomize things again. We do this so the list doesn’t keep moving things around as you play, otherwise you’d end up playing the same song twice.
Setlists are built to let you play songs in a specific order, but that doesn’t mean they’re limited to doing just that. Next time you play, try using these sorting options to switch things up a bit.
February 3, 2017
| Feature of the Week
Browsing through your forScore library is generally done in two steps: tap on a composer, genre, tag, or label to see the related scores in a submenu. From here, you can use the search bar to filter the results down to hone in on what you’re looking for, or you can just scroll through the list until you see it.
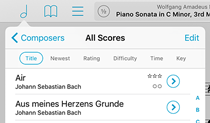
There’s one more thing here that can help, though, and that’s the sort bar. This control near the top of the menu (just below the navigation bar) lets you change how the items in the list are sorted, and the options vary based on which menu you’re using.
In score submenus, you can sort items by title, newest (files most recently added to your library), rating, difficulty, time, or key. Those last four choices are only offered when applicable, so if none of the scores in the current list have a rating, you won’t see that option.
Most of these sorting methods are straightforward enough, but the first—Title—can be a little contentious. Some users expect this to use a strict alphabetical sorting, while others prefer it to omit common words like “the,” “an,” or “and.” For this reason, an option in forScore’s settings panel called “Smart Sorting” controls how this works so you can pick the method that’s right for you.
January 27, 2017
| Feature of the Week
So much of forScore is built around helping you find and navigate between files that it’s easy to overlook another tool that’s just as important: the page selector. This dotted line along the bottom of the screen lets you quickly jump to a specific page without having to tap multiple times to get there. You might think it ends there, but there’s more to this handy control than it seems.
One feature of the page selector that’s obvious the first time you use it is that as you drag the knob left and right, you’ll see not only the page number you’re hovering over, but also a thumbnail preview of that page. These thumbnails include your annotations, so it’s easy to find the right page in a hurry.
If you use bookmarks, you’ll see more information under that page thumbnail if applicable. If there’s a single-page bookmark on the target page, its title will appear after the page number as “Page 5 (My Bookmark).” If there are any multi-page bookmarks that include the target page, you’ll also be able to see the page number relative to that bookmark. For example, imagine you’ve created a bookmark called “Prelude” that begins on page 3 and ends on page 4. As you drag the knob to page 3, you’ll see “Page 3 (Prelude, page 1),” and at page 4 you’ll see “Page 4 (Prelude, Page 2).”
It all works beautifully for most files, but if you’ve got a PDF with hundreds of pages it can be a little difficult to drag the knob to the right spot and lift your finger without accidentally moving slightly. You could just tap to move a few pages forward or backward to get to the right spot, of course, but there’s another trick here that can help. If you tap on the knob and start dragging it, then move your finger upward towards the top of the screen without letting go, you’ll find that as you get further away from the page selector, the knob reacts more slowly to left/right movements.
As if all that wasn’t enough, there’s one last feature of the page selector. It shows you how many pages forScore has cached in memory by showing solid dots for those pages and semi-transparent dots for the rest. Cached pages will open almost instantly, while others further out may take a little longer to appear on screen.
It’s such an obvious control that it doesn’t get much notice, but don’t underestimate the page selector! It’s a powerful and essential piece of the forScore interface that does its part to make your experience even better.
January 20, 2017
| Feature of the Week
There are plenty of ways to find a specific piece in your sheet music library, from browsing and sorting by composer and other types of metadata, to filtering longer lists down with the search field at the top of each menu. But perhaps the easiest way is to use the global search function, just to the right of the center panel in the main view’s control bar.
Start typing to hone in on a piece: use a few letters to find any score or bookmark whose title, composers, genres, tags, or labels contain that sequence of letters. Words are matched separately, so you can find “Piano Sonata in C Minor” by typing in “sonata piano,” and they can appear in any of the major metadata categories. For example, if you have several pieces by Mozart and you’ve used the Tags field to identify them by instrument, you could type in “Mozart piano” to find only those written for piano.
The search panel does a whole lot more than that, though. When you open it, before you’ve typed anything in, you’ll see the last five pieces you viewed—it makes getting back to something quick and easy. Search also gives you more flexibility by drawing together more than just your content: it can be used to find a specific metadata category and navigate to it in the Score menu, and it can be used to access many of forScore’s most important features and functions (search for “Buttons” or “Metadata” and tap to activate that feature).
So next time you know exactly what you need, skip the browsing and scrolling; open the Search panel and let it do the heavy lifting for you instead.
January 13, 2017
| Feature of the Week
When you’re using your iPad, iOS keeps track of how often you touch the screen and puts the device to sleep if it thinks you might not be looking at it anymore. This helps save power and gives the iPad its impressive battery life. This feature is called Auto-lock, and it can be configured globally in the Settings app to kick in after 2, 5, 10, or 15 minutes, or to never interfere and leave your screen on until you explicitly turn it off.
In some cases, though, auto-lock doesn’t make sense even though you may not want to disable it everywhere. When you’re watching a video, for instance, you’re not touching the screen for long periods of time—but you still want the video to keep playing and the screen to stay on. For this, Apple supplies developers with the ability to temporarily override the system setting and keep the screen on indefinitely. This override can apply to a specific action (like watching a video), or it can simply kick in whenever the app is open and revert to the system’s setting when it closes.
In forScore’s settings panel, an app-level option lets you decide how this should work. If auto-lock is enabled here, as it is by default, forScore won’t interfere at all and your standard system setting will apply. If you prefer to keep the screen lit as long as you’re using forScore, disable this option instead.
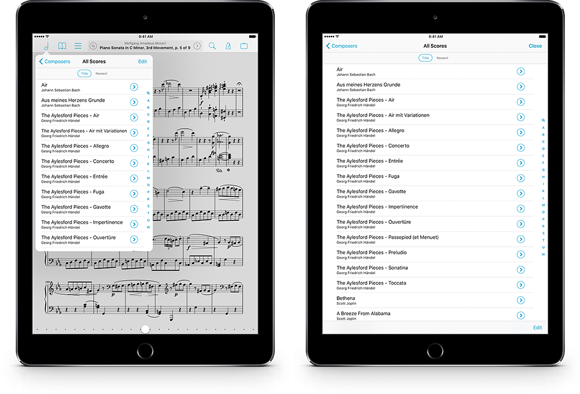
When you’re not playing music or annotating your scores, much of your time in forScore is likely spent working with menus that let you access and edit your scores, bookmarks, and setlists. These menus float above your score in the top left-hand corner of the screen, in what Apple calls Popovers. These popovers make sure you always know what you’re looking at and where it comes from, which is why they have arrows pointing to the button you tapped to open them. They also keep the rest of the control bar visible so you an do things like switch from the score menu over to the setlist menu with just one tap.
Popovers can be dismissed by tapping outside of them; this behavior works for most but some people find that they occasionally dismiss these menus accidentally. And, while most titles are short enough to fit into the default size of these menus, you may prefer to see as much information as possible and avoid unnecessary truncation. That’s why we’ve included an option called “fullscreen menus” in the “accessibility” section of forScore’s settings panel. If you enable it, these menus will take up the whole screen, preventing accidental dismissal and giving you the biggest possible view of your library and setlists.
December 30, 2016
| Feature of the Week
2017 is almost here, and tomorrow lots of people will be starting things out right by rededicating themselves to those habits that are important but hard to form. Like backing up your files.
If you’ve spent time scanning, organizing, and annotating your scores, then you should also know how to back them up—and you should do so regularly! We recommend backing up before any update to iOS or major update to forScore, and especially if you’ve made a lot of recent changes to your library. Our knowledge base article on the subject includes detailed instructions on how to back up your files:
Backing up your data to your computer
For those who got their hands on a shiny new iPad this holiday season, the instructions for transferring your library are similar. Of course, the best way to move everything to a new iPad is to restore it from an iTunes or iCloud backup. If that’s not possible, or if something goes wrong, it’s easy to move these files over manually. Here’s how:
Transferring your forScore library to another device
Don’t risk losing all of your hard work this year, back up regularly and turn a good practice into a smart habit. Happy new year!
December 23, 2016
| Feature of the Week
We love simple, clear designs, and we strive to make forScore as approachable as possible so that everyone can get started using it as quickly and naturally as possible. For some, that leaves the mistaken impression that forScore is a shallow app, and that couldn’t be further from the truth. That’s why we created this series, the Feature of the Week, and we’ve covered a lot of ground over the past twenty months.
This holiday week, we wanted to take a moment to recap all of the many features we’ve written and give our readers a chance to catch up on any they may have missed. So without further ado, here’s every feature we discussed in 2016:
And if that’s not enough reading material to keep your holiday travels lively, here’s everything from last year as well:
Thanks for reading, and happy holidays!
December 16, 2016
| Feature of the Week
Over the past two weeks we’ve taken a look at forScore’s Stamps tool. We began with a quick overview, then explored tinting to give you more flexibility and expressiveness. Finally, today we’ll take a look at forScore’s powerful stamp editor and the ability to create your own custom stamps.
From within the Stamps palette, tap the + button in the bottom toolbar to create a new stamp. Here, you can use the large canvas to draw small, detailed annotations and reuse them whenever you need to. Use the hue, saturation, transparency, brightness, and size sliders to adjust your drawing style, and use the undo or redo buttons when necessary. You can also use the eyedropper tool to reuse any color on the canvas (tap once to activate the tool, then tap on a colored portion of the stamp to use that color).
Once you’ve drawn your stamp and it looks correct in the small, medium, and large preview areas, tap Save to add it to your stamp collection. You can delete any stamp by selecting it in the Stamps palette and then tapping the trash can icon. You can also edit any existing stamp by selecting it and tapping the action icon (the box with the upward arrow). This opens the same stamp editor we just discussed, but with the selected stamp already on the canvas so you can refine it as needed.
Along the standard draw, erase, and clear tools in this editor, you’ll also see two additional options: import and revert. Reverting can be useful when editing an existing stamp: if you make some changes and decide that they’re not right, you can reset back to the saved version of your stamp and try again.
Which brings us to the important “Import” function. While drawing your shapes by hand works well in some cases and is a quick and easy way to design your own stamps, sometimes an image works better. If you add a PNG image to your forScore library using iTunes’ File Sharing panel, you’ll be able to select that image here and place it on the canvas. For best results, your image should be 144 pixels wide and tall, and should use a transparent background instead of a white one (so you don’t cover up your sheet music unnecessarily). Once imported, you can draw or erase to refine your stamp even further and tap Save when you’re done.
Stamps are incredibly useful, and the ability to create your own takes this feature from a nice add-on to an exhaustive and powerful tool that can service many different needs. If you haven’t used it yet, now is a great time to get started.