At A Glance
If your question is about one of these interface elements, click the image to learn more:
Adding files from a computer
There are many different ways to add files to your forScore library, but if you’re starting out with forScore and you have an existing collection of PDF files on your computer, File Sharing is the easiest way to begin. Users running Windows (all versions) or macOS 10.14 or earlier will find the File Sharing interface within iTunes, while users running macOS 10.15 can access this panel directly through Finder. Apple frequently updates their software and some of the instructions or screenshots you’ll find online may be slightly different than what you see at home.
To add files using File Sharing, perform the following steps:
- Close forScore on your iOS or iPadOS device
- Access the File Sharing panel
- Click “Add…” in the documents panel, if available, to open a file browser and choose one or more files
- OR, drag and drop items from a file browser window over the documents list
- The file transfer will start automatically and a progress bar will appear
- When finished, you may disconnect your device and launch forScore
Unlike syncing music or other data to your device, copying files to and from an app through the File Sharing panel begins immediately. As soon as the progress bar is completed your files have been transferred and there’s no need to sync your device before disconnecting it and using forScore to access your files.
Note: the File Sharing interface lets you copy or immediately and permanently delete files within forScore’s Documents directory. Unlike when you delete items using the app, these files cannot be recovered if you make a mistake—before removing files, be sure you understand how that will affect your forScore library.
About Folders
When the iPad and iTunes File Sharing were first introduced, they were designed to work with files only and not with folders. Although recent updates have eased these restrictions slightly, working with folders through File Sharing is very limited and there’s no way to view a folder’s contents without copying it back to your computer first. Based on Apple’s original guidance, forScore was designed to work similarly and continues to work this way today—it recognizes files placed within its documents directory but ignores any subdirectories. If you have files organized into folders on your computer, you’ll need to copy each folder’s contents into forScore separately and handle any filename conflicts as they arise.
Adding files from other apps
Whether you’re finding something new to play, replacing an updated score sent from a colleague, or importing music you’ve created using a composition app, sharing files with forScore is an essential part of getting the most out of your iPad or iPhone. Each app is a little different, but as you become comfortable with iOS’ various interface elements and conventions you’ll be able to share files between apps like a pro.
Share Sheets
Sharing files is a very common task, so iOS provides a standardized interface (called “share sheets”) for doing so. Any app like forScore can provide a file to the system and iOS handles things from there. You’ll generally see something like this:
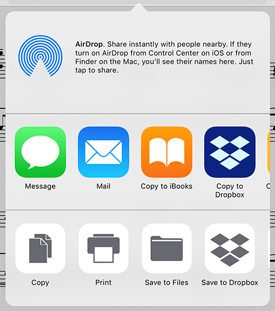
The options iOS shows within this interface are based on the file type being shared and which other apps are installed on your device. If you share a PDF file (like you can from within forScore), any app on your device that can read PDF files should appear in this panel, along with some other common options like AirDrop, printing, and more.
If you have many apps that support the same file type, iOS may not display all of them by default. In that case, scroll over to the end of the list until you see the “More” item and tap it to reorder, enable, or disable apps to prioritize the ones you need most frequently.
Other Apps
While iOS provides a standardized interface for sharing files, how you access the sharing functionality within each app works a little differently. There’s no one “right” way to offer file sharing within an app, but there are some general conventions that most apps use that can help you figure out where to tap to share something. In most cases, just look for the iOS “action” or “share” icon:
![]()
When presented in a file context, the presence of this symbol usually indicates that tapping it will show you sharing options. If the file is a PDF or other forScore-compatible file type, you should see forScore’s icon in the share sheet with the words “copy to forScore” underneath. Tap this icon to copy the file to your forScore library.
System Apps
Most system apps use this same convention. When viewing a PDF file in Safari on iOS 11, for instance, the share icon appears just to the right of the address bar. In the Files or Mail apps, tap a file to open it, then tap the share icon in the top right-hand corner of the screen. In Mail you can also tap and hold the attachment’s icon to share it without opening it first.
Drag and Drop
On iPad with iOS 11, Drag and Drop is another way to copy files between apps. Learn more about using Drag and Drop gestures here and read about how to use these gestures to import files here.
Overriding your device’s sleep setting
In the settings panel you’ll find a forScore-specific option called “Auto-lock”. If enabled, forScore will allow your device’s screen to dim then sleep if it’s set up to do so. If you disable this option, forScore will override the device’s settings and prevent it from going to sleep as long as forScore is visible on the screen.
Accessing the iTunes File Sharing panel
macOS 10.15 or later
With macOS 10.15, Apple restructured iTunes and split up its functionality into several different apps: Apple’s File Sharing panel can now be accessed directly through Finder.
Warning: Apple’s File Sharing panel in macOS 10.15 does not prompt you when you attempt to add a file with the same name as an existing file. Instead, it permanently overwrites the app’s copy with the computer’s copy and this cannot be undone. We do not recommend using Apple’s File Sharing panel at this time.
- Connect your iOS/iPadOS device to your computer
- Open a new Finder window on your computer and select your iOS/iPadOS device in the sidebar
- Select the “Files” tab
- Find forScore in the list of apps and click the arrow button just to the left of its icon to reveal its documents list
forScore Backup Utility (recommended)
As of October 2019, Apple’s file sharing interface within Finder lacks basic functionality like the ability to select multiple files, so we created our own version and built it into our free Mac app called forScore Backup Utility which includes all of the same features as Apple’s version and more. We strongly encourage users to take advantage of this app rather than use Apple’s incomplete interface.
- Download and launch forScore Backup utility on your Mac running macOS 10.14 or later
- Connect your iOS/iPadOS device to your computer
- Launch forScore (version 11.1 or later), tap to show the navigation bar if necessary
- Tap the toolbox icon in the top right-hand corner and choose “backup” from the list
- On your Mac, click the “File Sharing” button when it appears in the main window
Windows, macOS 10.14 or earlier
With macOS 10.14 or earlier, or with all versions of Windows, File Sharing is built into iTunes and the interface varies based on which version is currently installed. Use the instructions below that correspond to your version of iTunes to access the File Sharing panel and forScore’s documents.
iTunes 12.7 or later
- Connect your iOS/iPadOS device to your computer
- Open iTunes on your computer
- Click the small device icon in the upper left corner, next to the library drop-down menu
- Click the “File Sharing” item that appears in the left sidebar under Settings
- Choose forScore from the list of apps to see a panel on the right showing all of forScore’s documents
How to purchase forScore
forScore is available exclusively on the App Store for a one-time fee that includes free updates for life. forScore is offered as a Universal Purchase, so you only have to buy it once to use it on all supported platforms (up to ten of your own personal devices). Learn more about forScore’s minimum requirements here.
forScore Pro is an optional, auto-renewing annual subscription within forScore. It is available via in-app purchase and offers advanced functionality, priority support, and exclusive content like additional stamps and app icons. It is not required for normal use and all current benefits are outlined on this page.
As of February 2025, forScore costs $24.99 USD (one-time purchase) and forScore Pro starts at $14.99 USD per year. Pricing varies by region and currency and may include additional taxes or fees. Prices are subject to change at any time; this article may not always reflect the current price as listed on the App Store.
We typically avoid sales and promotional pricing, so the price you see today on the App Store is generally the best price you’ll find. Since we’re constantly working to make forScore better, its price may increase periodically as major new features are added.
Half-page turns
When your device is in portrait orientation, half-page turns allow you to see the top half of the next page while finishing up the bottom half of the current page. A blue horizontal divider shows you where the page is split so you don’t get lost, and you can reposition this divider vertically by dragging the three horizontal lines up or down. The divider’s position is saved per page of score, so you can set it once to the most convenient location for each turn and it’ll always split in that same spot.
Toggling Half-Page Turns
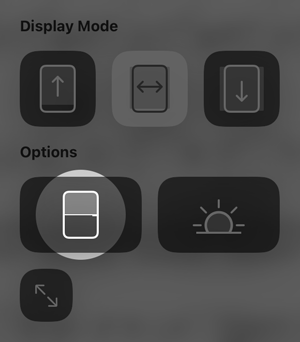
Half page turns can be toggled using the Display Options overlay. To access it, double tap the center of the page or tap the gear icon in the title bar:

Next, tap the button shown below to turn this mode on and off. When the button’s background is light (on), half-page turns are enabled.
Older Versions
In older versions of forScore, you may see the button shown below in forScore’s title bar instead of the gear icon. You can either tap this button or use the method described above to toggle half-page turns. When this button is blue half-page turns are active, and when it is gray they are not.

Using Apple Pencil
Apple Pencil is great for annotating and more, and we’ve optimized forScore to give you the best possible performance while also providing a number of highly customizable settings to ensure that every user can work as naturally as possible.
Apple sells multiple versions of Apple Pencil, each compatible with different iPad models. Apple also worked with Logitech to create several versions of the Crayon stylus which is, in Apple’s words, “built using Apple Pencil technology” and functions similarly. The features and settings described below apply to all three styluses, except where noted.
Drawing
Live Annotations
Version 9.3 added the ability to annotate by simply drawing on the page with Apple Pencil (removing the need to activate annotation mode first). Use the “automatically enter annotation mode” option in the Apple Pencil section of forScore’s settings panel to toggle this behavior.
Because forScore remembers which drawing preset or tool you were using the last time you annotated, and because Live Annotation starts immediately, it can get confusing to keep track of exactly what will happen when you begin drawing with Apple Pencil. With forScore 9.4 or newer, additional settings allow you to control how this works: check and uncheck tool types to either allow them to be saved between annotation sessions or not. Or, if you prefer, simply set a default drawing tool that will always be active every time you start annotating.
Instant Annotations
Version 10.1 added another setting, called “automatically exit annotation mode” that works in conjunction with the “automatically enter annotation mode” option. This setting allows you to start drawing with Apple Pencil, but does not show the annotation toolbar and automatically saves your work and returns to the normal viewing mode after a delay. This setting’s options are “short” (a very quick delay), “long” (a slightly longer pause), or “never” (annotation mode stays active until you explicitly save or cancel your changes, annotation controls appear normally).
On iPads that support Apple Pencil hover detection, forScore also uses proximity to determine when you’re finished annotating. As long as Apple Pencil is near the screen, annotation remains active and your changes are not saved until you move the pencil tip farther away.
Preventing Finger Drawing
Version 10.0 introduced a setting called “prevent finger drawing” that allows you to use your fingers to do things like change tools or zoom in on the page, but only allows Apple Pencil to draw or place stamps and shapes. If you’re using forScore versions 10.0-10.4.9, this setting only applies when you’ve entered annotation mode by touching the Pencil to the page (see Live Annotations above). If you activate annotation mode using any other method, like the default tap and hold gesture, forScore will recognize finger input as it normally does. This is intended to allow you to annotate with your finger even when Apple Pencil is connected but out of reach.
 With forScore 10.5 this setting was changed to no longer depend on how annotation mode is activated. Instead, forScore disables drawing if Apple Pencil has touched the screen at any point within the last 15 minutes. If your Pencil is out of reach or out of power, tap the hand icon in the center of the annotation control toolbar to re-enable touch drawing. Touch drawing will remain enabled until the next time you touch the screen with Apple Pencil.
Variable Width
To provide a more natural, expressive annotation experience, forScore increases the width of your markings based on several factors. When you’re using Apple Pencil, it does this by monitoring both pressure and tilt; otherwise it relies on your drawing speed instead. In forScore’s settings panel, you can adjust how pronounced this effect is and, if needed, disable pressure sensitivity, tilt sensitivity, or both. (Note that Logitech Crayon does not feature pressure sensitivity, only tilt.)

Gestures
Double TapforScore 10.5
The front third of certain Apple Pencil models can be double tapped to perform certain actions depending on which app you’re using. Apple provides a system setting that influences how other apps should generally behave, and forScore responds as logically as possible to each while in annotation mode. “Switch between current tool and eraser” and “switch between current and last used tool” work as stated, while “show color palette” opens the currently selected tool’s options, if applicable, so you can adjust its properties as needed. If you choose “off” forScore will ignore this gesture entirely.
By default this gesture only works while you’re in annotation mode, but with forScore 11.1 you can allow it to change annotation tools at all times by adjusting the “switch tools” option in the Apple Pencil section of forScore’s settings panel (great if you use the instant annotation settings described above). Otherwise, if you prefer to repurpose the gesture and allow it to perform a different task whenever annotation mode is inactive, you can assign it to any of the options available in the “Page Turners & Shortcuts” settings panel.
SqueezeforScore 14.2
Apple Pencil Pro features a squeeze gesture that can be used in similar ways as the double tap gesture (iPadOS 17.5 or later required). An additional option in the Settings app presents a contextual palette which is implemented in forScore as a radial tool picker, and this gesture is also available for use in the “Page Turners & Shortcuts” section of forScore’s settings panel.
HoverforScore 14.0
When using certain models of iPad and Apple Pencil with iPadOS 16.1 or later, forScore can detect when Pencil is near the screen and shows a preview of the currently selected annotation tool before you start drawing. If you’re a forScore Pro subscriber you can do even more: while Pencil is hovering, use customizable pinch, swipe, and tap gestures to resize or cycle through presets, undo or redo drawings, or show a radial tool picker that makes accessing your presets faster and easier than ever.
Compatibility
For the latest compatibility information for all Apple Pencil models, please visit support.apple.com. For more information regarding Logitech Crayon models, visit logitech.com.
Why is there a gray bar in annotation mode?
In annotation mode, forScore can display a ruler that helps you draw straight lines or better align elements like stamps or shapes. You can drag the ruler around on the screen with one finger to reposition it, or place two fingers on it and rotate them to adjust its angle. Tap this icon in the annotation toolbar to control whether or not the ruler is visible (the icon is outlined when the ruler is hidden and filled when it is shown):

Backing up your data to your computer or cloud service
This article provides step-by-step instructions for backing up your information using forScore’s Backup panel, but it’s also important to understand where your data is stored and how forScore works with iOS backups, iCloud, and your computer. For more information on these topics, visit this page.
Note: this article references 4SB Archives which are available as of forScore 10.4.7. Archives take up significantly more storage space on your device and may not be available in all situations. Learn more about the difference between 4SB backups and archives here.
Using a computer
This method is the fastest and most common way of backing up your data. We recommend this process instead of using the Services panel whenever possible.
If you’re transferring information from an iPad, iPhone, or iPod Touch, use these instructions:
- In forScore, open the Tools menu and choose Backup.
- Tap the + button to create a new backup (recommended) or an archive, if available.
- Connect your device to your computer with its USB cable and access the File Sharing panel.
- If you created an archive, select it from the list. If you created a backup file, select all of the files (this includes all PDFs and other files like CSVs or audio files) in the documents list.
- Click the “Save To…” (or “Save”) button and specify a location on your computer. The transfer begins immediately—once the progress bar finishes, it is safe to disconnect your device.
If you’re transferring information from forScore running on a Mac, use these instructions:
- In forScore for Mac, open the Tools menu and choose Backup.
- Tap the + button and create a new archive.
- Click and drag the resulting archive out of the forScore window and to a separate location on your computer or right click on the file and choose “Share.”
Using the Services panel
You can also back up your library to a supported cloud service through forScore’s Services panel. When using this method, we strongly encourage using Archives instead of Backups since only a single file needs to be uploaded and ensures that you don’t end up with an incomplete backup of your library.
- In forScore, open the Tools menu and choose Backup.
- Tap the + button to create a new backup or archive (recommended, if available).
- Return to the Tools menu and choose Services, select your account if not already visible, and navigate to your preferred upload directory.
- If you created an archive:
- Tap the + button, navigate to the “Backups” tab, select your archive and choose “Upload” to begin the transfer.
- If you created a backup:
- Tap the + button, navigate to the “Backups” tab, select the backup you just created and choose “Upload” to begin the transfer.
- Tap the + button again, navigate to the “Scores” tab, tap “All” in the lower left-hand corner to select all files. Ensure that the upload format is “PDF” in the bottom right-hand corner, then choose “Upload” to begin the transfer.
- Tap the + button and navigate to the “Audio” tab. If any files listed, tap “All” in the lower left-hand corner to select all of them and choose “Upload” to begin the transfer.
- Repeat the last step for the upload picker’s “Other” tab, if necessary.
Using forScore Backup Utility for MacforScore 10.5
Archive your library directly to a Mac running macOS 10.13 or newer by downloading our free backup utility. This creates a single 4SB Archive file on your computer that can be used to recover your entire forScore library if needed. If you need to be able to browse through and access your documents on your computer, see the “using a computer” section above.
- Connect your iOS device to your computer using its USB cable
- Launch forScore Backup Utility
- Open forScore and choose “Backup” from the tools menu
- Create a new archive by tapping the + button in forScore’s Backup panel, then choosing “Back Up to [computer name]”
- When the progress bar completes, follow the prompt in the Backup Utility app to specify a location on your computer to save the resulting file. You can now disconnect your device.
Please don’t leave your hard work up to chance, back up regularly!
If you ever need to restore your data from a forScore backup, see this article: Restoring your library from a forScore backup file
Transposing and music playback
Since forScore relies on user-supplied pdf files that could come from any source (scanned, exported from another program, or even handwritten), it doesn’t have the ability to detect notes on a page, so it isn’t able to transpose the music or play back the notes for you.
Annotating near the top of a page
While you’re annotating, forScore displays a toolbar so you can change drawing presets, tools, save or cancel your changes, or move between pages. This toolbar covers up part of the page, so you’ll need to move it when you want to annotate near the top of the screen.

On either side of the toolbar you’ll see a set of three horizontal lines. This is a standard iOS control that signifies when something can be moved up or down, for instance when reordering items in a list. Tap and drag this control up or down to move the annotation controls out of the way and they’ll stay there until you move them again (even if you exit and re-enter annotation mode later).
Linking audio to your scores with Music Binding
If you want to use an audio track with a particular piece, you can associate that track with the corresponding sheet music in forScore and control playback directly from within the app. Open the Metadata panel for the score or bookmark and select the “Audio” tab. Tap the + buttons to select tracks from your device’s shared music library or from files stored in the app’s documents directory. (Audio files can be created using the record feature, imported from other apps, or transferred via Apple’s File Sharing panel.)
The media box updates every time you turn the page, disappearing if there is no track associated with the current score or bookmark, so you don’t have to spend time looking through your audio library every time you want to listen to it—just press play.
If multiple tracks are associated with the current score, swipe left and right over the album artwork to move between them.
Viewing multiple pages at a time
forScore features an optional display mode that shows two or more pages of a score side by side. This option is generally available when your device is in landscape orientation, or whenever forScore’s window is too short to display a standard portrait-oriented page. In other cases, half-page turning mode is available instead. Two-up mode can be toggled using the Display Options overlay. To access it, double tap the center of the page or tap the gear icon in the title bar:
Next, tap the button shown below to turn this mode on and off. When the button’s background is light (on) forScore displays two pages side by side. When the button’s background is dark (off), forScore displays a single page instead.

When this mode is enabled, forScore 14.1 or later displays up to five pages at once based on the window’s current size and aspect ratio. By default, it calculates this based on the most common page size in portrait orientation, but you can tap and hold the button shown above to use landscape orientation instead, or to always show 2 or 3 pages no matter how much space is available.
Older Versions
In older versions of forScore, you may see the button shown below in forScore’s title bar instead of the gear icon. You can either tap this button or use the method described above to toggle two-up mode.

Which version do I have?
We update forScore a lot—in fact, there have been over a hundred and fifty updates since we launched in 2010. To find out which version you’re using, open forScore and tap the center of the screen to show the navigation bar (if it isn’t already visible). Tap the toolbox icon in the top right-hand corner of the screen to open forScore’s Tools menu, then choose “Support” near the bottom of the list. The version number should be displayed there, near forScore’s icon.
Lower down in the support menu, you may be notified if forScore detects that an update is available. If so, tap the update item to visit the App Store app and install the update.
You can also open the App Store app on your device and either select the tab called “updates” along the bottom of the screen, or tap the profile icon and scroll down to see the Available Updates section (don’t see it listed there?). You may need to drag the updates screen down to refresh the list. Remember, updates are free for life so as long as you’re signed in with the same account you originally used to purchase forScore, you won’t be charged a second time.
Lastly, your device may be set to download app updates automatically. (Settings app > iTunes & App Store > Automatic Downloads: Updates) Given how much our customers tend to rely on their libraries, we recommend disabling this feature and checking for updates manually so you can install them when you’re ready, instead of immediately before a performance.
Merging two or more files
Use the following process to merge two or more files into a single PDF:
- Open the score menu and navigate to a view that shows all of the files you’d like to combine
- Tap the edit button and tap to select each of the files you would like to combine in order from first to last
- Tap the Merge button at the top of the list
- Provide a name for the merged file and choose whether or not you’d like to retain the source PDFs
Note: Page specific information like annotations and links are copied to the new merged file, but only the metadata from the first item you select will be used. Metadata from the other items you’re merging (like composers, genres, etc.) will not be assigned to the resulting file.
If you need greater control over the order of pages, or if you want to remove certain pages, use the Rearrange tool instead.
How do I annotate behind the toolbar at the top of the page?
Moving the annotation toolbar
While you’re annotating, forScore displays a toolbar so you can change drawing presets, tools, save or cancel your changes, or move between pages. This toolbar covers up part of the page, so you’ll need to move it when you want to annotate near the top of the screen.
On either side of the toolbar you’ll see a set of three horizontal lines. Tap here and drag your finger up or down to move the annotation controls out of the way—they’ll stay there until you move them again (even if you exit and re-enter annotation mode later).
Moving the page
When the toolbar is positioned at the top or bottom edge of the screen, you can also drag the page up or down using two fingers to access the obscured portion instead of repositioning the toolbar.
Why is there a blue line across my page?
When your device is in portrait orientation, half-page turns allow you to see the top half of the next page while finishing up the bottom half of the current page. A blue horizontal divider shows you where the page is split so you don’t get lost, and you can reposition this divider vertically by dragging the three horizontal lines up or down. The divider’s position is saved per page of score, so you can set it once to the most convenient location for each turn and it’ll always split in that same spot.
Toggling Half-Page Turns
Half page turns can be toggled using the Display Options overlay. To access it, double tap the center of the page or tap the gear icon in the title bar:
Next, tap the button shown below to turn this mode on and off. When the button’s background is light (on), half-page turns are enabled.
Older Versions
On devices running iOS 13 or iPadOS 13, or when using older versions of forScore, you may see the button shown below in forScore’s title bar instead of the gear icon. You can either tap this button or use the method described above to toggle half-page turns. When this button is blue half-page turns are active, and when it is gray they are not.
Why are there blue rectangles on certain pages?
Many PDF files embed hyperlinks into their pages to direct you to a webpage or perform certain actions (like compose a new email) when you click on a specific word, phrase, or image. These hyperlinks are just one type of embedded PDF annotation that your files may include on any of their pages. In forScore, hyperlinks are highlighted using a semi-transparent blue rectangle with a darker border. If they’re particularly small, like the hyperlinks that are sometimes added to every note in LilyPond files, they may appear as small bubbles instead.
If you’re working with files that misuse these links, or if you don’t use them, you can disable them in forScore’s settings panel. Open the Tools menu and choose Settings, then tap “PDF annotations” and uncheck “Hyperlinks” as well as any other embedded annotations you prefer not to see.
Minimum requirements & older versions
Minimum Requirements
forScore is compatible with iPads running iPadOS 16.4 or later, iPhones running iOS 16.4 or later, Macs running macOS 13 or later, and Vision Pro running visionOS 1.1 or later. We don’t make apps for any other platforms such as Windows or Android. (Why not?)
Supported devices include the following models or newer: iPad Pro (all models), iPad Air (3rd generation), iPad (5th generation), iPad mini (5th generation), iPhone 8 or SE (2nd generation), Vision Pro, and these supported Macs.
Some features require hardware components or OS updates that are not available for all of the models listed above.
Older Versions
We can not sell or provide older versions of forScore to new users whose devices do not meet the current minimum requirements. Existing customers who purchased forScore before certain dates can still re-download and use these last compatible, unsupported versions of forScore if needed:
| OS Version | forScore Version | Purchased Before |
|---|---|---|
| iOS 5/6 | 5.1.5 | October 7, 2013 |
| iOS 7 | 10.0.4 | September 13, 2016 |
| iOS 8 | 10.2.6 | September 19, 2017 |
| iOS 9 | 10.5.7 | April 9, 2019 |
| iOS 10 | 11.0.4 | September 19, 2019 |
| iOS 11 | 11.2.6 | September 16, 2020 |
| iOS 12 | 12.1.3 | September 20, 2021 |
| iOS 13 | 13.0.5 | September 12, 2022 |
| iOS 14 | 13.1.7 | March 6, 2023 |
| iOS 15 | 14.2.5 | September 23, 2024 |
Apple is solely responsible for allowing users to re-download previously purchased apps—we do not offer any kind of support for these versions and we cannot assist customers trying to do so. If you need help re-downloading a previously purchased app, please see this Apple support article or use Apple’s support services.
Transferring your forScore library to another device
If you’ve just upgraded to a new device, the best way to get up and running is to follow Apple’s setup instructions and restore from a recent whole-device backup, if available. If that isn’t possible, or if you prefer not to do so, you can use forScore’s Backup panel to migrate your data instead. The following two articles provide step-by-step instructions:
Step 1: Backing up your data to your computer
Step 2: Restoring your library data from a forScore backup file
Can I copy and paste parts of my PDF?
PDF files aren’t designed to be edited, but with forScore 11.2 and a forScore Pro subscription you can make structural changes to your scores using Page Copy & Paste. To manipulate the contents of a page, open the Layers panel and choose the “PDF” layer, then use the selection tool to copy, cut, and paste measures as needed. You can copy and paste page contents on the same page, between pages of the same document, and even between documents.
- Navigate to the page containing elements you’d like to copy and enter annotation mode.
- Open the layers panel and choose the “PDF” entry at the top of the list.
- Tap to activate the Selection tool, if needed, and tap it again to switch between freeform (circle) or rectangular modes.
- Select a portion of the page and tap the clipboard icon to copy the outlined contents of the page, or tap the scissors icon to “cut” it.
- If pasting on another page, exit annotation mode, navigate to the target page, and enter annotation mode again.
- Choose the layer you want to paste your elements into (this can be any layer, not just the PDF layer).
- Ensure that the selection tool is still active (if an area is currently selected, tap the dimmed portion of the page to deselect it).
- Tap the page to place the Paste indicator, then tap the clipboard icon to paste your contents into the highlighted area.
- Drag your pasted selection to reposition it, if needed, then tap outside of it to finish this process.
Page Copy & Paste is currently available exclusively to forScore Pro subscribers. If you’re a forScore Pro subscriber and you make structural edits to a document, you can still share it with colleagues—either send an annotated PDF file with permanently embedded annotations, or share a 4SC file (the receiver can show, hide, or clear the PDF layer but can not make any changes of their own).
Note: forScore cannot copy vector information stored within a PDF file, it can only copy a high-resolution image of the selected portion of a page. If you’re working with vector-based files (which can be enlarged without limit), changes made using Page Copy & Paste will appear pixelated at higher zoom levels. Whenever possible, permanent or archival changes should be made using the same source material and application that was used to create the original PDF file in the first place.
Understanding Backups, Syncing, and iCloud
Backing up your data is an important part of using forScore, and with today’s cloud-connected devices it can be hard to know exactly where your data is at all times. This document explains how and where forScore stores your information and gives you a broad understanding of how you can effectively back it up. For step-by-step instructions, visit this article.
App Storage
Every app on your device has a standard set of folders that it uses to store information. The Documents directory is commonly used to store user content, like documents you add to (or create within) an app. If an app chooses to do so, like forScore does, it can make the contents of this folder available through the Files app or through Apple’s File Sharing panel on a computer when your device is connected to it.
Other data like app settings, which are designed to be changed through the app’s interface and not edited directly, are stored in a number of private app directories instead.
Documents (Public)
PDF files, CSV indexes, recordings, tracks, 4SB files, and more
Library (Private)
Annotations, setlists, bookmarks, metadata, settings, and more
4SB Backups
When you access forScore’s documents through the Files app or with Apple’s File Sharing panel, you’re only seeing some of forScore’s data. If you were to back these files up and copy them to a new forScore installation, you’d find that your annotations, metadata, setlists, settings, and certain other information would all be missing. To help you keep all of that extra information, forScore’s Backup panel lets you export its private app data as a single 4SB backup file that’s stored in the Documents directory alongside the rest of your documents. Together, an up-to-date 4SB backup and a copy of every other file in forScore’s Documents directory is enough to duplicate or restore your music library. Backups cannot be used on their own: they snapshot forScore’s information about your files, not your files themselves.
4SB ArchivesforScore 10.4.7
You can also use forScore’s Backup panel to create 4SB archives. An archive is a single 4SB file that includes a copy of every file in forScore’s Documents directory as well as the private information that’s contained in a standard 4SB backup. Because they duplicate all of your documents, archives require much more free space on your device, but they are more convenient because they contain everything you need to migrate or recover your entire forScore library. They can be uploaded to your preferred cloud storage service or copied to a computer using File Sharing.
iCloud Backups
Depending on your settings, iOS can regularly back up your entire device to a computer or to iCloud. If your device is lost or damaged, you can usually use this information to get back up and running quickly. Keep in mind, however, that iCloud offers limited storage and that you can’t restore data for a single app—it’s all or nothing. Because of this, we also recommend manually backing up your forScore library on a regular basis.
iCloud Syncing
Introduced in version 12.1, iCloud Syncing keeps your forScore library up to date automatically across all of your devices. Syncing was initially offered as an Early Access feature as part of forScore Pro and was made available to all users with forScore 13. Learn more about this feature, backups, and more in our user guide.
Deleting forScore
If you delete forScore from your device, all of your information goes with it. If an Apple employee tells you to delete the app to fix a problem, be sure you have made a complete backup first. We don’t store a copy of your files and can’t help you get them back if they’re erased.
Using performance mode to focus on your music
forScore’s performance mode disables most gestures and controls to allow you to focus entirely on your music. The only functions available are paging forward and backward, and the forward page turn zone is enlarged to take up the right two-thirds of the screen. This makes it much easier to turn pages quickly and removes the possibility of unintentionally triggering annotations or other features.
Activating Performance Mode
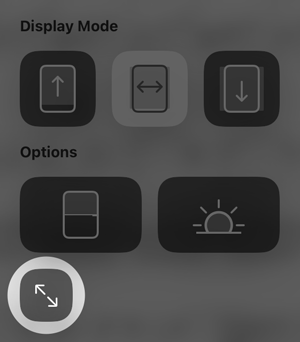
Performance mode can be activated using the Display Options overlay. Double tap the center of the page or tap the gear icon in the title bar:
Tap the button highlighted below to begin using performance mode. To exit performance mode, tap the blue × button in the upper right corner of the screen.
Older Versions
On devices running iOS 13 or iPadOS 13, or when using older versions of forScore, performance mode can accessed using the Tools menu or by tapping the “full screen” arrow button in the title bar’s second page of shortcuts.
Tips for scanning your hard copy sheet music
Most scanner software will allow you to create a PDF file directly from individual page scans, but keep in mind that forScore’s performance can vary widely based on the characteristics of the files you’re using. Keep your file sizes low by choosing a dpi of around 100-150 (up to 300 if you’ll need to zoom in often to see small details or if you have a device with a Retina display), and consider using a grayscale setting since color information typically isn’t very important for score. Each combination of scanner hardware and software is different, so try a few different test files to find the best balance between quality and performance to suit your own needs.
Note: most scanner software also has an option to “append” or create “multi-page” PDFs. We highly recommend using this feature to combine all pages from a score into a single file, rather than keeping each page as a separate file.
Rearranging Setlists
In the Setlists menu, with Manual sort order selected, you can arrange your setlists or their contents by tapping the Edit button and using the control on the right-hand side of each item (three horizontal lines). Tap and hold the control until the row pops out of the table view, and then drag the score upward or downward. You can also do this from within the full screen setlist editor, where the gray bars are always visible in the setlist column.
Cropping pages to enlarge your music
Although margins can be helpful for printed sheet music, they’re much less useful on a screen and can affect your ability to see the music by making it too small to read comfortably. There are three ways to enlarge a page of music, but the most flexible and powerful option is Cropping. Cropping lets you adjust the position, zoom, and rotation of a page as displayed within forScore without making any permanent edits to the PDF file itself. You can learn more about cropping in our online user guide.
Margin adjustment is a simpler alternative to cropping: it lets you magnify all pages of a document by the same amount. It’s much quicker to adjust, but it can only zoom in towards the center of each page—it can’t reposition or rotate the page in any way. It works well when every page of your document has similar margins.
Finally, if you just need to get a better look at a specific portion of the page temporarily, you can zoom in on the page by placing two fingers on the screen and moving them apart. While zoomed in, you can drag the page around to see a different portion but you won’t be able to turn pages until you zoom back out again.
Understanding Display Modes
Display Modes
forScore features several different page display modes depending on your device’s orientation (or window size) and forScore’s current layout. To switch display modes, double tap the center of the page to show the Display Options overlay or tap the gear icon in the title bar. The fit modes are presented from left to right in the order described below.
Display modes affect how your annotations are presented on screen but do not alter your annotations. If you make edits while using these display modes, drawings that you’ve previously made outside of the visible area will not be lost.
Portrait Modes
 Standard fit mode uses a common aspect ratio across all devices to ensure that you’ll see the same thing on any screen size, even if doing so creates gaps on the left and right side or bottom of the page. In most cases this is identical to how previous versions of forScore have always worked and emphasizes compatibility and consistency.
 Best Fit mode is the best choice for most people. It makes each page of music as big as possible without clipping it, although some annotations, links, or buttons may be partially or completely clipped if they fall outside of the page’s bounds. Depending on your screen size and page aspect ratio, this may be indistinguishable from Standard mode.
 Zoomed mode is similar to the “Display Zoom” feature that was previously offered exclusively for the 11-inch iPad Pro in older versions of forScore. It zooms in to fit the height of your screen, even if doing so clips the left and right edges of your music or annotations.
In summary, Standard shows everything, Best Fit shows the whole page but not necessarily the whole annotation canvas, and Zoomed makes the annotation canvas fit the height of your screen no matter what gets clipped.
Landscape Modes
 Best Fit (forScore 13.0 or later) works just like it does in portrait orientation, ensuring that the entire page is always visible and that scrolling is not necessary. Some annotations, links, or buttons may be partially or completely clipped if they fall outside of the page’s bounds.
 Scroll mode is the default and fits the width of the page to the width of the screen, extending the page down below the bottom of the screen and allowing you to scroll or shift the page up and down to see its full contents.
Cropping
Note that once you’ve cropped a page, forScore assumes that the placement you specified offers the best possible view of your sheet music. In these cases, portrait fit modes will have no additional effect.
Using Links to handle repeats
Create a link (Tools menu) between two points in your score to handle repeats with a single tap. Every link that you create consists of two components: a blue circle and an orange circle (an activation point and a target point). Blue circles are visible at all times and act like buttons, taking you to the correct location when tapped. When you do, the corresponding orange circle flashes twice, showing you where to begin playing, but remains invisible the rest of the time.
Note: Links don’t have to be on different pages, they can also be used as visual cues on the same page. If you’re using forScore in landscape mode, it even scrolls up or down if necessary.
To create a link, select “Link” from the tools menu, and you’ll see a new screen appear with two copies of the current score displayed side-by- side. You can use the seek bar or swipe to flip through the pages of either stack.
Tap anywhere on the left-hand page to create a blue circle, and tap anywhere on the right-hand page to create a corresponding orange circle. Both points are required to create a link. If you need to adjust the placement of a link point, simply tap the screen again in the correct position and the circle will move.
Tip: Tap and hold the page for a moment and a magnifying glass will pop up just above your finger, letting you position your links more precisely.
Tip: If you’re using a foot pedal to turn pages, use the Rearrange tool instead to duplicate and re-order your pages for a linear play-through of the song.
Adding or creating new stamps
forScore’s annotation stamps include a general set for music markup, but we’ve also included the ability for users to create and add their own stamps to further customize the stamps palette and tailor it to their individual needs. In the stamps panel, tap the ellipsis (…) button in the top left-hand corner and choose from the available options. Tap Draw to create a new stamp by hand or tap and hold an existing stamp and choose “edit” to launch the stamp editor, where you can draw or edit your design.
You can also create stamps from images imported from your device’s photo library, the Files app (and any configured cloud storage services), or from forScore’s documents directory if you’ve added any images using File Sharing. First, find or create a PNG image (for best results it should be 144×144 pixels), then create a new stamp and press the “Import” button to select an input method. Select your image to place it on the canvas and continue to edit it or save it as is. forScore Pro users can also create new stamps by typing the name of a symbol in Apple’s SF Symbols library.
Tip: The “Browse Images” list allows you to delete images you no longer need—swipe from left to right over an item and tap “delete” to confirm.
On iPad, Drag and Drop gestures make this process even simpler. Use Safari or any other app that supports Drag and Drop to find or create an image, open forScore’s Stamp creator, then drag the image onto the stamp creator’s canvas.
If you created a stamp you no longer need, you can delete it by selecting it and then tapping the trash can button at the bottom of the panel.
Hands-free page turning with foot pedals
If you want to avoid tapping the screen to turn pages and the Autoturn and Replay options aren’t right for you, consider purchasing a foot pedal that allows you to turn pages without moving your hands from your instrument. You can find links for a variety of options in our shop.
Virtual keyboard won’t appear
iOS disables the virtual on-screen keyboard whenever most page turners are connected, because many page turners use a “keyboard” device profile. Disconnecting your device will allow the virtual keyboard to reappear when it is needed, and the devices listed below include an additional hardware workaround that can allow you to use the device and the virtual keyboard at the same time:
AirTurn BT-105 (firmware v1.22 or later) or BT-106, Duo, Quad
After connecting your device via the Bluetooth section of the Settings app, open forScore and tap to activate the text field you’d like to type in. Then, press the red power button. Once that’s done, you should be able to use the virtual keyboard and still turn pages normally. Be aware that pressing the virtual keyboard’s “hide” button in the lower right-hand corner will undo this workaround, and you’ll need to repeat these steps to continue to use the virtual keyboard. For a video demonstration of this feature, visit AirTurn’s website.
AirTurn PED (if used in mode 2 or higher)
After connecting your device via the Bluetooth section of the Settings app, open forScore and tap to activate the text field you’d like to type in. Then, press the keyboard button on the PED device. Once that’s done, you should be able to use the virtual keyboard and still turn pages normally. Be aware that pressing the virtual keyboard’s “hide” button in the lower right-hand corner will undo this workaround, and you’ll need to repeat these steps to continue to use the virtual keyboard. If possible, use the AirTurn PED in mode 1 to connect via Bluetooth Smart and avoid this issue entirely.
PageFlip Firefly, Butterfly, Dragonfly, and Cicada revision 4 or later
After connecting your device via the Bluetooth section of the Settings app, open forScore and tap to activate the text field you’d like to type in. Then, press the currently selected mode button (the button with the blinking red light below or next to it). Once that’s done, you should be able to use the virtual keyboard and still turn pages normally. Be aware that pressing the virtual keyboard’s “hide” button in the lower right-hand corner will undo this workaround, and you’ll need to repeat these steps to continue to use the virtual keyboard. Note: Earlier revisions of the PageFlip Cicada do not have any way to toggle the virtual keyboard. If you have an early model of the Cicada, consider updating to a newer PageFlip model.
IKMultimedia iRig BlueTurn
After connecting your device via the Bluetooth section of the Settings app, open forScore and tap to activate the text field you’d like to type in. Press and hold the left (“up” arrow) pad for three seconds to activate the virtual keyboard. Once that’s done, you should be able to use the virtual keyboard and still turn pages normally until you repeat these steps or power cycle your BlueTurn.
Understanding the setlist menu
Unlike the score menu, which automatically generates and sorts its contents, the setlist menu is completely manual. Create a setlist by tapping the + button and supplying a title, and rename or move it up or down at any time by tapping the “edit” button. Tap on any setlist to view or edit its contents.
The main list of setlists and the contents of each individual setlist can be sorted manually, alphabetically, or by least-recently played (fresh). In addition, individual setlists can be sorted randomly and shuffled at any time: drag the list downward until you see the refresh control, then let go to re-shuffle the queue.
Converting images or scanning to PDF
Use forScore’s Scan tool to digitize scores on the go: it allows you to take photos with your device’s camera or import images from your Photos library, then turns those images into a PDF file and adds it to your music collection. To begin, choose “Scan” from the tools menu.
Note: Scan is intended to provide a quick method for digitizing scores, not as a replacement for a true scanner or dedicated scanner app. For the best results, we highly recommend using an app like Scanner Mini or Scanner Pro, which then allows you to export as PDF to forScore.
Learn more about how to use the Scan tool in the corresponding section of our online user guide.
Why do bookmarks stop me from turning the page?
When you create a bookmark in forScore 11 or newer, you can choose whether you want an “item” or “page” bookmark. There are important differences in how forScore works depending on which choice you make.
Older versions of forScore do not provide a choice of “item” or “page” in the bookmark creator. When using these versions, you can choose which type of bookmark you want to create by either including or omitting an end page value. The information described below applies equally to all versions of forScore.
If you create a “page” reference (or leave the end page blank), the bookmark works like a table of contents entry: select it from the Bookmarks menu and you’ll go to the corresponding page, but everything else will stay the same—you can turn pages backward and forward throughout the entire score just like you’d expect.
If you create an “item” (or supply an end page), you’ll be creating a virtual score in your forScore library from the range of pages you specified. This is intended to help people split up multiple works within a single PDF file without having to actually separate the pages into many different files. It treats a range of pages as a unique item in your library, so when you select it from the Bookmarks menu you’ll only be able to work with those pages. For instance, if your bookmark starts on page 3 and ends on page 5, you won’t be able to turn backwards from page 3 to 2, or forward from 5 to 6.
Note: Item bookmarks have their own unique metadata like composers, rating, and audio tracks, but they don’t have their own page-specific information like annotations. If you draw on page 1 of a score, a bookmark made from pages 1-2 will also display those annotations.
Connecting your AirTurn PED, BT200, or BT500 Series
AirTurn’s PED, PEDpro, BT200 and BT500 Series of devices feature six different modes for compatibility with a wide range of devices. Using the Mode 1 (AppDirect) will give you the best battery life and won’t interfere with iOS’s virtual on-screen keyboard. Modes 2 and up are not recommended due to double signal transmission introduced in recent firmware updates. If you have a special use case that requires setting the device in mode 2 or above, please disable “AirTurn Support” in forScore’s Devices panel to eliminate the second signal.
Note: These devices require a Bluetooth Smart-capable device, iPad 1 and 2 not supported.
Switching device modes:
- Turn on the device.
- Press and hold the MODE button. The red LED will flash once per second from 1 to 6 flashes. The number of flashes corresponds to the same MODE number. Be sure to count the flashes.
- Release the MODE button following the number of flashes that reflects the desired MODE. The blue and red LEDs will flash together the number of times indicating which MODE has been set.
- IMPORTANT: You must restart the device after switching between modes 1 and 2. With the device powered on, press and hold the power button for six seconds. After two seconds, the device will appear to power down. Continue to hold the power button. At six seconds both LEDs will blink three times. After the third blink release the power button. Once the device is reset and you turn it back on, you will need to re-select mode 1, as it defaults to mode 2.
Connecting via mode 1 (forScore 8.3 or newer):
- Check the “Bluetooth” section of the Settings app for your AirTurn device under the “My Devices” list. If listed, tap the circled “i” button to the right of it and select “Forget This Device.”
- If you haven’t done so already, set your device to mode 1 (see above).
- Open forScore and tap the center of the screen to show the title bar, if necessary.
- Tap the toolbox icon (the far right of the title bar) to open the Tools menu.
- With forScore 10 or earlier, choose Devices from the list. With forScore 11 or later, choose Settings, then Devices.
- In the Devices panel, select AirTurn.
- Ensure that “AirTurn Support” is enabled and select your device from the devices list when it appears.
Using AirTurn with forScore for Mac
The AirTurn framework is not currently used on macOS: to connect your page turner directly to your Mac, open System Preferences and pair your device within the Bluetooth section using Mode 3, then it should turn pages in forScore without any further configuration. If you want to customize the commands sent by the AirTurn, please see this knowledge base article.
Sharing a setlist
If you’re using setlists as a group, forScore makes it easy to share them with your colleagues, even if they’re using another app. Setlists can be shared from the root view of the setlist menu (that’s the list of all of your setlists, not the contents of a specific setlist). If you’re using forScore 10 or newer, swipe from right to left over the setlist you want to share and choose the Share action that appears. If you’re using an earlier version of forScore, tap the “Edit” button on the right-hand side of the menu’s navigation bar, then select your setlist and tap “Share” from the options at the top of the list. forScore’s sharing interface allows you to share a setlist in a variety of formats:
Setlist Only: If your colleagues are using forScore and already have the PDF files they’ll need, this choice is best. It’s a forScore-specific file type (4SS), and it includes all of the information about your setlist but does not contain the setlist’s scores or bookmarks.
Include Scores: This also creates a forScore-specific .4SS file, but includes the necessary PDF files as well. Use this format’s “include extras” option to choose whether or not to include each file’s editable annotations, metadata, and more.
Merged PDF: You can also merge the scores in your setlist into one long PDF file. This option is great for colleagues who are using another music reader.
Annotated Merged PDF: Like the last choice, this merges your setlist’s scores into one long PDF file, but this time also includes permanent annotations. Specify whether to use forScore’s standardized aspect ratio or use each file’s original aspect ratio instead.
Text List: For colleagues using paper, a text list might be the best choice. Use this format’s options to specify if you’d like to number your list, include composer information, and whether or not to sort the items alphabetically.
Tap a thumbnail icon to share your setlist using the default options, or tap the ellipsis (…) button to configure additional options first and then tap “share” in the top right-hand corner to continue. Once you do, you’ll see a standard iOS Share Sheet appear which gives you options like AirDrop, email, and more. If you’re using iOS 11 or later, choose “Save to Files” to copy your setlist to iCloud Drive or any other third-party cloud storage provider you’ve configured for use with iOS’ Files app.
Note: If you’re planning on sharing your setlist via email, you may need to check that the combined file sizes of all the scores in the setlist are smaller than any attachment limit your email provider may have.
Sharing Setlists via forScore’s Services panel
If you’d like to upload your setlist to one of the cloud storage providers supported by forScore’s Services panel, do the following:
- Open the Tools menu and choose Services.
- Navigate through your cloud service’s folders until you’re viewing the folder you’d like to send the file to.
- Tap the + button at the bottom of the panel.
- Choose the Setlists view.
- Tap to select one or more setlists.
- Tap the Format button in the lower right corner to toggle between the options. In the services panel, only Setlist Only, Include Scores, and Include Scores & Extras are available options.
- When ready, tap the Upload button in the upper right corner and the upload will begin.
- Use your cloud service’s sharing functions to share the file or folder with other forScore users, if necessary.
Can I brighten a bad scan or copy and paste measures between pages?
PDF files are designed to display their information predictably and to look the same no matter which device or operating system you use to view it. The file extension stands for “portable document format,” and it’s generally only meant to be read, not modified (except for in certain specific cases, like forms with fields).
Although PDF files can be created from images, you can’t work with them the same way you might work with an image file. Instead of pixels, PDF files think in terms of vectors and points—relative measurements rather than concrete ones. They often include highly specific data that can’t be conveyed through an image, like web links, multimedia, or computer-readable text.
What this means for apps like forScore is that while we can allow users to take photos and make adjustments to brightness and contrast, once those images are saved into a PDF file those kinds of changes can no longer be made safely. As a result, any issues with your scans must be corrected before you create your PDF file.
For the same reasons, copying and pasting measures isn’t practical with an app like forScore. We provide additional tools that let you augment how your document is displayed (by adding annotations, for example), but we can’t modify the document itself in the same ways.
Extracting bookmarks as separate PDFs
If you’ve created a bookmark with a start and end page, you can use forScore’s sharing functions to export just those pages if needed. Swipe from right to left over a bookmark in a menu and tap Share or open the bookmark and choose Share from the tools menu. You can export bookmarks as PDF files (with or without annotations) or as 4SC files for use by other forScore users.
To save the bookmark as a new PDF file within your forScore library instead of sharing it, open the Rearrange panel while viewing your bookmark then choose “Save As…” and supply a title.
Sending and receiving MIDI signals
In the “MIDI” section of the metadata panel, you can assign a unique command to each score and open it with some MIDI devices. You can also save a list of commands to be sent out each time that score is opened. If you plan to use the same set of commands more than once, presets make it easy to save them and assign them to other scores later.
Note: USB-enabled MIDI devices can often connect to an iOS device via Apple’s Camera Connection Kit, while others may require an adapter like the iRig Midi.
I accidentally deleted a stamp, can I get it back?
If you accidentally delete a stamp from the default set that comes with the app, you can get it back by restoring your library and settings from a recent backup (all changes made since then will be undone) or by visiting the Settings panel in forScore’s Tools menu. Near the bottom of the list, tap “Reset,” then tap “Reset Stamps” and confirm.
Warning: resetting stamps removes all of your stamps and replaces them with the default set. If you’ve customized your stamps in any way, consider replacing the missing stamp with an image instead of resetting all of them.
Compatible file types
PDF Scores
You can view virtually any PDF file with forScore, and use a wide range of free applications for every major platform to convert other files to the PDF format. forScore also works with password-protected PDF files, and will prompt you for the password the first time you open it, then store that password in your iOS Keychain so you don’t need to enter it every time. Note that some PDF files are restricted and require special software, so we can’t guarantee compatibility.
Additional Formats
forScore supports many popular audio file formats so you can import tracks and associate them with specific scores for easy access. Audio track support is determined by Apple and is subject to change at any time, but generally includes MP3, AIFF, AAC, ALAC, WAV, and M4A files. As of version 10.2, forScore also supports importing comma-separated values (CSV) files for use with the Bookmarks menu’s Indexes feature. Finally, forScore’s custom 4SB format allows you to create and restore from backups of forScore’s metadata, setlists, settings, annotations, and more.
Transport Formats
Some files can be imported by forScore but are not stored and used as-is. For instance, forScore 7 added the ability to import TXT, RTF, DOC, and DOCX files which are then automatically converted to and stored as PDF files.
forScore also uses two custom formats to share information with other forScore users: 4SC and 4SS files. 4SC files contain a PDF file and additional forScore-specific metadata, editable annotations, and more. When you import a 4SC file into your forScore library, the PDF file is saved to the app’s Documents directory while the other information is stored in forScore’s database and private directories. 4SS files contain setlist information and may include scores as well. Like 4SC files, 4SS files are unpacked and their contents are stored in various locations within forScore.
More detailed technical information regarding forScore’s file type support can be found here.
Using Margin Adjustment to remove white space
Most PDF files contain white space around the edges, but these margins are more important for printing something out rather than displaying it on a screen. The margin adjustment slider allows you to zoom in equally towards the center of every page of that score at once. It doesn’t affect the original file, so you can still print it out later if you need to.
forScore 14 or later
- Open the metadata panel for the item you’d like to adjust (tap the title display for the current item or tap the info button to the right of an item in a menu)
- Make sure the “Properties” tab is selected
- Use the slider to the right of the page thumbnail image to make a global adjustment to the margins of the file
- The preview image will update to reflect your changes, and you can page through by swiping or tapping the blue arrows to check how the adjustment affects the other pages in the file
- When finished, close the metadata panel (changes are saved automatically)
forScore 13.1.7 or earlier
- Open the metadata panel for the item you’d like to adjust (tap the title display for the current item or tap the round arrow button to the right of an item in a menu)
- Make sure the “Layout” tab is selected about 2/3 down the panel
- Use the slider at the very bottom to make a global adjustment to the margins of the file
- The preview image will update when the slider is released, and you can page through by swiping or tapping the blue arrows to check how the adjustment affects the other pages in the file
- When finished, tap away from the panel to close it and save the changes
To crop individual pages differently or off-center, consider using the Crop function in the tools menu instead. Note that cropped pages won’t zoom in when you move the margin adjuster.
Inverting the screen for low light environments
While forScore doesn’t have a “night mode”, iOS has an “invert screen” feature that may help. If you open the Settings app, under General, choose Accessibility. At the bottom of that panel, set the Accessibility Shortcut option to “Invert Colors” (in iOS 11 or later there are two options: Classic Invert Colors and Smart Invert Colors). Then, when using forScore, triple-click on the Home button on your device and it will invert the colors of the screen, setting white text on a black background.
For more information about Accessibility Features, see these articles on Apple’s website from the iPad User Guide:
Display Accommodations
Accessibility Shortcuts
Using the Rearrange tool
Take charge of your music by reordering, duplicating, rotating, or removing pages. When you’re done, save the results to a new file or replace the original. (Note: Rearrange is not available for password-protected files.)
Editing a Score
While links are a great visual way of dealing with repeats, they still require that you reach up and tap on the screen. Rearranging a score in advance, however, ensures that the next page is always the correct one—it’s great for musicians who use the autoturn feature or a foot pedal to turn pages.
While viewing the score you’d like to edit, choose “Rearrange” from the tools menu. The system will take a few moments to generate thumbnails for each page, and then you’ll be ready to customize your score’s layout. Drag pages around on the screen to rearrange them, and use the toolbar along the bottom of each page to remove it, rotate it 90° clockwise, duplicate it, or to create a new section beginning with it (use sections to split up large files into multiple documents). You can also rotate all pages at once using the arrow buttons at the bottom of the screen.
If you’re using forScore 10.5 or later, drag one page and then tap additional pages to move them all at once. If you drop them in a new location, they’re placed there in the order they were picked up. While dragging multiple pages, tap the Cancel button in the top right-hand corner to release all pages and place them back in their original locations, if needed.
Merging Files & Inserting Pages
With forScore 10 or newer, you can tap the “+” button at the bottom of the screen to add all of the pages from another score or bookmark to your Rearrange workspace. When you save, the pages will all be merged into one continuous PDF file. You can also insert one or more pages from a template, including blank pages—they’re fully annotatable so you can use them for just about anything.
Saving a Score
When you’re done adjusting your score’s layout, tap “Save As…” to create a new file or “Save” to permanently overwrite the original file. “Save As” copies the original score’s information but does not duplicate its versions. “Save” overwrites the original file and cannot be undone, and all score information (including versions) is updated as needed. In both cases, Links and Bookmarks are preserved and updated as long as their start and end pages haven’t been removed and, in the case of Bookmarks, that they haven’t been inverted (a bookmark’s start page must precede its end page).
Note: Rearrange was updated to preserve bookmarks and links with forScore 10.4. If you’re using an older version, your bookmarks and links will not be preserved when saving a rearranged file.
Keep in mind that some files use special fonts that iOS cannot reproduce, and in some cases this can result in missing text or blank pages. Before overwriting any file, we strongly recommend that you save a copy first to ensure that the results are usable.
If you’ve split the file into multiple sections, the “Save” button won’t be available, but you can use the “Save As…” button to create a set of new, sequentially numbered files.
Tip: Use the “white marker” annotation preset or the rectangle shape to cover up the portions of repeated pages that you don’t need to play again. Since each page includes its own annotations, you will still be able to see that information on other copies of the page.
Using the Clone feature to create multiple versions of a score
forScore 11 includes a Clone feature that allows you to duplicate scores in your forScore library without using up any additional storage space. This is possible because of a file system-level feature that allows multiple documents to share the same data whenever possible. They’re completely independent and work just like any other files in your library. They can be modified at any time, at which point iOS will separate their data and use up more of your storage space.
To clone a document, open the score menu and tap Edit, select your document, tap “Clone” and supply a name for your copy.
Using Indexes to create bookmarks
About Indexes
When you’re using one long PDF file with multiple pieces within it, bookmarks are an essential part of ensuring that forScore can be at its best, giving you all of the great features you’d get with individual PDF files for each score.
Since adding bookmarks can be a daunting and time-consuming task, use the Indexes feature to create bookmarks from a comma-separated value (CSV) file. To begin, import a CSV file by downloading it through the Services panel, copying it to forScore from another app (or using Drag and Drop), or by adding it to your forScore library from a computer using Apple’s File Sharing panel.
Importing Data From Indexes
While viewing your score, open the Bookmarks menu and tap “Indexes” in the top left-hand corner and choose your CSV file. Values found in each column are listed in the “values” section—tap any of them to assign their information to specific types of forScore metadata, then browse through each record to make sure things look right. The minimum values to create bookmarks are title and starting page; if you want to be able to add individual metadata or add bookmarks to setlists, you’ll also need to set an end page. Set a page offset value, if necessary, and check the thumbnail preview to make sure each bookmark lines up correctly. Skip any header or footer rows as needed, then tap “save” when you’re ready.
If you have multiple CSV files that are structured similarly, you can save and reuse your current value mapping in the future by selecting “default to these settings.” Each time you repeat this process, those settings will be applied by default and you can make any changes, if necessary, before importing the data.
About the CSV Format
CSV files are text documents whose contents follow certain rules. Each line of text (with a newline or carriage return character at the end) contains one or more values separated by a comma. Since newline characters and commas are both used structurally, there are certain rules for how they must be used within values (e.g. if the name of a bookmark is supposed to contain a comma it should be surrounded by double quotes).
In most cases, using a spreadsheet editor is easier and will ensure your data fully conforms to the CSV specification. A CSV file that contains the text shown below, when opened in a program like Excel or Numbers, will be properly formatted and editable without worrying about specific rules or scenarios:
Name,Artist,Year,Start,End
The First Song,”A value, with a comma”,2012,1,2
Another Song,”A value with “”quotes”””,1976,3,5
| Name | Artist | Year | Start | End |
|---|---|---|---|---|
| The First Song | A value, with a comma | 2012 | 1 | 2 |
| Another Song | A value with “quotes” | 1976 | 3 | 5 |
Editing a CSV file directly is as easy as opening a text file, but ensuring that it can be parsed correctly is another story. Whenever possible, we recommend that you rely on spreadsheet editors to do that work for you.
Turning pages from one score to the next
By default, forScore’s settings allow you to turn pages from one file to the next in the queue when viewing a setlist, but not from the main score menu (music note icon). You can adjust this in the app’s settings panel under “Flip between scores.” The options are:
- Off: Only allows you to flip between pages within the same PDF file.
- Setlists: Allows you to flip from one score to the next when viewing a setlist. Queue order is determined by the sort order you’ve selected in that setlist (Manual, Sorted, Fresh, or Shuffle)
- All: Allows you to flip from one score to the next when viewing a file from either the Score or Setlist menu. Queue order is determined by the sort order of the menu or sub-menu where you first viewed the file.
Jumping quickly to a page using the seek bar
forScore features a seek bar (dotted line) along the bottom of the screen that appears or disappears like the rest of forScore’s controls when you tap once in the center of the screen. Drag the white circle left or right to see page numbers and thumbnail previews of the current score’s pages and let go to navigate to that page. If you’d like the seek bar to stay put at all times, enable the “Always show seek bar” option in the app’s setting panel.
Deleting Links or Buttons from a score
To delete or reposition a link or button, enter annotation mode by choosing “Annotate” from the tools menu or by tapping and holding the page for a few moments. If the “erase” tool is selected, links and buttons will transform into delete buttons—tap on one to remove that link. If any other tool is selected, links and buttons appear as white circles that can be dragged around on the page. Note that only the blue ‘source’ dot of a link can be edited after creation. If you need to move the orange ‘destination’ dot, you’ll have to delete the link and recreate it.
Adding text annotations
Text annotations can be used to display custom text directly on the page at all times. With the “type” mode selected, tap anywhere to create a text box. You’ll see two small handles on either side of the box: the left handle allows you to move the text box around the screen, while the right handle allows you to change the width of the box. When you do so, the text box automatically adjusts its height to ensure that all of the text is visible.
Tap inside the text box to edit it, and you’ll notice a toolbar appear with several buttons on it. The “Format” button allows you to change the font, size, and color of the current annotation (save them as the default settings for any new text boxes if you like). The “Delete” button removes the current text box, and the “Done” button completes the edit. You can also tap anywhere on the page outside of the text box to finish editing and dismiss the virtual keyboard.
Tip: We do not recommend using multiple spaces in between text to create exact spacing across a page. (Example: entering chord markings across the top of a line of music.) Due to text scaling differences and font characteristics, the spacing can change when rotating from portrait to landscape or when printing or exporting an Annotated PDF. Instead, try creating a separate text field for each set of text, or, if you’re marking chords, try using stamps instead.
Customizing accessory or page turner shortcuts
Use an accessory’s physical controls or gestures to perform common forScore tasks and access your favorite features. Popular examples include using a foot pedal to turn pages, double tapping the Apple Pencil 2 to switch annotation tools, or sending a program change message from a MIDI controller to open a specific score. To create your own shortcut, first connect your accessory to your iOS device—this differs depending on each accessory:
- Connect standard Bluetooth accessories by visiting the Bluetooth section of iOS’ Settings app
- Certain Bluetooth Smart accessories (like AirTurn PED) connect directly to the app through forScore’s Devices panel
- Many USB accessories—including standard computer keyboards—can usually be connected using your iOS device’s port and an adapter, if needed
- MIDI devices must be physically connected to your iOS device (a USB or MIDI adapter may be required) or configured to use a network MIDI session
- Apple Pencil 2 pairs automatically when you attach it magnetically to the side of your iPad
Once your accessory is configured and connected, open the Tools menu, select Settings, and choose “Page Turners & Shortcuts.” Tap a command in the list provided to begin “listening” for a signal, then activate one of your accessory’s buttons, gestures, or controls. If it’s compatible with forScore, the corresponding characters, keystrokes, or MIDI code(s) will appear to the right of the command in the settings panel.
When you’re done, leave this panel and return to forScore’s main view. Repeating the accessory action at this point will invoke the corresponding command, if available (some commands are unavailable in certain situations and may not always respond). Tap the “x” button next to a saved command to remove it and restore its default setting.
Note: Some commands respond to certain keystrokes by default and shouldn’t need to be changed to function as expected. The “previous page” and “next page” commands, for instance, respond to left/right arrow keys, up/down arrow keys, and page up/page down keys (most page turners send these by default). Unless you’ve customized a command you’ll see its default keystrokes in light gray, where applicable.
Tip: If you’re using a computer keyboard and an iPad, press and hold the “command” key to see all currently available keyboard shortcuts, including any you’ve configured using the process described above.
Moving scores between libraries
You can reassign scores to different libraries or designate multiple libraries for a particular score through the metadata panel:
- From the Libraries menu, tap All Libraries to select it. The panel should automatically close and return to the main score view
- Browse or filter the menus to identify the scores you’d like to move
- Open the Metadata panel by tapping the circled button to the right of any single item or by using edit mode to select multiple items and batch edit them
- Choose the Libraries tab and tap to select or deselect libraries in the list
- Close the metadata panel to save the changes.
Creating bookmarks
While viewing a score, you can create a bookmark for it by opening the bookmarks menu (the open book icon) and tapping the + button. Supply a title and start/end pages, and if something is wrong with the values you’ve entered a message will alert you.
When creating a bookmark using forScore 11 or newer, you can choose whether to create an “item” or “page” bookmark. In older versions, this distinction is made based on whether or not you include an end page number (“item”) or leave it blank (“page”). Page bookmarks are like table of contents entries that simply take you to a specific page, while Item bookmarks work like virtual items in your forScore library. You can learn more about these two types of bookmarks here.
Sharing scores
Whether you want to share a file with a colleague, print out a score with all of your annotations, or send a copy to another app on your device, forScore’s Share function can help. To share one or more items, use any of the following methods:
- Choose the “Share” option in the tools menu or from the title bar’s ellipsis menu to share the score you’re currently viewing.
- While viewing a list of scores or bookmarks in most of forScore’s menus, either swipe from right to left over an item and tap the Share action or tap and hold an item and choose “Share” from the popup menu.
- In the Scores or Bookmarks menus, or while viewing the contents of a setlist in the Setlists menu, tap the “Edit” button on the right-hand side of the navigation bar, tap to select one or more items, and choose the “Share” option at the top of the list.
Any of these actions will prompt you to share your item or items in a variety of formats with additional options where applicable. You can share a single file as an unmodified PDF file, a permanently annotated PDF file, or using a special forScore-only “4SC” file format that includes editable annotations, metadata, links, and more. If you’re sharing more than one file, you’ll see an additional text list option. Note that some of these formats may be unavailable depending on the content you’re sharing (e.g. password-protected files).
Tap a thumbnail icon to share using the default options or tap the ellipsis (…) button to adjust your sharing settings first. When sharing a single item as a PDF or annotated PDF, you can specify a range of pages to share instead of sharing the whole file. When sharing one or more files as an annotated PDF, you can choose to use forScore’s standardized aspect ratio or preserve the original file’s aspect ratio instead. When sharing multiple files as a text list, you can choose to include numbers, composers, and whether or not to sort the items alphabetically.
When you’re finished, a new popup will appear giving you a wide range of sharing options. This popup, called a “share sheet,” is provided by the system and its contents depend on your device’s setup and which apps you currently have installed. Common options include Mail, Messages, Print, and—if your device supports it—AirDrop (which lets you share files quickly with other iOS users in close proximity). You will also have the option to copy your file to any other PDF-compatible apps on your device, like iBooks or Dropbox.
In-Place Editing
As of forScore 10.4, sharing certain files with other apps may either send a new copy of the file to that app, or it may make forScore’s copy available for in-place editing (if the target app supports this). Changes made to your files in this manner are immediately reflected within your forScore library. In-place editing is not supported when sharing modified files, such as annotated PDFs or 4SC files.
Playing audio through other apps
Since forScore lets you automatically queue up a particular audio track when you view a score, it also takes control of the device’s shared music system (the music app) when it launches. If the track that’s currently playing in the background (from an app that supports background audio playback) isn’t associated with the visible score, your audio will stop and forScore will get ready to play the right song, if applicable.
If you’d prefer that it not take control of the music system automatically, enable the “use external audio” option in forScore’s settings panel. Now, if a track is playing in the background and it’s not associated with the current score, it will continue playing and a circled “x” button will appear in the top right-hand corner of the media box. Tap it at any time to stop the external track and allow forScore to queue up the correct song, if applicable.
Troubleshooting App Store or Apple ID issues
If you’re having trouble getting the app to install or authenticating with your Apple ID, restarting your device and/or logging out of the App Store and logging back in again may help. Otherwise, you’ll need to contact Apple Support directly since they manage all transactions and App Store processes on our behalf.
Managing a score’s setlist and library membership
The “setlists” tab in the metadata panel lets you quickly manage which setlists the current score is a part of. Tap a setlist to add the current score to it (a blue check will appear) and tap it again to remove it. If you have multiple libraries set up, a similar “libraries” panel lets you manage library membership in the same manner.
Using Replay to automate page turns
Automate your page turns by recording them in conjunction with a linked audio track:
Setup
Tap the Replay button in the media box (the page with an arrow in it) then turn pages and/or scroll up and down as needed while the track plays. Tap the circled “x” button in the top right-hand corner to stop recording once you’re finished, or wait until the track ends.
Usage
Once you’ve recorded your navigation actions, tap the Replay button to enable or disable Replay mode. While replay mode is on, small lines in the seek bar will show you where saved page turns are located. Play your track and forScore will repeat each of your navigation actions at just the right moment.
Note that Autoturn and Replay are not intended to be used in tandem. We recommend choosing one method or the other.
Editing
With ForScore 11 or newer, while Replay is active you’ll see a “···” button to the right of the seek bar that opens the Replay editor which lists all of the navigation actions you’ve recorded. Swipe from right to left over an entry and tap Delete to remove it, or tap to select it and use the audio scrubber along the bottom of the panel to adjust its timing. To reset all Replay data, tap the Clear button.
If you’re using forScore 10 or earlier, the button to the right of the seek bar is a small “x” and can be used to reset all Replay data and start from scratch.
Using cloud services
Use online storage services to store and access any scores you don’t have room for on your device, to share music with friends and colleagues, or to manually back up your most important files. While we provide access to some third-party services through our app, we have no control over their service or terms and conditions, both of which are subject to change at any time. Please be sure to visit their respective websites if you have any questions prior to signing up for or using these services.
Files, iCloud Drive, and File Providers (preferred)
With iOS 11, Apple introduced the Files app and interface which gives you system-wide access to your documents whether they’re stored on your device, in iCloud Drive, or elsewhere. Many third party apps and services choose to make their content available through this interface (called “File Providers”). You continue to use the same interface you’re used to within the Files app, but behind the scenes that third-party app is doing the work of updating and maintaining your documents wherever they’re stored. Major cloud services such as Dropbox, Google Drive, Box, Microsoft OneDrive, SugarSync, and Amazon Drive have all updated their apps to work this way, and other apps such as FileExplorer and FileBrowser let you configure and connect to many different locations including servers that use FTP, SFTP, or WebDAV.
Visit this page to learn more about working with the Files app and interface.
The Services Panel
Getting Started
forScore’s Services panel also allows you to access and work with files stored in your Dropbox or Box account. Tap the + button to pick which services you use. When you’re done, select any of your preferred services from the account list to log in and begin using it. Services ask you to log in as you start using them, or if your credentials expire.
Once you’ve successfully logged in, you’ll be able to navigate through your folders and see your files. You can upload, download, move, and delete many of the file types forScore supports, including PDF files, forScore-specific (4SC, 4SS, and 4SB) files, comma-separated (CSV) files, and many audio file formats. You can also download some kinds of text files (TXT, RTF, DOC, and DOCX) and they’ll be automatically converted to PDFs once they’ve been downloaded. Unsupported or unrecognized file types are greyed out.
Downloading Files
Tap on a file to download it and a copy will be saved into your forScore library. If a file with the same name already exists in your library, you’ll be asked to duplicate or overwrite the file, or to cancel the transfer. Tap the stop button in the middle of the progress wheel to cancel a file transfer.
To download all files within a folder:
- View the folder you’d like to download from
- Tap the Edit button in the upper right corner of the panel
- Tap the “select all” button along the bottom of the panel (a circled check mark)
- Tap the “download” button (cloud with an arrow pointing down out of it) to start downloading the selected files
If you have setlists in your current forScore library, you can also download one or more scores and add them to a specific setlist automatically once they’re finished. Swipe from right to left over a single score and choose “Download…” to see a list of options: download the item normally, download it to the last setlist you were viewing in the Setlists menu, or choose any setlist from a complete list. To download multiple files into a setlist, tap the Edit button, select your files, and tap the download icon at the bottom of the panel—the rest of the process is the same.
Moving Files
While in edit mode, tap to select one or more files, then choose “Move” from the control bar. The selected files will turn blue, and you’ll be able to select directories or use the back button to navigate to the desired destination. When you’re ready, tap the “Move” button once again to send the selected files to the current directory.
Uploading Files
To upload files, tap the + button at the bottom of the panel. This presents a searchable list of all the files in your library that can be uploaded, with separate tabs for scores, setlists, audio files, backups, and other file types such as CSV indexes. Depending on which tab you’ve selected, you may also see additional upload options in the bottom right-hand corner of the upload picker. When viewing scores, for instance, you can choose to upload the original PDF file as-is, a forscore-specific (4SC) file that includes editable annotations and additional information, or as a flattened PDF file with non-editable annotations. Tap one or more files to select them, then tap the “Upload” button in the upper right corner of the menu to begin the upload process. If you would like to select all files, tap the All button at the bottom of the panel.
Drag and Drop
If you’re using iOS 11, you can also use Drag and Drop gestures to upload items or move files between folders:
To move files, tap and hold your finger over any supported file until it animates up and then drag your finger away to begin. While continuing to drag the first file, tap additional items to collect them, if desired, then drop them onto a folder to move them there or use your other fingers to navigate into and out of folders as needed until you’re viewing the target location, then drop the files to finish moving them.
To upload, drag one or more scores, setlists, or other supported files from forScore’s various menus into the Services panel and drop them into the list to upload them there or use your other fingers to navigate to the correct location first. If necessary, you’ll be asked to choose which format you want to use once you drop your files into the Services panel.
Restoring your library data from a forScore backup file
If you want to reset your library to a previously backed up state, or recover information that may have been lost by deleting the app or restoring your device, you can do so by re-adding your documents and restoring from a 4SB backup file or by restoring from a 4SB archive as described below.
Note: this article references 4SB Archives which are available as of forScore 10.4.7. Archives take up significantly more storage space on your device and may not be available in all situations. Learn more about the difference between 4SB backups and archives here.
Using a computer
Transferring to an iPad, iPhone, or iPod Touch:
- Ensure that “automatic fetching for new files” is disabled in forScore’s settings.
- Close forScore and connect your iOS device to your computer.
- Access the File Sharing panel.
- Click “Add…” in the documents panel on the right and navigate to the folder that contains your forScore data.
- If you’re restoring from an archive, select it and click “add.” If you’re restoring from a backup and a directory of files, select all of the files by clicking on one and pressing Ctrl-A (PC) or Command-A (Mac), then click “Add.”
- Once chosen, the transfer will begin immediately, and a progress bar may appear at the top of the window (depending on your version).
- When the transfer is complete, you can disconnect your device from your computer.
- Launch forScore, then open the Tools menu and choose Backup.
- Tap the backup file you’d like to restore, then choose “restore library and settings” when prompted.
Transferring to forScore running on a Mac:
- If you have a 4SB archive, double click on it to copy it into forScore then open forScore’s Backup panel and click on it to restore its contents.
- If you have a 4SB backup, perform the following steps:
- Open forScore and press command + i or click the File menu at the top of the screen and choose “Import.”
- Locate your files (the 4SB backup, PDF files, and any others copied out of your other library) and select all of them by clicking the first item in the list, then pressing and holding the shift key while clicking the last item in the list. Click “open” or press the return key to import them into forScore (the original files aren’t deleted).
- Open forScore’s Backup panel and click on the backup file to restore its contents.
Using the Services panel
You can also restore your library from a supported cloud service through forScore’s Services panel. We don’t typically recommend this since uploading and downloading an entire library can be slow when relying on an internet connection (instead of a USB connection to your computer), but the following instructions will help you restore from a full backup of your library in a supported cloud service.
- Ensure that “automatic fetching for new files” is disabled in forScore’s settings.
- Select “Services” from the Tools menu, set up your account if needed, and navigate to your backup directory.
- If you’re restoring from a 4SB Archive:
- Locate your archive and tap on it to begin downloading it.
- If you’re restoring from a 4SB Backup and accompanying files:
- Locate the folder that contains all of the files and tap the Edit button in the upper right corner.
- Tap the “select all” button at the bottom of the panel (a circled check mark), then tap the “download” button next to it.
- When the download is complete, open the Backup panel.
- Tap the 4SB file you’d like to restore, then choose “restore library and settings” when prompted.
Using forScore Backup Utility for MacforScore 10.5
Restore your archive from a Mac running macOS 10.13 or newer with our free backup utility.
- Connect your iOS device to your computer using its USB cable
- On your iOS device, open forScore and choose “Backup” from the tools menu
- On your Mac, launch forScore Backup Utility and click “Restore…” to locate your archive file
- When prompted on your iOS device, choose to continue or cancel restoring from the archive
If you’re not familiar with backing up your forScore library and database, see this article: Backing up your library to your computer
About iCloud Syncing
forScore’s syncing feature uses iCloud to automatically keep your content up to date across all of your personal devices. It uses your AppleID and iCloud storage quota, and was first introduced in forScore 12.1 as an Early Access feature offered exclusively to forScore Pro subscribers. As of forScore 13, this feature is now available to all users.
How It Works
Once enabled, forScore uses Apple’s iCloud storage service to automatically update your content between devices. It does not facilitate sharing content between users or accounts, and it is not a cloud storage service—a complete copy of your library is stored on each device and files cannot be offloaded or downloaded on demand. Unlike some apps that use Apple’s “Documents in the Cloud” infrastructure, forScore communicates directly with Apple’s servers to manage changes promptly rather than waiting for the system to perform background transfers at its own pace.
Although iCloud Syncing provides an easy way to transfer your content to a new device, it does not offer any sort of recovery feature or previous versions of your data. Once something is deleted or edited, that change is permanent. Therefore, it’s essential that you regularly back up your data using Apple’s whole-device backups and/or forScore’s manual backup feature. You can learn more about iCloud storage and backups in our user guide.
Requirements
iCloud Drive must be enabled in your iCloud account settings to use forScore’s syncing feature and forScore must be enabled for iCloud Storage (an error message in forScore’s Sync panel that begins with “Could not connect to your iCloud account” usually indicates that this setting is not enabled). For instructions on enabling iCloud Drive, see this Apple Support article.
Troubleshooting
Many error messages shown in forScore’s Sync panel are informational and represent temporary issues that resolve themselves after a short time. In other cases, a change you’ve made on one device may not sync successfully to other devices—in this case, making any change to the good copy will cause forScore to sync it again.
Depending on your internet connection, forScore typically syncs changes within one minute. If needed, you can open forScore’s Sync panel and drag downward until the refresh control begins spinning to attempt to sync immediately—note that this may not always be possible, such as when another device is currently syncing, iCloud is being rate limited, or if Apple’s servers are temporarily unavailable.
If an issue persists or if syncing has been automatically disabled, be sure to contact us directly so we can help. If needed, forScore provides a logging tool that can help us identify and troubleshoot issues. This tool maintains a limited record of syncing-related tasks and their status (but not your actual data) and you can use the “report a problem” button to send a copy of this log to us, if we request it.
Syncing FAQs
Can I access forScore documents in iCloud Drive?
No. forScore uses a private iCloud directory that only the app can access for use while syncing. This directory is not user-accessible.
Is syncing the same as backing up my library?
No. Syncing is not a substitute for backing up your library on a regular basis. Synced data cannot be reverted or restored and does not safeguard your information. Instructions for backing up your library are provided here.
Can I set one device to always be used as the authority on my library?
No. In a sync relationship, all devices are treated equally. Changes are made based on the timecodes recorded in your sync logs. You cannot set a device as “canonical” or “primary” over others.
Using the Reflow feature
Although forScore can’t interpret the notes in a PDF file, it can detect where important information is generally on each page. With Reflow, forScore takes that information, magnifies and redraws it, then lays it out end-to-end so you can read your music in one long line—like a horizontal teleprompter. Reflow gets you most of the way there with its smart detection, and if it gets something wrong you can correct it quickly and never worry about it again.
Reflow is available by default on iPhone but on other devices it must first be enabled for use through the ‘Accessibility’ section of forScore’s settings panel. To activate it, select the Reflow (zig-zag arrow) icon from the Display Options overlay.
Reflow mode features several buttons along the top of the screen: Edit, zoom, navigation mode, and an exit button. Learn about each of their functions below.
Editing Zones
The Edit button allows you to adjust Reflow’s zones if needed. You’ll see them as gray rectangles—tap once to see its resize controls, and tap again to show the delete option. Drag the green control at the top of each rectangle to downward to split it horizontally into two new areas.
You’ll see a control bar along the bottom of the screen: use the + button at the bottom of the screen to create a new zone, use the arrows to move between pages, and drag the set of three lines on either end of the control bar to drag it up or down and out of your way. If you’d like forScore to reset all zones and re-scan the page, tap the Reset button.
Zoom
Zoom in or out to find the best magnification for you—up to three times as large as the original page.
Navigation
Choose to page or scroll through your music. In Page mode, tapping on either side of the screen will shift the music over by half of your screen’s width. In Scroll mode, your music will scroll by continuously: tap the left side of the screen repeatedly to slow it down or the right side to speed it up. Tap in the center of the screen to pause or resume scrolling.
Do I need to purchase forScore again to use on another device?
Like all apps you purchase through the App Store using your Apple ID, Apple allows you to install them on multiple compatible devices at no additional charge, so long as you’re logged into the same Apple ID used to make the original purchase.
When upgrading devices, you can re-install them (or restore from a device backup) on the new device at no charge as well, again if you are logged into the same Apple ID.
If you restore your new iPad from an iTunes or iCloud backup of an older device, this should also transfer all your apps to the new device and restore your forScore library files and data (occasionally this does not happen, but in most cases it does). If you would like to set up the device from scratch or if the iTunes/iCloud backup doesn’t restore your forScore data, you can sign into the App Store app with the same Apple ID, then download forScore at no charge, then use these instructions to transfer your library manually: Transferring your forScore library to another device
Where do I get content?
If you have an existing collection of PDF sheet music on your computer, the easiest way to get started is to transfer your files using the File Sharing panel. To access your files stored in the cloud, use Apple’s file browser to access your iCloud, Dropbox, Google Drive, or many other accounts (available for users running iOS 11 or later).
If you’re just starting to build your digital music library, get up and running in no time with our in-app purchase storefront and its collections of works by popular composers. When you’re ready for even more, Musicnotes, Noteflight, and Virtual Sheet Music are the best places to find high-quality, fully licensed scores across a wide range of styles, instruments, and difficulty levels. All of your purchases can be accessed through the Services panel and downloaded directly into your forScore library as standard PDF files.
Many apps also allow you to share a PDF file and copy it to your forScore library. For example, you can use Safari to find a score online or use Mail to save an attachment that someone has sent you. Since forScore keeps its own copies of these files, you don’t have to worry about having an internet connection when you’re ready to play.
Using tabs to view multiple files at once
forScore includes a tabs feature that works much like the tabs in your web browser. The tab bar is hidden by default when there’s only one tab in use, but you can open an item in a new tab in a couple different ways. From the main view, tap the circled ellipsis button in the title bar and choose “new tab” to open the current score or bookmark in a second tab. When viewing items in a menu, tap and hold an item and choose “new tab” from the contextual menu to open it in a new tab. Or, while editing a single item in the metadata panel, choose “new tab” from the properties menu next to the close button (a circled downward-pointing chevron).
Once the tab bar is visible, you can also tap the + button in the tab bar to open a new tab immediately. And if you’d like the tab bar to always show, there’s an option for that in the app’s settings panel.
With forScore 10 or later, you can also rearrange tabs: tap and hold one of them for a moment until it animates and grows larger, then drag it left or right as needed and lift your finger to drop it.
Moving PDFs from iBooks to forScore
If you previously kept your PDF files in iBooks, or accidentally added them into iBooks through iTunes, you can transfer them from your computer into forScore. Here are some instructions for that process using a Mac computer, with the iBooks app installed:
- Connect your device to your computer
- On your computer, open the iBooks app and navigate to your PDF files
- Select the files you’re like to transfer, then click and drag them to your computer’s desktop
- Open the File Sharing panel
- Drag the file(s) from your desktop into the panel to add them to forScore
- The file(s) will be copied to your device automatically
If you use a PC, iBooks are stored in the iBooks section of your iTunes library. Browse the library to locate the PDF files you’ve added, then click and drag them to your desktop to copy the files there. Once you’ve finished, follow steps 4-7 above to add them to forScore.
If you have purchased music through the iBooks Store, there is no way to transfer those files to forScore due to proprietary file formats and copy restrictions.
How do I close a file or the Quick Start guide?
When forScore launches, it usually shows the last score you were viewing. If you haven’t added any scores yet, or if the piece you were viewing last has been removed from your library, forScore will show the Quick Start guide by default. To close the guide, or any other score, simply navigate to a new one—files aren’t kept open in the background unless you’re using tabs.
Recovering deleted scores and setlists
forScore 10.5 includes a recovery feature that can help you restore scores or setlists you’ve recently removed from your library. When you use forScore’s menus to delete these items, they’re moved out of your library to a temporary location. If you need to recover one or more items, open forScore’s Tools menu and choose Backup, then tap “Recently Deleted” to access them. Tap an item to recover it, or swipe to delete and permanently erase it. Items are permanently erased automatically after seven days.
Tap the Edit button in this panel to recover or erase multiple items. While in edit mode, you’ll see two additional buttons in the bottom toolbar: a trash can icon and a recover icon. Tap either of these icons to select all items and prompt to recover or permanently erase them, or select one or more items first to recover or erase just those items.
Only items set aside by forScore can be recovered. If you use Apple’s File Sharing panel or iOS’ Files app to delete items, they won’t be moved to this location and you won’t be able to recover them. If you delete forScore from your device, all of your information goes with it and cannot be recovered using this method. We don’t store a copy of your files and can’t help you get them back if they’re erased.
Working with annotation layers
Introduced with forScore 10.4, annotation layers allow you to separate your markings so you can organize them, show or hide them, and edit some of them without affecting others. All drawn markings (including stamps and shapes) and text annotations belong to a layer, while links and buttons are separate and always appear above other annotations on the page.
The Layers panel
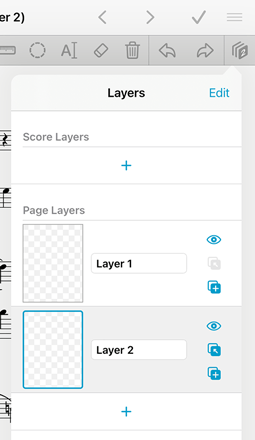
The Layers button in the annotation toolbar allows you to view and manage layers, and to select one layer to make it active. Every page always has at least one layer and can have up to eight page layers in total.
Tap the Layers button and then use the + button to create a new layer. Your new layer is given a default name and automatically made active (represented by a slightly darker background), and you can tap its title to rename it or tap other layers in the list to change the active layer at any time. Any markings you create are placed within the layer that’s currently active.
Items shown in this list from top to bottom represent layers from back to front (the layer at the top of the list contains annotations shown behind all others, and annotations within the layer at the bottom of the list are displayed in front all others). To the right of each layer in the list you’ll find three icons for toggling its visibility, merging it with the one behind it (above it in the list), and duplicating it. Use drag and drop gestures or tap the “Edit” button and drag the reorder control on the right-hand side of a layer to move it up or down.
Deleting or clearing layers
To delete a layer, tap “Edit” and then tap the red button on the left-hand side of a cell to confirm and remove it and all of its associated markings. Without activating edit mode, you can also remove a layer by swiping over it from right to left in the list view. This action also gives you a quick way of clearing all of the annotations on a particular layer without removing it entirely.
Moving annotations between layers
If you’ve made markings on one layer and want to move it to another layer, the Selection tool can help. Its copy and paste functions work within whichever layer is currently active, so you can select annotations in one layer, copy and then clear them, choose another layer, and paste them there. You can also move text annotations between layers: while editing a text annotation, tap “Layers” in the toolbar just above the keyboard (or along the bottom of the screen if you’re using an external keyboard) to move that annotation to a different layer.
Score layersforScore 11
Score layers are linked annotation layers that are available on every page of a score. Each page has its own unique annotations, but if you delete, hide, show, or rearrange score layers on one page those changes will take effect on all other pages as well. You can create up to four of these layers per score.
Note: to ensure page turns are as fast as possible, forScore flattens annotation layers into a single working copy when you save your changes. If needed, forScore also regenerates the working copy for every page affected by changes you’ve made to score layers. This can take a little bit of time, so consider splitting up very long files into smaller collections, if appropriate, to minimize this delay.
Page Copy & PasteforScore Pro
Exclusively for forScore Pro subscribers using forScore 11.2 or later, the PDF layer allows you to copy and paste the contents of a PDF page. For step-by-step instructions, please visit this knowledge base article.
Accessing Perform, Reflow, and Face Gestures
forScore 13 introduces support for multiple windows on iPadOS and macOS. Since Perform, Reflow, and Face Gestures can now be enabled per-window, they have been moved to the Display Options overlay. To access it, double tap the center of the screen or tap the gear icon in the title bar:

Perform, Reflow, and Face Gestures. Note that some of these icons are system-provided and may differ based on your OS version.
Freezing, Crashing, & Resetting to the Quick Start Guide
A system bug in iOS/iPadOS 13.4 or later can cause forScore to freeze and eventually crash, either at launch or at any time while using the app. If this happens, forScore will close all tabs and revert to displaying the quick start guide upon relaunching (a general safety measure intended to protect users from repeated crashes).
With forScore 11.2.5 we introduced an opt-in workaround that avoids this bug by limiting forScore’s communication with the system’s shared music playback framework. Based on this bug’s severity and Apple’s failure to address it for over a year, forScore 12.1 enabled this workaround by default for all users. Unless you need to use specific functionality that is limited by this change, we recommend leaving it on until further notice.
If the situation above does not apply to you, please contact us directly so we can diagnose the issue further.
Does forScore sync content across devices?
Yes, forScore can use your iCloud account to keep your content up to date across all of your devices automatically. It was initially offered in forScore 12.1 on a limited basis, and was made available to all users with forScore 13.0. Visit this page to learn more about syncing, accounts, storage quotas, and backups.
If needed, you can also manually copy your entire library from one device to another (without using iCloud Syncing) by following the instructions on this page: Transferring your forScore library to another device
Playing music with repeats
Handle repeats with a single tap by creating Links to connect two points in a score. Each link that you create consists of two components: a blue circle (an activation point) and an orange circle (a destination point). Blue circles are visible on the page at all times and take you to their target page and scroll position when tapped. When you arrive, the corresponding orange circle flashes twice, showing you where to begin playing, but remains invisible the rest of the time.
You can also use the Rearrange tool to duplicate and re-order the pages of your score as needed so that the correct page is always a flip away.
Understanding forScore bookmarks
With forScore, you can create bookmarks to quickly navigate to a specific page or to divide longer scores into individual sections and work with them independently from each other.
Open the Bookmarks menu (open book icon) to see all of the bookmarks for the score you’re currently viewing. You can sort them by page number, alphabetically, or search for a particular title. Tap the + button to create a new bookmark.
When creating a bookmark with forScore 11 or newer, you can choose whether to create an “item” or “page” bookmark. (With forScore 10 or earlier, supply an end page value to create an item bookmark, or leave it blank to create a page bookmark instead.) Page bookmarks are like table of contents entries that simply take you to a specific page, while Item bookmarks work like virtual items in your forScore library. You can learn more about these two types of bookmarks here.
Recording audio in forScore
Whether you’d like to review your practice sessions later or share your progress with friends and colleagues, forScore’s recording feature can help. Choose “record” from the tools menu to begin, and tap the microphone icon when you’re ready. You’ll see a red volume meter so you can make sure you’re close enough for the microphone to pick up clear audio. Tap the microphone again to stop recording, and then either save or discard it. Saved recordings are automatically linked to the current score so you can review them later.
The list icon next to the microphone lets you view, share, or delete any recordings you’ve made for the current score.
Note: The media box is not visible while recording. Tap the X button when you’re finished recording to continue using the media playback controls.
My page turner is not behaving correctly
A common accessibility setting introduced with iOS and iPadOS 13 can interfere with Bluetooth page turner functionality. This issue can affect all models of PageFlip devices, the iRig Blue Turn, AirTurn BT-105/106 class of pedals, as well as other devices that use a standard computer keyboard profile to connect to the iPad on a system level.
This can result in any of the following behaviors:
- Intermittently unresponsive pedals or buttons
- Selection of interface elements like tool icons or the seek bar in forScore instead of page turns
- Opening menus or performing other commands instead of page turns
If you are experiencing any of these behaviors, follow these steps to disable this setting:
- Open the system Settings app
- Choose Accessibility > Keyboards > Full Keyboard Access
- Turn Full Keyboard Access OFF
If these steps do not resolve the issue, please visit the connection and troubleshooting article specific to your model of accessory to ensure that the device is connected properly. If you have further issues not addressed in those articles, please contact us to troubleshoot further.
Editing information with the metadata panel
In the score, bookmark, and setlist menus, tap the blue circular button off to the right-hand side of any score or certain bookmarks to open the metadata panel where you can view and edit forScore’s information about that item. From the main screen, you can also tap the title in the menu bar for quick access to the current score or bookmark’s information. This article deals primarily with the elements found within the “Properties” tab of the metadata panel. For more information about the metadata panel’s other tabs, please visit forScore’s documentation.
Editing Values
The box to the left of each metadata value indicates and controls what will happen to any existing information once you close the panel. If it’s unchecked or empty, no changes will be made for that specific type of metadata. If it’s checked, the file’s existing metadata will be replaced with whatever you’ve entered in. The best choice is selected for you automatically as you work with these fields, but you can tap the box at any time to change it. For instance, if you want to clear out any existing values for a field, delete the text and then tap the box on the left so it shows a check mark. This replaces the value that was there previously with the one you’ve entered in: nothing.
Title
A score’s title is, by default, its filename minus the “.pdf” extension. If you change the title, forScore updates the filename to match as closely as possible. With forScore 11.2, you can change this behavior in the “advanced options” section of forScore’s settings panel so that changing a score’s title does not affect its filename. If you do, forScore will provide an additional “rename” contextual option in the Score menu so you can still rename files when you need to (without losing your annotations or metadata).
Multiple Values
Items may have one or more composers, genres, tags, or labels. To use multiple values, separate them using commas within each text field. For instance, “tag 1, tag 2” is automatically separated and creates two entries (“tag 1” and “tag 2”) in the Tags list.
Other Metadata
Other values include reference, rating and difficulty (which can be set by tapping or sliding your finger across their star or dot symbols), time, and key. While editing a score, you can specify a page offset to account for a preface or title page if needed.
Bookmarks
Bookmarks can be created by supplying a title, start page number, and an optional end page number. If no end page number is provided, the bookmark lets you quickly access that page but offers no additional abilities and does not maintain its own metadata values. If you do provide an end page, forScore creates a reference to that range of pages and treats them like any other score in your library: you can add metadata to them, add them to setlists, and more. (The rest of this section pertains to this second type of bookmark.)
There are a few differences between working with metadata for scores and bookmarks. Unlike with scores, a bookmark’s title has no relation to its PDF filename. Bookmark titles must be unique within their parent score, otherwise you can use any value you like. Page offsets are available for scores only, since the number of leading pages isn’t something that’s specific to a particular bookmark.
Batch editing
From most of forScore’s menus, you can use edit mode to select multiple items and batch edit their properties. When you’re batch editing, the Composers, Genres, and Tags fields will toggle between the same “checked” state—meaning that existing values will be replaced with whatever you’ve typed in—and an “append” state (a plus symbol). In this case, the + indicates that the values you’ve entered in will be added to the selected files, and that all existing values will be preserved.
Turning pages automatically with Autoturn
For scores with sequential pages, forScore’s metronome can turn the pages for you automatically. To use autoturn, follow these three steps:
- For each page of your score, enter in the number of beats on that page or type in the number of measures and the app will do the math for you. If you’re on the first page of your score, consider adding a few extra beats as a lead-in.
- Tap the autoturn button to turn it on (if it isn’t already)
- Start the metronome by selecting Audible, Visible, or Both
Once the metronome counts up to the number you’ve specified, the page will turn automatically. If you’re viewing your score in landscape mode, forScore will also scroll down when it reaches half of that number. (For example, if you have 64 beats on a page, it’ll scroll to the bottom of the page at 32 beats.)
Turn the metronome off at any point to reset the autoturn count.
Tip: Autoturn relies on a consistent tempo for each page. If your score contains multiple time signatures or significant changes in speed, consider using Replay or a hands-free page turner instead. Please note that Autoturn and Replay are not intended to be used in tandem. We recommend choosing one method or the other.
Offsetting page numbers to match printed copies
Some PDFs may contain extra pages at the start of the score that aren’t paginated in print. To compensate for this, open the metadata panel and choose the Properties section, then tap the book icon next to the page thumbnail image. This allows you to set a page offset so your page numbers will match any page numbers displayed in the file or on printed copies. For example, if the first two pages of a PDF show as roman numerals i and ii, enter “-1” in the field to offset the first page backward 2 steps from the PDF’s page 1.
About forScore for Mac
In November 2020 we brought forScore to the Mac and introduced a whole new sheet music reading experience. Learn more about forScore on the Mac below:
What are the minimum requirements?
forScore requires macOS 13 (a free update for most Macs). It runs natively on all Macs that support macOS 13, including both Intel-based models and the newer Apple Silicon-based models first introduced in late 2020.
How is it different than the iOS and iPadOS version?
forScore on the Mac was designed to be nearly identical to the iOS and iPadOS version. Whenever possible, its features and tools work exactly the same way across devices, but there are some differences and limitations:
- There are several APIs that Apple does not currently offer on macOS, including ARKit (used for face gestures), AirPods Pro motion sensing, and automatic document scanning (though the camera and image inputs are still available through forScore’s Scan feature). If these APIs are updated in the future, forScore will be able to utilize them just as it does on iOS and iPadOS.
- Due to major unresolved issues with Apple’s Media Player framework on macOS, audio playback using the Music app is currently not available—though in most cases forScore can use its own audio engine to play these same Music library tracks directly while offering advanced functionality like speed and pitch adjustment. This limitation currently prevents forScore from playing songs that are streamed from the cloud or DRM protected.
How do I get it?
forScore is a universal app, so you only have to purchase it once using your Apple ID, then you can download and use it on all of your personal devices authorized for use with that same Apple ID at no additional charge. That means you can buy it once (exclusively on the App Store) to then use it on your iPad, Mac, Vision Pro, and iPhone. If you’re a forScore Pro subscriber, use the “restore” button in the forScore Pro interface to activate your membership on each device.
What if the App Store prompts me to pay again?
This is an occasional App Store issue that can be easily addressed—please see this article for more information.
How do I transfer my content to the Mac?
You can use iCloud Syncing to automatically keep your content up to date between devices, or perform a one-time transfer: use forScore Backup Utility to archive your iPad or iOS device’s library directly to your computer, then launch forScore on your Mac and drag the resulting 4SB file into the Backups panel and click on it to restore its contents.
Displaying your music on an external display
In forScore 12, the legacy “TV Output” feature was replaced in order to provide better picture quality, greater flexibility, and independent display options. To access options and enable video output, first connect your display using the appropriate cable, then double tap the center of the page in forScore’s main view to show the Display Options overlay. (If you’ve changed the double tap gesture in the Gestures section of forScore’s panel, double tap with two fingers instead.)
To enable or disable video output, tap the switch next to the words “External Display.” Once enabled, use the buttons in that section to change the secondary display’s page fit mode, toggle two-up mode or the sepia effect, rotate the page, or adjust the zoom level to compensate for overscan.
Note: the External Display section is hidden or shown automatically when forScore gains or loses access to an external display. If you don’t see it, disconnecting and reconnecting your monitor may help.
To use AirPlay Mirroring instead, disable forScore’s external display support first and then use the directions on this page to activate this system-level feature.
Organization Basics
The score menu organizes your files by Composers, Genres, Tags, and Labels. These lists are generated dynamically, so they’ll only show values currently being used by one or more items in your library. (Learn more about changing an item’s properties using the Metadata panel.)
Tap any of these entries and you’ll see a new list containing all of the scores that pertain to that category. A single score may be visible in several different lists, so long as it matches the corresponding category or setlist. (For example, a score with “Johann Sebastian Bach” as its composer and “Romantic” as its genre will be listed under both of these categories.) Most submenus can be sorted by date added, rating, difficulty, reference, time, key, or alphabetically.
Note: By default, forScore sorts Composers alphabetically by last name and ignores common words like “the,” “a,” and “and” when sorting categories, scores, bookmarks, and setlists. You can adjust these behaviors within forScore’s settings panel to better suit your needs.
The setlist menu lets you create lists and group things manually so you can play through them in any order you need. Setlists even allow you to place the same item in a list more than once. Learn more about setlists here.
Toggling the control bar
To help you get the best view of your music, forScore’s controls are hidden by default. A quick, single tap in the middle of the page reveals the control bar along the top of the screen. This control bar gives you access to six important items (in blue): scores, bookmarks, and setlists on the left, and search, audio utilities, and the tools menu on the right.
The darker area in the middle of the toolbar displays the current item’s title, composer, and gives you quick access to commonly used tools and functions. The gear icon on the left shows the Display Options overlay, and the ellipsis icon on the right presents a menu that includes additional options related to the piece of music you’re currently viewing.
Adding files to a specific Library
To import new scores to an existing library, use the following steps:
- From the Libraries menu, tap to select a library you’d like to use. The Libraries menu should close and return to the main score menu showing only the selected library.
- Add the files to your forScore library using your preferred method and they will be imported into the currently selected library by default.
If you’ve already added scores to forScore and would like to change which library or libraries they belong to, visit this page for more information.
Adding files from an email attachment
When you are viewing an email in the Mail app with a PDF attachment, here’s how you can import it into forScore:
- Some larger files may not be completely downloaded yet. If that’s the case, the PDF icon will say “tap to download”. Tap the icon and the file will download completely
- Once the file is downloaded, tap and hold on the PDF attachment icon, and a list of options will appear
- Choose forScore from the “Open In…” list, and the file will open in the app and be saved to your forScore library
- If you accidentally tap quickly on the PDF icon, the file will open in “quick look.” In this case, tap once on the screen to show the file options, then tap the “share” button in the upper right corner (the box with an arrow pointing upward), and you’ll see the same sharing options and be able to choose forScore
Note: if you use a different email app, this process may be different, but most mail clients have a “share” or “action” function that will allow you to send a file to another app on your device.
Troubleshooting the Cue feature
Cue allows multiple devices to connect to each other and send signals from a “leader” to one or more “followers.” The way the devices communicate with each other is built into an iOS framework, so the majority of it is under the system’s control, not forScore’s. iOS uses a combination of Bluetooth and WiFi protocols to search for nearby devices, then create an ad hoc network between them. (This works even if you do not have a local wifi network to connect to.)
There are also a number of environmental factors that could be causing interference, such as other active Bluetooth devices within range (audience members, for example), the architecture of a building, etc.
However, there are a few things that you can try to troubleshoot the issue:
- Ensure that all devices have enabled Local Network access. You can verify this in the Settings app by choosing forScore in the sidebar. The Local Network switch should be turned on.
- If your Cue devices are joined with a WiFi network, make sure there are no other devices on the same network
- Make sure both Bluetooth and Wifi are enabled on all devices you are attempting to connect.
Note: Devices running iOS 10 and higher are unable to connect reliably (or at all) to devices running iOS 9 or earlier. For best results, all devices should be running the same major version of iOS.
Turning pages
Turn the page with two basic kinds of gestures: swipes and taps. Swipe left or right across the screen like flipping through pages in a book, or simply tap either side of the screen once.
You can also adjust the page transition type in the app’s settings panel under the Tools menu, and choose between curl, slide, stack, or no transition at all.
Connecting the iRig BlueTurn
The iRig BlueTurn is a Bluetooth LE device that uses a standard computer keyboard profile to connect to your iOS device. It features three different command modes, all of which are compatible with forScore by default.
First Time Pairing
- Turn the switch on the bottom of the device to the On position.
- The blue light on the top of the device should blink repeatedly, indicating that it is available for pairing.
- Open the Settings app on your device and choose Bluetooth.
- In the list of available devices, select iRig BlueTurn.
- Confirm when prompted to pair the device.
- Launch forScore, and the device should turn pages without any further configuration in any of the 3 device modes.
- If the pages do not turn, first try cycling through to a different device mode using the instructions provided in the device’s user manual. If that has no effect, adjust the page turner and shortcut settings using these instructions, or reset them to the defaults.
Toggling the virtual keyboard
Since the BlueTurn connects to your device with a computer keyboard profile, the virtual keyboard will not appear when a text field is selected. After connecting your device via the Bluetooth section of the Settings app, open forScore and tap to activate the text field you’d like to type in. Press and hold the left (“up” arrow) pad for three seconds to activate the virtual keyboard. Once that’s done, you should be able to use the virtual keyboard and still turn pages normally until you repeat these steps or power cycle your BlueTurn. For more information, see this article: Virtual keyboard won’t appear
Common Troubleshooting
Most issues with these devices are resolved by either switching modes on the device itself (see the device manual for further instructions), or by resetting the device and re-pairing it with your iPad.
If the device is unresponsive or intermittently responsive after trying the above, and you are running iOS or iPadOS 13 or later, a common Accessibility setting may be interfering with forScore’s ability to detect the device’s commands. Open the Settings app, then choose Accessibility > Keyboard > Full Keyboard Access and make sure this setting is turned OFF for optimal performance.
If you continue to have issues with the device, please contact us so we can troubleshoot further.
Connecting the iRig BlueBoard
The iRig BlueBoard is a Bluetooth LE device that forScore can communicate with directly, without the need for the intermediary BlueBoard app. If you have the BlueBoard app installed, make sure you have forced it closed using these instructions before pairing the device with forScore.
First Time Pairing
- Launch forScore, tap the center of the screen to toggle the control bar, and open the Tools menu (toolbox icon).
- With forScore 10 or earlier, choose Devices from the list. With forScore 11 or later, choose Settings, then Devices.
- Turn the switch on the bottom of the BlueBoard to the On position.
- The blue light on the top of the device should blink repeatedly, indicating that it is available for pairing.
- In the list of available devices, select iRig BlueTurn.
- The BlueBoard should pair with forScore immediately.
- Adjust the page turner and shortcut settings using these instructions, to customize each button for a command in forScore.
Setlist folders
Setlist folders allow you to organize your setlists into discrete groups. Unlike in the score menu, where an item can appear in multiple category lists based on its attributes, folders are concrete locations: a setlist can only ever be in one folder at a time, just like on a computer.
To create a new empty folder, tap the “edit” button and then tap the new folder icon with a “+” symbol inside it. Supply a name and your folder will appear at the bottom of the list. Folders can be rearranged and mixed in with your other setlists, so you can put them anywhere in your list.
Use the setlist metadata panel to move a setlist into or out of a folder. Tap the circled “i” button next to any setlist or use edit mode to select multiple setlists and batch edit them to change their folder location. Select any existing folder, create a new one, or select “no folder” to move your setlist or setlists.
Note: Setlist folders are available in forScore 10 or later.
Selecting Links or Buttons with an external device
With forScore 9.3 and later, you can use a supported accessory like a Bluetooth page turner, keyboard, MIDI controller, or Bluetooth Smart device to select and/or activate Links and Buttons on a page without needing to tap them. To configure your device, follow the customizing page turner shortcuts instructions and set a shortcut for “Select Control” and/or “Activate Control.”
If both options are configured, Select Control allows you to move focus between any of the currently visible links or buttons on your page, and Activate Control simulates a tap on the currently selected control. You can also just use Activate Control to skip the selection process and immediately activate the first (or only) control on the page.
If only Activate Control is configured, it activates the first control on the page (from the top left corner).
If only Select Control is configured and you’re using forScore 11.2 or later, you can use it to switch focus between the various links and buttons on a page by pressing it repeatedly, then forScore will activate the focused one after a short delay.
Note: Only one command can be assigned to each button or pedal on your device. So if you’d like to be able to use Previous Page, Next Page, Select Control, and Activate Control commands, you would need to use a device that has four buttons or pedals. Some two-pedal devices (AirTurn BT-105/106 and PageFlip Firefly) also have inputs on the back to expand to four pedals.
Letting forScore turn pages for you
forScore can turn pages for you automatically with two different tools: If you use the metronome, just enter in the number of beats per page, activate autoturn, and start the metronome. Once the metronome reaches the specified number, the page will flip. Learn more here: Turning pages automatically with Autoturn
If you’re using an audio track with your score, use Replay to automate your page turns instead—listen to the audio track once all the way through and turn pages when appropriate, then press play and watch as forScore moves from page to page at just the right moment. Learn more here: Using Replay to automate page turns
How to replace a file but keep forScore data intact
Sometimes you may want to replace an existing file in your forScore library with a new version of the PDF, but keep any existing annotations and metadata intact. For example, a composer might rewrite a few measures of a new piece, but the changes aren’t significant enough to scrap all of your work with the original version.
With most import methods, forScore will prompt you with options for handling duplicate file names. In this case, choose “Overwrite” and the app will replace the original PDF with the new one and keep any existing metadata in place. You can also use the File Sharing feature in forScore’s Backup Utility app (macOS 10.15 and later), where you’ll be prompted to replace any identical files.
Warning: Apple’s File Sharing panel in macOS 10.15 does not prompt you when you attempt to add a file with the same name as an existing file. Instead, it permanently overwrites the app’s copy with the computer’s copy and this cannot be undone. We do not recommend using Apple’s File Sharing panel at this time.
Creating a new library
Use these steps to create a new library in forScore:
- Open the Scores menu to the root Categories view (tap the back button if necessary) and tap the Library button in the upper left corner
- Tap the + button to add a new library, then give the library a name
- If you’d like to reorder your libraries, tap “edit” and drag the three lines to the right of each item up or down
- Tap to select your new library and make it active, closing the Libraries list and returning you to the Scores menu
Any scores you add to forScore are automatically added to the current library, but since your new library is empty right now there won’t be much to look at. Return to the libraries list and select “All Libraries” to browse for the scores you’d like to use. In the metadata panel, choose the “libraries” tab and tap the name of your new library to place a check mark next to it. This works while batch editing, too, so you can add multiple scores to a library quickly and easily.
About Page Flags
forScore 13 introduces Flags, a way of quickly marking a page so you can remember to come back to it later. Flags are accessible through the Bookmarks menu, where you can tap the flag icon to flag or unflag the current page (or, in two-up mode, pick the left or right page). View all flagged pages for the current score, or tap the circled ellipsis button to show all flagged pages across all scores instead. Tap the trash can icon to delete all of the flags in the list at once.
You can also quickly flag or unflag a page by using contextual menus (right click on a page if you’re using a pointing device or use the title bar’s ellipsis menu, if available). You can also configure gestures, keyboard shortcuts, and accessory button presses to flag or unflag the current page through the Gestures and Page Turners & Shortcuts sections of forScore’s settings panel.
Using stamps and shapes for common markings
Some musical symbols cannot be typed into a text box or drawn precisely, but with the “Stamps” and “Shapes” presets you can place these kinds of annotations on the page quickly and easily. Stamps is the first item on the second line of the annotation toolbar (a flat symbol by default), and shapes is the second item (a slur tool by default). Tap on either tool to select it, and tap again to see all of the available options. Drag the size slider at the bottom of either panel left or right to adjust stamp size or shape thickness.
Stamps
Tap the “tint” button at the top of the Stamps palette to color your stamps on the fly. Set a preferred color and enable tinting by tapping the switch in the top right-hand corner, then use the stamp tool like you normally would. Tinting only affects new annotations; existing ones are unaffected. On iPad, the arrow button in the top left-hand corner of the Stamps palette lets you collapse the view into a single column so you can see more of the page.
Shapes
The Shapes panel also allows tinting but on a per-shape basis. Tap the arrow button to the right of any shape to adjust its color and, in some cases, additional settings. For instance, the oval and rectangle tools can be filled or outlined, and the staff shape can be customized to draw a different number of lines. (Shape settings are available with forScore 10.5 or newer.)
Deleting Files
There are several ways to delete files from within forScore (allowing you to recover them if you accidentally delete something), but you can also delete them directly from your device through the Files app or the File Sharing interface if needed.
Within forScore
Swipe to Delete
- In the scores menu (music note icon) or search panel, swipe from right to left across an item to reveal a red “Delete” button
- Tap the Delete button to confirm and move the item to the trash*
Contextual MenusiOS 13
- In the scores menu or search panel, tap and hold an item to open its contextual menu
- Tap the Delete option to move the item to the trash*
Deleting One or More Scores
- In the scores menu, tap the Edit button then tap items in the list to select or deselect them
- Tap the Delete button at the top of the list, then confirm when prompted to move the selected item(s) to the trash.*
*If you use the methods above to delete files using forScore 10.5 or later, certain items like scores, setlists, and backups are moved to the “recently deleted” section of forScore’s backup panel and can be restored for up to seven days. Learn more about this recovery feature here. If you are using an earlier version of forScore, or if you use the methods below, items are immediately and permanently erased.
Other Methods
From a computer using File Sharing
- Connect your device to a computer and access the File Sharing panel
- Select one or more files, then press the Delete or Backspace key and confirm to immediately and permanently delete them
Using the Files appiOS 11
- Open the Files app on your iOS device (install it from the App Store if necessary)
- Swipe inward from the left edge of the screen or tap the back button, if necessary, until the Browse sidebar is visible
- Choose “On My iPad” or “On My iPhone” under Locations
- Select the forScore folder and browse for your file, then tap and hold it until additional options appear
- Tap “Delete” to delete it (see the note below)
When deleting files through the Files app, those items are moved to a “Recently Deleted” folder and can be recovered within a certain amount of time. Unlike forScore’s recovery features, however, this process does not preserve your annotations, metadata, or other score-specific data (which will be purged automatically the next time forScore updates its library). If you remove an item using this method and then later recover it, this additional information will most likely be lost.
Preventing finger input while drawing
If you’re using Apple Pencil (1st or 2nd generation) or Logitech Crayon to annotate, iOS provides great palm rejection right out of the box. While the system is good at ignoring unintentional touches, there’s still a chance that your fingers can make stray markings while you draw with one of these styluses. If that’s the case, the “prevent finger drawing” option in the Apple Pencil section of forScore’s settings panel may help. When this setting is enabled and active, you’ll be able to use your fingers to interact with forScore normally (switch tools, zoom in on the page, and tap other interface elements), but only your stylus will be able to draw markings on the page.
Because your stylus isn’t always around, and because Apple doesn’t give developers an efficient way of checking whether or not a stylus is currently connected, forScore uses different techniques to determine when to apply this setting or not. In previous versions of forScore (10.0-10.4.9), this setting only worked if you entered annotation mode by tapping the page with your stylus.
As of forScore 10.5, forScore simply tracks the last time the stylus touched the screen. As long as you’ve used your stylus within the last 15 minutes, finger drawing will be prevented no matter how you activate annotation mode. If you need to re-enable finger drawing because your stylus is out of reach or out of power, tap the new hand icon in the center of the annotation toolbar. If you do, you’ll be able to continue drawing with your fingers until the next time you use your stylus.
Adjusting audio track speed and pitch
As of version 10, forScore has the ability to independently adjust the playback speed and pitch of your audio tracks, with limitations depending on each track’s properties:
- DRMed files or files that haven’t been downloaded to your device can be played at 50%, 75%, or 100% of their normal speed
- Other tracks can be slowed down or sped up from 25% to 200% of their original speed
- Other tracks can also be pitch adjusted by up to an octave up or down
These options are made available automatically whenever possible, and can all be accessed by tapping the dial button in the media box. Pitch and speed are saved automatically per track, so you can move between tracks or scores without losing your settings.
Using Multiple Windows
forScore supports multiple windows on iPadOS and macOS, allowing you to work with multiple scores or setlists simultaneously. The core music reading experience in secondary windows is very similar, giving you access to familiar features like annotation, page turning modes, editing functions, layout options, and more.
Secondary windows offer a unique browsing experience that combines most of forScore’s menus into a single unified hierarchy. The sidebar allows you to navigate between general sections, while the submenu lets you access the items within that section. Swipe from the left or tap the left-most icon in the title bar to access this interface. You can learn more about secondary windows in the user guide.
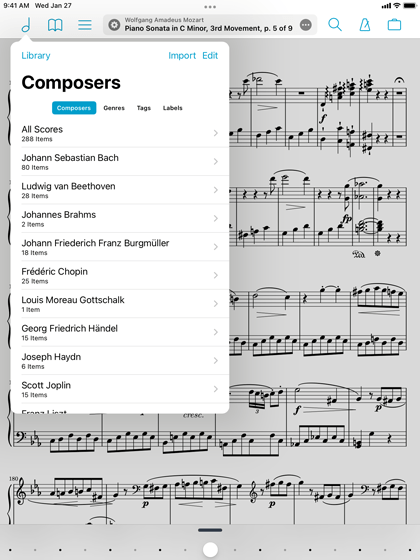
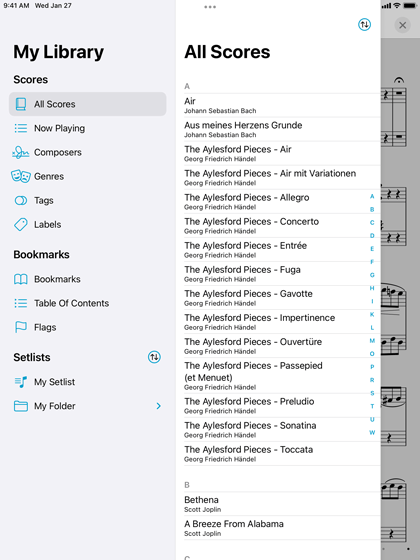
The easiest way to create a new window is by browsing for a score or setlist in the menu, then using its contextual menu to open it in a new window. On iPadOS, you can also use drag and drop gestures or the system’s multitasking interface, and on macOS you can use the menu bar or keyboard shortcuts.
Each device and operating system works a little differently, so be sure to consult Apple’s user guides for the most up to date information.
How to change the app language
The language of forScore is related to the language selected in your device’s system settings. For iOS and iPadOS, please see this support article on Apple’s website for more information. On macOS you’ll find these options in System Preferences under Language & Region.
forScore’s app documentation (user guide and online knowledge base) are only available in English. We do not have the resources to translate the documentation into all supported languages on an ongoing basis. However, our online user guide includes a link to use Google Translate to automatically translate each page. To do this, visit the user guide and click on “English” in the top right corner, then select your preferred language from the menu.
Looping a segment of audio
If you’d like to loop a portion of an audio track, tap on the repeat symbol and drag the two handles that appear above and below the seek bar left and right to set the loop region. With forScore 11 or newer, tap the “···” button to the right of the seek bar to make more precise adjustments using the two timestamp selectors (white areas with a waveform display and yellow indicators): touch anywhere within either of these boxes and drag left or right to set the exact timing of each loop point.
Understanding forScore’s metronome modes
With forScore’s metronome, you can use several different methods to keep time. In Audible mode, you’ll hear a tick at regular intervals, based on the beats per minute (BPM) that you set. With the Visible metronome, a black border pulses around the edges of your score, allowing you to keep time visually while still being able to see the entire page. If you like, you can use the Both option to both see and hear the metronome simultaneously.
Downloading scores from Musicnotes.com
With forScore 10.4 or later you can access your Musicnotes.com purchases and download them as standard PDF files into your forScore library. To begin, choose “Services” from forScore’s Tools menu and tap “Musicnotes” in the list. Log in when prompted, if necessary, and your list of purchases will appear.
Purchases can be sorted by title, composer, date purchased, or by key. Tap any single item to download it or swipe from right to left and choose “Download…” to download the item and add it to a specific setlist. If a purchased title includes multiple keys, tap the circled “…” button next to the title to select the key you’d like to download. You can use Edit mode to select multiple files and download them at once.
Notes: The “…” button in the Services list will open the Musicnotes website in a full-screen view to allow you to manage your account. Sharing is disabled for files imported from Musicnotes.
What happened to Notes?
Notes is still available in forScore 13 but it is no longer visible in the tools menu by default. To re-enable it, open forScore’s Settings panel and tap “advanced options,” then tap “notes” to turn it back on. To learn more about this change, please visit: forScore.co/legacy
Using Drag and Drop to import and share files
On iPad, Drag and Drop isn’t just restricted to the same app—you can also drag compatible files into forScore to import them or from forScore to another app to share them. When combined with the iPad’s Split View and Slide Over multitasking modes, working with files and copying them between apps becomes even easier.
Importing Files
Many apps (including iOS 11’s Files app) allow you to drag files out of them and into any other app that supports that particular file type. Drag one or more compatible files from one of these apps and drop it into forScore to import it.
Drag one or more PDF, 4SC, or text files into forScore and drop them onto the page to import them and open the last one, or drag them into the main menu to import them without opening them. Drag files into the main setlist menu to import the items and create a new setlist with them, drag them onto a setlist to import them and add them to the end of that list, or drop them right into a setlist to import them and then add them to that setlist at that specific point.
You can also import 4SS, 4SB, and CSV files by dragging them into the setlist menu, the backups panel, and the indexes list (respectively). You can also drag audio files into the audio file picker, the recordings list, or right into the audio tab of the metadata panel to import them and associate them with the current score.
Sharing Files
Drag any of your scores out from the main menu, setlist menu, or the search panel into any PDF-compatible app to send a copy of the original file (without annotations) to that app. If you need to send an annotated PDF or a 4SC file, continue using the standard sharing functions you’re used to.
You can also drag tracks out of the audio file picker, recordings browser, media box, or the metadata panel. Copy CSV files and forScore backups out of the Indexes and Backup panels, respectively. In each of these cases you can drag the associated file or files out to any other app that’s compatible with that particular file type. A new copy is sent to the other app, so your forScore library remains unchanged.
What happened to Console?
Console is no longer viable due to Apple’s deprecation and planned removal of key functionality, and it is not included with forScore 13.1 or later. Although users running older versions of forScore can still access this unsupported feature, it was retired beginning with forScore 12.0 and does not appear in the Tools menu unless you explicitly re-enable it. To do so, open forScore’s Settings panel and tap “advanced options,” then tap “console” to turn it back on. To learn more about this change, please visit: forScore.co/legacy
If I delete forScore, will it delete my library?
Yes. Deleting an app from your device will delete all files and data associated with that app, and there is no way to undo this. Deleting the app should only be done after exhausting all other troubleshooting with us directly.
Your forScore library is stored locally on your device, but we provide the ability to back up that data to your computer or a supported cloud service. Please see this knowledge base article for more information and instructions for backing up: Backing up your data to your computer
Note: If you have contacted Apple Support or visited an Apple Store to troubleshoot an app-specific issue, they will often suggest deleting the app and reinstalling it to resolve the issue. This is not the solution. Please contact us directly to troubleshoot any issues with forScore instead of seeking help from Apple.
Understanding alphabetical sorting
Alphabetical sorting in most of forScore’s menus works by skipping leading articles such as “a”, “an”, and “the”, much like a library catalog or book index. If you prefer, you can disable the “Smart sorting” option for three categories in the app’s settings panel under “Sorting” to list the items purely by first letter.
When viewing the list of composers, forScore also alphabetizes by last name (or the last word of a name). If you prefer to sort using the first name of each composer value, open the app’s settings panel, and under Sorting, and enable “sort composers by first name.”
Note: As of forScore 11.2, Smart Sorting also applies to setlist names and categories by default (except for Composers when sorted by first name). In forScore’s settings panel, tap “smart sorting” and check or uncheck items, scores, or categories to enable or disable smart sorting for any of these three types of content.
Many or all files missing
forScore allows you to create libraries so you can work with a subset of your scores, bookmarks, and setlists without seeing everything else in forScore. When a specific library is selected, only that library’s contents will be visible in forScore’s menus. If most or all of your files have suddenly disappeared, the most common reason is that you’re viewing a different library than you might expect.
To verify this, open the Scores menu and tap the back button until you see the category list (composers, genres, tags, or labels). In the top left-hand corner, you’ll find the Library button. This button’s title changes to show the currently selected library, so it may be called “Library” or it may have a different name you supplied when creating your custom library. Tap this button and choose “All Libraries” to see all of your items.
If you created a new library by accident and no longer need it, you may remove it by reopening the list of libraries and swiping over it from right to left. Tap “delete” and confirm to remove the library—this will NOT remove the scores, bookmarks, or setlists within that library, which will all still be visible when “All Libraries” is selected.
If you have verified that the “All Libraries” item is selected and still cannot find your files, contact us so we can troubleshoot the issue with you.
Do you offer telephone support?
No. We are a small company of just two people (one of whom works part time) and we do not have the resources to offer telephone support. Our top priority is maintaining our app for all of our users, including releasing updates to ensure compatibility with the latest iOS versions and newest hardware, fixing bugs, and continuing to create and improve forScore’s features as part of our commitment to providing free updates for life.
We understand that it can be more difficult to describe an issue via email, which is why we include the Support section in forScore’s tools menu. Unlike when you use the contact form on this site to reach out to us, using the Contact Us features in forScore’s Support panel allow you to attach screenshots or screen recordings so that you can show us what you need. Visit these Apple support articles to learn more about taking screenshots and screen recordings.
To learn more about our support policy, please click here.
Connecting or Troubleshooting the AirTurn BT-105 or BT-106
If the virtual keyboard isn’t appearing when you select a text field with your foot pedal connected, please see this article.
The BT-105 and BT-106 series of page turners are compatible with forScore in Mode 3. To pair these devices, follow the instructions in the device user manual to pair in the Bluetooth section of the Settings app, then change to Mode 3 and the device should turn pages in forScore without any further configuration. Note: these devices will not appear in forScore’s Devices panel, which is only used for certain classes of device with direct integrations.
If your page turner is paired with your iOS device (in the Bluetooth section of the Settings app) but isn’t turning pages in forScore, first try reselecting the correct mode on the device.
BT-106:
- Turn on the BT-106
- Press and hold the MODE (6) button for 2 seconds. The red LED will flash once per second from 1 to 6 flashes. The number of flashes corresponds to the same MODE number. Be sure to count the flashes.
- Release the MODE button following the number of flashes that reflects the desired MODE. The orange LED will flash the number of times indicating which MODE has been set.
BT-105:
- Turn off the BT-105
- Hold the “forward” footswitch closed with one hand (follow the cable from the footswitch—it will be plugged into the port next to the USB port)
- While holding the footswitch closed, turn the device on with the other hand
- As soon as the power light comes on, release both the footswitch and the power button
You should see a sequence of blinks that confirm the profile change as follows: 1 red, 3 green, 1 red. The device is now in Mode 3. This video from AirTurn demonstrates the steps further:
If that doesn’t resolve the issue, you can try resetting the default page turner shortcuts in forScore:
- Open forScore’s settings panel (in the Tools menu) and choose “page turners & shortcuts”
- Scroll to the bottom of the panel and tap “Reset…”
- Confirm when prompted, and check the AirTurn device again to see if it’s functioning properly
If you’re having continued issues beyond that, you might check to see if another compatible app works properly with the AirTurn device. If the foot pedal isn’t working in any apps, please contact AirTurn support directly. If the foot pedal is working in other compatible apps but not in forScore, please submit a forScore support request using the form in the upper left corner of this page.
Why is forScore crashing on launch?
Important: If your app is crashing repeatedly, deleting the app is not the solution. Doing so will also delete all of your forScore library and data and should only be done if you have tried these troubleshooting steps, have contacted us for further assistance, and are absolutely certain you have a recent backup of your files and library data saved to your computer.
Crashing After an iOS Update
Occasionally, updates to iOS introduce features or changes that make older versions of forScore incompatible. If you do not have the current version of the app installed and it is crashing on launch, please follow these steps to update:
Determine which version of forScore you have installed
- Open the Settings app and Choose General > Storage & iCloud Usage
- Tap “Manage Storage” under the Storage section
- Locate forScore in the list and tap to select it, then make note of the version number you have installed. If the number matches the current version (listed in the upper left corner of this page), please contact us so we can troubleshoot further. If you do not have the current version installed, please continue to the next section.
Check for updates in the App Store
- Open the App Store app on your iOS device
- Tap the Updates tab, if available, or tap the user icon/image in the top right-hand corner
- Look for an update to forScore in the list and tap the “Install” or “Update” button if one appears
- Occasionally the App Store fails to show available app updates. If no new version is listed (or you see an Open button instead of an Install button), first try dragging downward on the Updates page to refresh it. If that doesn’t work, try restarting your device or proceed to the next section to try and install the update.
When we release updates to forScore, it can take several hours before that update appears in the App Store. If the version you’re trying to download was just released, you may simply need to try again later. Otherwise, the steps below may help.
Log out of the App Store and log back in
- Tap the Featured tab in the App Store app and scroll down to the bottom
- Look for buttons that either say “Sign In” or “Apple ID: yourappleid”
- If it says Sign In, tap the button and enter the Apple ID credentials that you used to purchase forScore originally, then check for the update
- If it shows your Apple ID, tap the button, Sign Out, then sign back in with the Apple ID used to purchase forScore originally and check for updates
Crashing When Viewing a PDF File
If the app crashed when trying to view a PDF file and continues to crash on launch, it’s possible the file itself is causing issues, either because it’s too large for your device to process (typically only an issue with older iPads) or it contains data that is causing an error.
Note: in most cases, forScore will revert to the quick start guide if it crashes on launch three times as a safeguard. If you haven’t tried relaunching the app several times, doing so may help.
If a particular PDF file is causing issues, backing up and then deleting that file from forScore can help you get back up and running. Note that this process will remove all metadata and annotations from the file. If you’re able to identify a problem PDF file, please contact us so we can do some testing with it to see if we can prevent similar issues in the future.
Retrieving/removing files using a computer
- Connect your device to your computer and access the File Sharing panel
- Locate the file in the documents panel, then click to select it
- Click the “Save To…” (or “Save”) button and specify a location on your computer to save the file; the transfer begins immediately
- When the transfer is complete, select the file in the panel again if needed, then press the Delete or Backspace key to delete it
- You can then relaunch forScore to see if it opens successfully. If the app is still crashing, please contact us to troubleshoot further.
Retrieving/removing files using the Files appiOS 11
- Open the Files app (install it from the App Store if necessary)
- Swipe inward from the left edge of the screen or tap the back button, if necessary, until the Browse sidebar is visible
- Choose “On My iPad” or “On My iPhone” under Locations
- Select the forScore folder and browse for your file, then tap and hold it until additional options appear
- Use the Share function to back up the file to a safe location, then use the Delete function to remove it
Customizing metronome sounds
With forScore 9 and later, you can customize the metronome “tick” and “tock” sounds to better suit your needs.
- Create or find two .wav files, one for each sound that you’d like to substitute for the defaults
- Add those two .wav files to forScore using any file import method
- Once added, open the tools menu and choose Settings, then Accessibility
- Choose Metronome Sounds, then tap a sound to see a list of compatible .wav files in your library
- Select a file name, then repeat the process for the next sound
- Close the tools menu to save your changes, and the metronome sounds will update automatically
Fixing crooked scans
With forScore 10 you can use the Crop tool to not only remove excess margins around the page, you can also correct crooked scans by precisely adjusting the angle of the page. The slider at the top of the screen can be dragged left or right, rotating the page by up to 20° in either direction.
Note that while your annotations, links, and buttons will all be updated to align properly with the page, these changes are not backwards-compatible with forScore 9 or earlier. If you need to share files with colleagues using an older version of forScore, sending an annotated PDF is the best way to keep your edits intact.
Working with large files
Several things can impact performance for certain files. The most common reason why a file may be sluggish compared to others is the file size per page. If you’re scanning in your own files, you may want to try using a lower resolution. Some other files can perform poorly but also have very small file sizes: this is generally due to the complication of the file itself. If the PDF file contains a large number of images or elements, even very small ones, it can take iOS some time to sort it all out. These files usually perform poorly across multiple PDF readers, even Apple’s built-in apps, not just within forScore.
Adjusting the BPM and time signature
For each score in your library, forScore saves a unique BPM value and time signature that’s automatically used every time you return to the metronome feature. Just tap either value to change it with the number keypad. You can also adjust the current score’s BPM by rotating the wheel, using the + and – buttons (available in forScore 10 or later), or by tapping twice in the center of the screen to feel out the beat.
Using forScore’s in-app store
We know how hard it can be to find high-quality scores online that don’t force you into using proprietary systems or obscure formats, which is why forScore includes an in-app purchase storefront. It’s the best place to discover, preview, and download free and paid PDF scores that are perfectly optimized for iOS devices.
Browsing
The storefront can be accessed by selecting the “Store” entry in the tools menu, and features a variety of downloadable scores, browsing categories, articles, our other apps on the App Store, and links to a few of our favorite accessory makers.
Purchasing and Downloading
Your Apple ID is your gateway to purchasing digital content, so you don’t need to worry about entering your payment information directly into the app. Tap any downloadable product to learn more and purchase or re-download it. Content begins downloading immediately once your transaction has finished processing, and you can monitor its progress or cancel a download from the product’s page or by tapping “My Purchases” in the top left-hand corner of the storefront’s main view.
The “My Purchases” button lists all downloadable content you’ve purchased through forScore and allows you to monitor downloads or re-download previously purchased content (even if it’s no longer available for sale). If you don’t see an item in the list, use the Restore function to unlock any previous purchases that you may have made from another device, then re-download them as needed.
Copy Protection
Although we don’t copy protect any of the content currently available for purchase through the in-app purchase storefront, some third-party scores sold in the past are restricted in this way. These files can be backed up to a computer for safe keeping, but they can only be viewed on the device that was originally used to download them. They cannot be shared, printed, or rearranged.
To view protected files on another iPad authorized with your Apple ID, you must re-download those files through the storefront. As long as you use the same Apple ID each time, you won’t be charged more than once.
Removing libraries
If you no longer need a library, you can remove it by opening the Scores menu and tapping the back button until you see the Categories list (the list of composers, genres, tags, or labels). In the top left-hand corner, you’ll find the Library button—it may be called “Library” if no library is currently selected, otherwise it will show the name of the active library. Tap this button to see the complete list of libraries and swipe from right to left over the library you want to remove, then tap “delete” and confirm.
Note: removing a library does NOT delete its scores, bookmarks, or setlists—all of that content will still be visible whenever “All Libraries” is selected.
Using forScore in landscape orientation
To get a better view of your score, turn your device sideways: the page will fill up the screen’s width and extend downward if necessary. Swipe or tap to scroll from top to bottom and between pages, or drag the page up and down with your finger.
You can also view two pages at a time or use display modes to control how pages are resized to fit your screen.
Adding files from the web
Use Safari to save PDF files to your library from just about anywhere.
iOS 11 or later
- Use the Safari app to navigate to a PDF file offered by a website. Direct access to the PDF file is required (some websites use frames to obfuscate the file source).
- Once the PDF has downloaded and loaded into the “preview” view, tap the “share” button (a box with an up arrow) in the main toolbar.
- Select “Copy to forScore” to save a copy to your forScore library.
iOS 10 or earlier
- Use the Safari app to navigate to a PDF file offered by a website. Direct access to the PDF file is required (some websites use frames to obfuscate the file source).
- Once the PDF has downloaded and loaded into the “preview” view, you will see a toolbar appear briefly at the top of the file with either “More…” (iOS 10) or “Open in…” (iOS 9 or earlier) on the left side. On the right side, it typically says “Open in iBooks…” or another common app used to view that file type. If the toolbar disappears too quickly, tap the PDF file to show the toolbar again, then tap the More or Open In button.
- Select “Copy to forScore” to save a copy to your forScore library.
Many other apps—including Mail—offer similar functionality, and scores imported in this manner are copied to forScore’s documents folder so you won’t need to be connected to the internet to use them later. The more often you choose forScore for opening PDF files, the more likely that “Open in forScore…” will appear on the right side of this toolbar as a shortcut.
Connecting the PageFlip Cicada, Firefly, Butterfly, or Dragonfly
All PageFlip models connect to your iOS device using a standard computer keyboard profile. Each device features several modes that are compatible with forScore. For the PageFlip Cicada, Firefly, or Dragonfly, choose modes 1, 2, or 3. Modes 2 and 3 on the Butterfly are compatible with forScore.
First Time Pairing
- Follow the instructions in your specific model’s user guide to pair the pedal with your iOS device.
- Once paired, launch forScore and the device should turn pages by default in any of the 3 compatible device modes.
- If the pages do not turn, or if you would like to configure additional pedals on the Dragonfly model, adjust the page turner and shortcut settings using these instructions, or reset them to the defaults.
Toggling the virtual keyboard
Since the PageFlip pedals connect to your device with a computer keyboard profile, the virtual keyboard will not appear when a text field is selected. See this article for additional instructions on toggling the keyboard: Virtual keyboard won’t appear
Common Troubleshooting
Most issues with these devices are resolved by either switching modes using the buttons on the device itself, or by resetting the device and re-pairing it with your iPad.
If the PageFlip device is unresponsive or intermittently responsive after trying the above, and you are running iOS or iPadOS 13 or later, a common Accessibility setting may be interfering with forScore’s ability to detect the device’s commands. Open the Settings app, then choose Accessibility > Keyboard > Full Keyboard Access and make sure this setting is turned OFF for optimal performance.
If you continue to have issues with the device, please contact us so we can troubleshoot further.
Adding/prioritizing forScore in iOS’s sharing options
Apple’s sharing interface changed starting in iOS 13 and iPadOS 13, and forScore may not appear where you expect. This “share sheet,” as Apple calls it, can be customized so you can add forScore to the visible choices and even prioritize it over other apps. To begin, open a PDF file in a compatible app and share it (for instance, navigate to a PDF file in Safari and then tap the action icon—it’s a square with an arrow pointing up out of the top).

The new share sheet shows a thumbnail preview of your PDF file (labeled “A” in the image on the right) and some basic file information at the top, with an “x” button on the right to close the sheet if you want to cancel sharing. Below that row, you may see a row of sharing shortcuts (“B”) that let you do things like AirDrop a file to your computer, send a file to a recent or favorite contact via Mail or Messages. Note: this section does not always appear.
Further down in the Share Sheet (labeled “C” in the image on the right), you’ll see the AirDrop icon and a horizontally scrolling list of compatible Apps you can share the file with. The apps that appear here and the order in which they appear is determined by the system and may change over time, but you can specify which apps you prefer and prioritize them so that you can always find them quickly. To do so, scroll all the way to the end of this row where you’ll find a “more” item. Tap it to see all of the available options, and tap “Edit” in the top right-hand corner of the panel to adjust them.
The upper section contains your favorites—tap the red circle to the left of an item to remove it or drag the three horizontal lines on the right up and down to prioritize the apps you use the most. If an app isn’t shown in the Favorites list, scroll down to the Suggestions section and find it there (tap the green “+” button to move any of them up into the Favorites list). If an app does not appear in either of these sections, you may not be sharing a file type that the app understands.
Keep in mind that this interface is provided by Apple and we have no control over it whatsoever. Aside from declaring our app as compatible with certain file types like PDFs, audio files, or CSV indexes, there’s nothing else we can do to make forScore available within it or choose where it appears. This interface may change over time and we cannot provide step-by-step instructions for every version of iOS or iPadOS. The general principles should help guide you, but may not apply literally in all cases.
Understanding forScore’s menu layout and navigation
Menus are a big part of forScore, so understanding how they’re organized in general can help you move from one to another without getting lost.
Menus usually feature a navigation bar along the top. This bar includes a title as well as edit, add, and back buttons (when appropriate). On iPhones or iPod touches, or when you’re using the iPad’s narrow multitasking modes, some of these buttons may appear in a toolbar along the bottom of the menu instead.
Below the navigation bar, you’ll see a series of buttons that alter the content or sort order of the list below it. While you’re editing a list, this bar may also show available actions, and it may scroll left and right if needed to display all of the options.
Most menus also include a search bar hidden between the navigation bar and the sort bar—drag the list downward to access it. When you’re done searching, or when you scroll down, the search bar slides back under the control bar and hides out of sight until you need it again.
Menus may also include an index down the right-hand side which allows you to move quickly through longer lists. Tap or drag your finger up and down over it to jump to a particular spot or first letter (if the list is sorted alphabetically).
Adding and removing setlists
To delete an entire setlist, swipe your finger across it from right to left and confirm by pressing the “delete” button. You can also tap the “edit” button and select one or more setlists, then choose “delete” from the options along the top.
Use the same process to remove one or more entries from a setlist (note that the buttons will read ‘remove’ instead of ‘delete’ since removing an item from a setlist doesn’t affect the original item).
While viewing a setlist, use the + button to add new items to it. A full- screen editor will appear, showing you the current setlist on the left and your library on the right. Tap on any item in your library to add it to your setlist—a dot will appear next to items that already belong to the setlist. You can also delete items from the setlist or rearrange them at any time.
Three buttons along the bottom of the editor give you additional options: add the current score to your setlist, create a placeholder with a custom name, or add all of the items listed on the right to your setlist at once.
Importing bookmarks
If your PDF file already contains a table of contents, you may be able to use this information to create bookmarks. Tap the edit button, then choose “Import” to scan for any usable information.
If you prefer to use a PDF’s table of contents directly, simply choose the third sort type, “TOC,” and you’ll be able to quickly navigate to any section by selecting it from the list.
Fetching PDF metadata
PDF files sometimes contain their own information for title, author, subject, and keywords, which can be used by forScore as values for title, composer, genre, and tags respectively. If you’ve already imported a PDF file that might contain metadata, tap “Fetch…” above the keyboard while editing any field to see if any of this information exists and then decide if you’d like to use it or not. To automatically check for and use this information when a new file is added to your library, enable the “automatic fetching for new files” option in forScore’s settings panel.
To learn more about the types of PDF metadata forScore supports and the formatting it uses, visit this page.
Using Count In to lead off a song
Use the “Count In” feature to automatically turn off the metronome after a certain number of measures. Tap the Count In button to enable it, then set the number of measures by tapping on the value and entering it with the keypad. Once you start the metronome (audible, visible, or both), the app will count out the number of measures specified and stop automatically.
Working with the Files app in iOS 11 or later
 iOS 11 introduced the Files app (formerly called the iCloud Drive app) which gives you access to many of your documents across your device, apps, and cloud storage services. It’s a centralized way to work with files and manage or share them no matter where they come from, and when used with iOS 11’s Drag and Drop gestures it becomes an even more powerful tool that can be used in a variety of helpful ways.
This knowledge base article provides an overview of the Files app and how it works in conjunction with forScore. For more information on using the Files interface as a modern replacement for forScore’s Services panel, see this page.
Working with Files
The Files app’s sidebar lets you browse by location or tags and gives you easy access your favorite folders. Tap any of the items in these lists to see the files within (or associated with) it. You can sort these files by name, date, size, and tags, switch between a list or grid view, and tap an item to preview it if supported. Tap and hold any item to see more options, allowing you to do things like rename, share, move, or delete a file. The “Select” button in the top right-hand corner lets you select one or more files and work with them simultaneously.
Copying from Files to other Apps
To send a copy of one of your files to an app like forScore, tap and hold the file (if you’re viewing the grid or list view) and choose “Share” or tap the item to open a full-screen preview and use the share icon in the top right-hand corner. More information on sharing files between apps can be found here. forScore works with PDF files, many audio formats, CSV files, and its own custom formats (4SC scores, 4SS setlists, and 4SB backups). forScore can also import certain types of text file and automatically converts them to PDFs upon import.
Copying from forScore to Files
forScore provides sharing features in a variety of different locations and contexts. Within most of forScore’s menus you can share a score, bookmark, or setlist by swiping over it from right to left and tapping “Share” or you can use edit mode to select and share multiple items. You can also swipe to share certain items when shown in the Search panel, backups panel, audio picker, and many of forScore’s other views. Tap the “Save to Files” option within the sharing interface to pick a location and save a copy of your content.
forScore’s DocumentsforScore 10.4
In the Locations section of the Files app’s sidebar, under “On My iPad” or “On My iPhone,” you can access the Documents directory of certain apps that store their content on-device, such as forScore. Working with forScore’s documents through the Files app has similar implications as using Apple’s File Sharing panel does: adding and removing files in this directory adds or removes them from your forScore library, and renaming PDF files is discouraged as it can lead to a loss of metadata, annotations, and other forScore information about that file. The use of subdirectories is not supported at this time.
When opening files from this directory in other apps, or when sharing them from within forScore 10.4 or later, those apps may offer in-place editing capabilities that permanently modify your content. Changes made to forScore’s files in this manner are reflected within forScore. Learn more about in-place editing by visiting this page.
Drag and Drop
When you’re using an iPad, Drag and Drop gestures allow you to work with content between apps, not just within them. That means you can drag scores, setlists, backups, and other kinds of content out of forScore and right into the Files app to copy them there. Or, drag compatible files from the Files app into various views within forScore to copy them the other way. Our importing and sharing articles provide more details about this.
File Providers
The Files app isn’t just limited to what’s on your device or stored in iCloud, any app can make its files available to the system interactively. You continue to use the Files app with its familiar interface and work just like you always do, but behind the scenes that third-party app is doing the work of updating and maintaining your documents wherever they’re stored. Common examples of third-party apps that take advantage of this system include Dropbox, Google Drive, Box, Microsoft OneDrive, Amazon Drive, SugarSync, and more.
If you’ve downloaded an app that has been updated to work this way, it will be available as an option in the Files app’s “locations” list but will be disabled by default. Tap “Edit” in the sidebar to see all available providers and flip the switch next to the ones you want to use to enable them.
Some apps provide access to multiple services or network locations by leveraging a variety of protocols, including FTP, SFTP, WebDAV, and more. Apps like FileExplorer and FileBrowser let you configure and connect to many different accounts, either through the Files app or using their own interface.
The Files Interface
Apple provides the standalone Files app to users, but it also makes the Files interface available to third-party apps like forScore so you can more easily manage your documents without constantly switching between apps. Visit this page to learn more about using the Files interface within forScore.
Moving setlists between libraries
With forScore 10 or later, use these instructions to manage a single setlist’s library membership:
- Open the main setlist menu and tap the circled “i” button next to the setlist you want to edit
- Tap to select a library from the list and a check mark will appear next to it
- The app will prompt you to move all associated files from that setlist to the corresponding library if applicable
- Tap the back arrow to return to the setlist menu
If you want to edit multiple setlists at once, or if you’re using forScore 9 or earlier, use these instructions:
- Open the main setlist menu and tap Edit in the upper right corner
- Tap to select one or more setlists, then tap the Edit option that appears at the top of the menu
- Tap to select a library from the list and a check mark will appear next to it
- The app will prompt you to move all associated files from that setlist to the corresponding library if applicable
- Tap the back arrow to return to the setlist menu
Deleting or replacing metadata
When you’re working with metadata, a box to the left of each field helps you understand and control what will happen to any existing information once you’re done editing. If it’s unchecked or empty, no changes will be made to your file for that specific type of metadata. If it’s checked, the file’s existing metadata will be replaced with whatever you’ve entered in. The best choice is selected for you automatically as you work with these fields, but you can tap the box at any time to change it. For instance, if you want to clear out any existing values for a field, delete the text and then tap the box on the left so it shows a check mark. This replaces the value that was there previously with the one you’ve entered in: nothing.
If you’re batch editing, the Composers, Genres, and Tags fields will toggle between the same “checked” state—meaning that existing values will be replaced with whatever you’ve typed in—and an “append” state (a plus symbol). In this case, the + indicates that the values you’ve entered in will be added to the selected files, and that all existing values will be preserved.
Using Drag and Drop with setlists
Rearranging Setlists
Typically, setlists or their items can be arranged by tapping “edit” and then dragging the three horizontal lines on the right-hand side of the cell up or down as needed. With Drag and Drop, there’s no need to enter “edit” mode first—simply tap and hold any part of the item until it lifts up and out of the list, then drag up or down as needed. Other items in the list will move out of the way, allowing you to drop your item when it’s over the right spot.
Note: rearranging setlists and their items can only be done when viewing them in “manual” sort order.
You can also use Drag and Drop to move setlists into or out of folders. Drop a setlist onto a folder to move it into that folder, or hover over the folder for a few moments (or tap on it with another finger) to open it and place the setlist at a specific spot. Or, drag a setlist and tap the menu’s back button with another finger to move it out of a folder and drop it back into the root list.
Creating Setlists
To create a new setlist, drop one or more scores or bookmarks into the main Setlists list and supply a name. To add items to an existing setlist, drop them onto the setlist’s name and they’ll be added to the end of that list. Or, hover over a setlist (or tap it) to open it, then drop the items into the list at a specific point. You can even drag items out from one setlist and into another one to copy items between them.
Annotating with Drag and Drop
While annotating, use Drag and Drop to rearrange your drawing presets by dragging them left or right. You can also work with images in several ways: drop an image onto the page (from the Photos app, Safari, or any app that allows you to drag images) and forScore can add it as an annotation. Resize it, reposition it, then tap outside of it to place your image.
Create new stamps by dragging images from other apps directly into the Stamp Creator’s canvas. Use the Selection tool to select an area of drawn annotations, then use Drag and Drop to copy them as an image to other apps. Since you’re working with standard images in both cases, you can even combine these two examples to create new stamps from annotations you’ve previously drawn by hand, all without leaving the app or needing to go to your computer to deal with image editing software.
Why can’t I turn pages?
There are a few reasons why you may not be able to turn pages in forScore:
The app’s default settings only allow you to flip pages from one score to the next when viewing items in a setlist. Details here: Flip between scores
Page turns are intentionally disabled when using the pinch-zoom feature because it is intended for quick up-close reference of your page. If you would like to reduce the margins or set the overall zoom level of a PDF to maximize the size of the music on the screen, use the Crop or Margin Adjustment tools.
If you are viewing a bookmark within a larger PDF, you will only be able to turn pages within the range set for that bookmark. View the source PDF file to freely turn pages throughout the PDF, or consider creating a “simple” bookmark by only entering a start page (no end page) to jump to a specific page in a file and page forward and backward freely.
Understanding forScore Bookmarks
Creating Bookmarks
If none of these apply to your situation or explain the behavior you’re seeing, please contact us using the form in the upper left corner of the page for further assistance.
Common forScore Pro Questions
What is forScore Pro?
For an overview of the forScore Pro features and benefits, visit our Pro page.
I subscribed to forScore Pro but the features aren’t appearing.
If you’ve subscribed and forScore Pro features are not unlocked, or if you’re using a different device than the one you initially used to subscribe, you’ll need to restore your purchase to gain access to forScore Pro’s features. Open forScore’s tools menu, choose Settings, then forScore Pro (if you’re subscribed and see a list of options, tap “Manage Subscription”). Tap “Restore” in the lower right corner of the panel, then authenticate your Apple ID when prompted. This will validate your purchase history and should unlock the Pro features. If this is unsuccessful, please contact us to troubleshoot further.
Face Gestures is not appearing as an option after subscribing.
This most likely means that your device is not compatible with facial tracking. To confirm this, open forScore’s tools menu, choose Support, then Device Information. Facial Tracking must be listed as “Supported” in order for this Pro feature to appear. If Facial Tracking is not supported, you will need to upgrade to a supported device in order to use this feature. We recommend checking the Device Information panel before subscribing to forScore Pro to ensure the features you want to use are supported on your hardware.
Will my Pro stamps be deleted if I cancel my subscription? If I share a score with a non-Pro user, will they be able to see my Pro stamps?
If your subscription ends you will no longer be able to access and use the Pro stamp sets. Any Pro stamps that you have already placed on your PDFs will remain visible and will not be affected by your subscription status. Other users receiving annotated files that contain Pro stamps will be able to view them without issue. If you’ve copied any of the Pro stamps to your personal stamp collection or customized them, those copies will continue to be available to you regardless of your subscription status.
How do I manage my Pro subscription?
Like all in-app subscriptions, you can manage them through the App Store app under your Apple ID account information. If you have questions related to billing, renewals, payment methods, or anything else related to the actual purchase of the subscription, contact Apple Support. We do not have access to any Apple ID information for privacy and security reasons.
Scanning for new files
To make things as speedy as possible, forScore only scans for new files periodically and may not always show your newest files immediately. If you’ve just added something and it’s not showing up, drag the score menu’s list downward until you see the refresh symbol, then let go to update the listing.
Customizing forScore’s settings
You can customize forScore’s settings as needed to tailor the app to your particular needs. From the main view, tap the center of the screen to show the navigation bar if not already visible, tap the toolbox icon in the top right-hand corner, then choose “Settings” from the list.
To learn more about all of the settings available in the current version of forScore, visit this page. It you’re using an older version, refer to the corresponding user guide for more information.
Turning pages with AirPods
With forScore 12.0.5 or later running on iOS or iPadOS 14, you can flip pages by turning your head while wearing AirPods 3, AirPods Pro, or AirPods Max. This feature requires AirPods firmware 3A283 or newer and a device that supports motion processing (Apple has not provided a list of compatible devices).
To enable AirPods gestures, open forScore’s Tools menu and choose Settings, then Devices. Tap “AirPods” to enable or disable this feature, adjust its sensitivity or invert its direction, and test it out with visual indicators (shown if at least one AirPod is connected and in your ear).
To flip pages backward or forward, hold your head still for a moment and then turn to the left or right with a quick and steady lateral motion (similar in speed and movement to a swipe gesture performed with your finger). Since gestures aren’t relative to your screen, you can start them from any position: forScore establishes a resting baseline, then waits for horizontal movement to determine when you’re trying to turn pages.
Troubleshooting
If you’re experiencing issues, first ensure that your setup meets the minimum requirements: forScore version 12.0.5 or later (forScore’s Tools menu › Support), iOS or iPadOS 14 or later (Settings app › General › About), and AirPods firmware 3A283 or newer (Settings app › General › About › [AirPods name]). AirPods firmware is updated automatically under certain conditions and Apple does not provide users with any explicit way of forcing an update. If you need assistance updating or connecting your AirPods, please contact Apple Support.

Place one or both AirPods in your ear(s) or place AirPods Max over your ears and ensure that they are paired and connected to your device—look for the headphones icon in the top right-hand corner of the status bar. If that icon is not shown, your AirPods may be connected to a different nearby device; open the Settings app › Bluetooth and tap on your AirPods name to connect them.
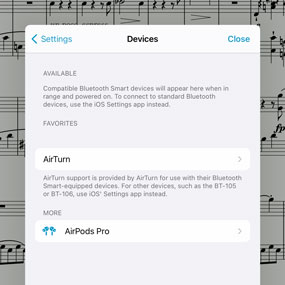
Open forScore’s Tools menu, choose Settings, then Devices. If you do not see AirPods listed here, your device does not support motion processing. Otherwise, select it from the list and allow forScore to access “Motion & Fitness” data when prompted. If you’re not automatically prompted to grant access to this data, or if you want to change your settings in the future, open the Settings app and choose “forScore” to find this and other privacy settings.
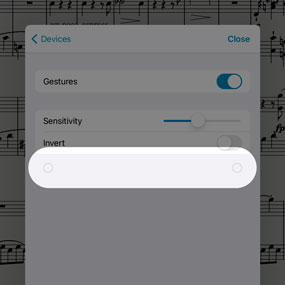
Enable gestures and you should see two circles appear below the “invert” setting. This is a visual indicator that lets you try out head turn gestures. If these circles do not appear, data is not being received from your AirPods; If they do appear, turn your head left and right to see the blue flashes that indicate a successful gesture.
Note: due to the complex requirements listed above, our ability offer one-on-one support for gesture and device setup is limited. Please read these directions carefully and ensure you’ve followed them all before contacting us for assistance.
Drag and drop basics
Drag & Drop
iOS 11 introduced Drag and Drop gestures, allowing you to work more quickly and naturally in apps like forScore that have been updated to support them. Note that Drag and Drop is not available on iOS 10 or earlier, and that it works between apps on iPad but only within the same app on iPhone or iPod Touch.
Gestures
To use Drag and Drop, tap and hold your finger over an interface element—if it can be dragged, it will animate and appear to lift off of the screen slightly. Once it does, drag your finger away to start a drag session. While continuing to hold that item with one finger, you can use other fingers to interact with the app just as you normally would. You can close the view you’re working in, open other panels or menus, and even switch apps (or use the iPad’s Split Screen and Slide Over multitasking modes).
When you drag your items over a compatible view or portion of the screen, you’ll see the interface change to indicate that an action can be performed there. When rearranging items in a list (scores within a setlist, for example), other items move out of the way and create a gap to show that you dropping your item there will move it to that spot. In other cases, a green “+” symbol may appear indicating that your items will be added or copied instead of moved. Different situations use different symbols, and it takes just a few minutes of exploration to understand what each of them means and how they work.
Multiple Items
In some cases, you can start dragging an item with one finger, then tap other similar items with a second finger to add them to your drag session. As you do, each item will animate over to your first finger (Apple calls this “flocking”) and you’ll be able to drag them all around at once and drop the entire set wherever you need to.
Often times you can even drag similar items from different views: drag a score out of the main menu, then tap a bookmark from your most recent setlist, for instance, to add it to the items you’re currently dragging.
How do I reuse metadata values or edit text annotations?
Keyboard Buttons
While editing certain text fields, keyboard buttons allow you to perform actions related to that field. When you’re editing metadata, these buttons let you reuse existing values or import (“fetch”) a PDF file’s metadata. If you’re editing a text annotation, these buttons let you move it to another layer, change its formatting, or delete it.
These buttons appear at the top of the virtual keyboard or, if the virtual keyboard isn’t visible on screen (because you’re using a physical keyboard or certain page turners), they appear along the bottom of the screen instead. On iPadOS they’re shown as icons as shown below, while on iPhone you’ll see text labels instead.
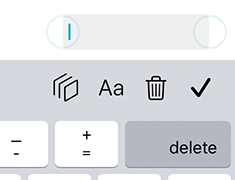
Note: these keyboard may not appear on some versions of iPadOS 13 if “shortcuts” is disabled in the Settings app. We notified Apple of this bug and they have since fixed it with iPadOS 14.0. To work around this issue on iPadOS 13, ensure that the Shortcuts item is enabled in the Settings app.
forScore 12
forScore 12 introduces several new alternative methods to access these functions. A circled downward arrow that appears to the right of most text fields in the Metadata panel gives you quick access to all existing values for that category (filtered by any text you’ve already typed in, if applicable). If you’re using iPadOS 14 or macOS, tap the ellipsis button to the right of the active text annotation to access the formatting panel, change layers, or delete that text annotation.
Using menu search and filters
In many of forScore’s menus, you can drag the list downward to reveal a search bar that allows you to quickly find exactly what you’re looking for in that list by showing items whose title or certain metadata match your query.
 When you’re viewing a list of items in the Score, Bookmark, or Setlist menus, you’ll also see a filter icon on the right-hand side of the search bar that allows you to narrow down that list of items by more advanced rules. Tap this button to show the Filters interface. (A similar Filter button is also available to the left of the search bar in forScore’s global Search panel.)
This interface features two sections: the Filters section contains any rules you’ve set up and allows you to add new ones, and the Recent section allows you to quickly reuse recent rules. Tap the + button to create a new rule, then tap to select one or more Composers, Genres, Tags, Labels, or Setlists. At the bottom of the panel, you’ll see the “matching rule” which defines how forScore should interpret your rule.
With only one category or setlist selected, you’ll be able to tap here to toggle between two modes: Contains (shows items that belong to that category or setlist) and Not (shows items that don’t belong to that category or setlist). With multiple categories or setlists selected, these modes change to Matches Any (shows items that belong to at least one category or setlist), Matches All (only shows items that match all of the selected categories or setlists), and Not (shows items that do not belong to all of the selected categories or setlists).
Tap the Done button when you’re finished setting up your rules and you’ll be returned to your list with the results now narrowed down accordingly. A blue bar below the signals that the list is currently being filtered, and you can tap here to remove the filters when you’re done.
Score metadata is changing automatically
PDF files may contain properties that can be used by forScore for its own metadata values. If you’ve enabled the “Automatic fetching for new files” option in forScore’s settings panel (under “Advanced Options”) this can change the title of scores and affect where they appear in your library immediately after they’ve been imported. To avoid this behavior, consider disabling this setting.
Locking audio when flipping between scores
If your settings allow you to flip between scores, you’ll see a lock icon in the media controller that prevents you from accidentally flipping to the next or previous score as long as the track is still playing.
Does the Donner/Moukey page turner work with forScore?
Although we’re unable to test every page turning device on the market and do not guarantee compatibility with them, many of our users have reported that Donner and Moukey pedals are fully compatible with forScore. As long as modes 1, 2, or 3 are selected, you should only need to pair the device with your iPad in the Bluetooth settings, then it should work by default in forScore without any further configuration.
For a list of the most popular recommended page turner devices, please visit our shop.
Re-centering the ruler
If you’ve dragged the ruler off the edge of the page while in annotation mode and are having trouble moving it back, tap and hold the ruler icon in the annotation toolbar for several seconds to reset its location back to the center of the page. If the ruler is still on the page but obscured by the annotation toolbar, this article describes how you can move the toolbar instead to access all areas of the page.
Searching for items in your library
In many of forScore’s menus, a search bar hidden up at the top of the list will allow you to filter down its items and find exactly what you’re looking for. If you’re viewing a list of composers, for instance, drag the list downward and type a few letters to see composer names containing those letters. If you’re viewing a list of scores, you can also use multiple words in any order to match either the score’s title or its composers.
In most cases, however, it’s easier to find what you’re looking for by using the global search function (the magnifying glass icon in the main control bar). You can search for any score, bookmark, setlist, or category (composer, genre, or tag). You can even search for an action or tool by name to get to it quickly.
Understanding forScore’s Devices panel
Although most Bluetooth devices connect to your iOS device using the Bluetooth section of iOS’ Settings app, certain Bluetooth Smart accessories connect directly to forScore instead. With forScore 10 or earlier, open the Tools menu and choose Devices. With forScore 11 or later, open the Tools menu and choose Settings, then select Devices.
forScore’s Devices panel currently allows you to connect to an AirTurn PED or PEDpro, iRig BlueBoard, and Turn Touch remote (forScore also offers limited, legacy support for certain third-party smart styluses—use of these is no longer recommended and compatibility cannot be guaranteed). Use the links above to find specific connection instructions for your device.
Where did the Devices panel go?
With forScore 11 the Devices panel was moved from the Tools menu into forScore’s Settings panel based on frequency of use. Open the Tools menu, tap Settings, then choose Devices from the list to access this panel using newer versions of forScore.
Crash when merging or rearranging
Some users may experience crashing when saving changes made in rearrange mode, merging files together, or sharing merged PDF setlists. This typically happens when working with large files or files within many pages.
This is due to the way Apple chooses to handle situations where an app requires more resources or requires them for a longer period. On iOS and iPadOS, apps may be terminated unexpectedly by the system in these cases (this tends to occur most frequently when rearranging or merging large and/or high-resolution files).
Since this is a system-level policy, we don’t have any means of changing this behavior ourselves. We recommend checking the PDF’s file resolution using PDF editing software (such as Adobe Acrobat) to make sure it’s optimized for display on the iPad screen. We recommend no more than 300dpi for best balance of resolution and performance. If the file is larger than 300dpi, downsample it using a PDF editing utility so that the saving process in forScore doesn’t require as much system memory. To swap out the downsampled PDF for the original one, see this knowledge base article.
About iPad multitasking
Since iOS 9, iPad users have been able to use Split View and Slide Over multitasking modes to work with multiple apps more easily. With iOS 11’s addition of the dock and Drag and Drop gestures, things have gotten even more powerful. Apple’s support article explores this topic more generally, and it’s the best place to learn how to use all of iOS’ multitasking features.
forScore has supported Split View and Slide Over multitasking modes since iOS 9’s release, and we updated forScore to deeply integrate with Apple’s Drag and Drop gestures ahead of iOS 11’s launch. Use both to work more efficiently and naturally than ever before.
forScore also supports multiple windows on iPadOS and macOS. Learn more about using multiple windows in our documentation.
Does the Yamaha MD-BT01 wireless adaptor work with forScore?
Based on information reported by forScore users, this device can be connected to a third-party app such as MIDIMITTR or BLE-MIDI and then used in conjunction with forScore using the built-in MIDI functions. Please note that we have not tested and do not endorse these third-party apps, cannot guarantee their ongoing support, and there may be other apps that serve this function available. In addition, we have not tested with this Yamaha device ourselves and cannot provide support for this and many other MIDI devices/accessories.
Adjusting the metronome audio channels
If you’re using headphones or a line out with your device, an icon at the top of the panel controls which channel(s) the audio plays through. Tap to toggle between left, right, and both channels.
Choosing an App Icon
On iPadOS and iOS you can change forScore’s app icon: open the tools menu and choose Settings, then scroll down to the last section and tap “App icon.” You can switch between the newest icon and most of the icons that shipped with older versions of forScore.
Additional alternative app icons are available to forScore Pro subscribers (or those who previously purchased any of the “voluntary upgrades” that are no longer available).
Apple does not currently allow developers to offer alternate app icons on macOS.
Using Drag and Drop with audio tracks
Importing and Sharing Files
forScore uses Drag and Drop to help you import or share audio files. Drag them into and out of the audio file picker to import or export them, or drag files from another app onto the media box to import them and link them to the current score or bookmark. If the current track in forScore’s media box is a locally stored file, you can also drag the track’s title to send a copy to another app. Tracks linked from the Music app cannot be shared.
Linking Tracks
You can also use Drag and Drop to associate tracks with scores or bookmarks in your library. Drag a track out from the metadata panel’s audio track list, the audio picker, or the media box’s title text. Navigate to a different score or bookmark and drop it into the media box to link it, or open the metadata panel to the correct piece and drop it into the audio track list. This can be done with any track, whether it’s locally stored or it comes from the system’s shared Music library.
Opening and Editing Files In-Place
With iOS 11 and forScore 10.4 or later, the contents of forScore’s documents directory are now available through the Files app and you can view or edit them directly through other apps on your device. If you share files from forScore to other apps, it’s important to understand what features they offer and whether you may be permanently altering your files. Visit this page to learn more about in-place editing.
I deleted the app or restored my device. How can I restore my data?
The instructions in this article are also applicable for lost or damaged devices that can no longer be accessed.
We do not recommend deleting and reinstalling the app unless we explicitly direct you to do so after exhausting all other troubleshooting. If you encounter issues with the app, please contact us first using the form at the left of this page.
Deleting forScore from your device also deletes all files and data associated with forScore (iOS should have warned you about this with an alert requiring you to confirm that you would indeed like to delete the app). However, if you did delete the app, the following methods can be used to attempt to restore your forScore library and data:
If you have a manual backup of your PDF files as well as a forScore 4SB backup file, you can follow the instructions here to restore your library.
If you don’t have a manual backup, you might try restoring your iOS device from a computer backup or iCloud backup to see if that also restores your forScore library. Please note, however, that restoring from a full backup restores your entire iOS device, not just one app, and these backups aren’t guaranteed to contain all of your forScore data. Learn more about restoring from a whole-device backup on Apple’s Support site.
If neither of these methods are available or successful, then unfortunately there’s no other way to restore your library. To safeguard your data, we highly recommend backing up your library on a regular basis using these instructions.
About Transactions, Accounts, and Policies
Per Apple’s policies, all App Store apps must be sold and distributed exclusively by Apple on developers’ behalf. This includes virtually all apps for Apple devices except those for the Mac that developers choose to distribute outside of the Mac App Store (like we currently do with our free Backup Utility).
Apple handles all transactions and distribution of our apps using your AppleID, without any involvement from us whatsoever. We do not maintain any user accounts, transaction records or receipts, and we receive no personally identifiable information about you from the sale of our apps.
While we do offer technical support for our apps, we do not have access to your AppleID and we cannot assist you with questions or concerns regarding your transactions, payments, app installation, family sharing, or your Apple account information. For these kinds of questions, you must contact Apple directly:
About Universal Purchases
Universal Purchases
Developers who make apps that are compatible with more than one kind of Apple device (iPad, iPhone/iPod Touch, Mac, Apple Watch, and Apple TV) can choose to offer their apps as “universal purchases,” meaning that Apple allows customers to purchase the app once and then download and run the app on a number of their other compatible devices. Note that purchases are associated with your Apple ID, so you must use the same account on each device to take advantage of this feature.
App Store Issues
Currently all of our apps sold in the App Store are available as Universal Purchases. If you purchase one of our apps on one platform and then attempt to download it onto another device, you may be asked to pay again. This is an App Store error that we have already made Apple aware of. If you purchased one of our universal apps on one supported device and are being asked to pay to install it on another, please follow these instructions to download the app without being charged a second time:
- Ensure you’re using the same Apple ID on both devices. If you are unsure which Apple ID you used to make the original purchase, access your purchase history by following these instructions. If you proceed with the following steps using a different Apple ID, you will be charged again and while Apple usually offers refunds in these scenarios, they are wholly responsible for all transactions and we can offer no recourse if they refuse.
- On the second device, proceed with the normal purchase process and confirm when you see a message such as this: “Are you sure you want to buy and download [name of app]? Your payment method will be charged for this purchase and your app will begin to download immediately.” Despite the wording, you will not be charged a second time if you have previously purchased that same app on another device using the same Apple ID.
- After this step, you will see an alert stating: “This update is free because you own a previous version of this item. To get this update now, click OK.”
The messages quoted here appear in the Mac App Store on macOS 10.15.4, other versions may be worded differently. If you have any questions or concerns before continuing, we urge you to contact Apple directly.
Discontinued Apps
Some of our discontinued apps were sold separately and do not qualify as Universal Purchases due to Apple’s limitations and policies. These apps include separate Mac versions of our apps that were available for sale between October 2019 and March 2020. If you purchased these apps and do not already own the universal (iOS) versions of them, please contact us to ensure you continue to receive free updates.
Metadata Icons & Menu Changes
forScore 14.3 introduces a new design for segmented controls that prioritizes the use of icons when appropriate. In most of forScore’s menus, metadata categories and sorting options are now shown as symbols with text appearing next to the selected option. To see text labels for all options, tap and hold anywhere in the segmented control for a moment until they appear. In the metadata panel, you can tap any of the category names to rename them and change their icon to better suit your needs.
If you prefer to always see text labels instead of icons in these controls, open forScore’s Tools menu, choose Settings › Accessibility › Segmented controls and choose “text only” instead of the default “show icons.”
Connecting your Turn Touch remote
The Turn Touch remote is a Bluetooth LE device that forScore can communicate with directly to turn pages or perform other commands.
First Time Pairing
- Open forScore and tap the center of the screen to show the title bar, if necessary.
- Tap the toolbox icon (the far right of the title bar) to open the Tools menu.
- With forScore 10 or earlier, choose Devices from the list. With forScore 11 or later, choose Settings, then Devices.
- Press the top arrow button of the Turn Touch to turn it on.
- In the list of available devices, select “Turn Touch Rem” to pair your remote.
- By default, the right and left buttons and up and down buttons will turn pages in forScore. Adjust the page turner and shortcut settings using these instructions, to customize each button for a command in forScore.
Note: Using the Turn Touch remote with forScore does not require the Turn Touch app. If you have installed the Turn Touch app, make sure the device pairing is removed from that app for best performance in forScore.
Editing bookmarks
To edit a bookmark from a menu, tap the round button to the right of it to open the Metadata panel. In the Properties tab, you’ll see two additional fields for start and end page: these values can be changed at any time, along with the other standard metadata values.
Rearranging items with Drag and Drop
Many of forScore’s views list items that can be rearranged: setlists and their contents, libraries, audio tracks and MIDI commands in the Metadata panel, accounts in the Services panel, and more. Typically, these items can be arranged by tapping “edit” and then dragging the three horizontal lines on the right-hand side of the cell up or down as needed. With Drag and Drop, there’s no need to enter “edit” mode first—simply tap and hold any part of the item until it lifts up and out of the list, then drag up or down as needed.
Do I need an account to use forScore?
No, forScore does not use accounts and does not collect any information about you. Some of the system features on your device require an iCloud account from Apple, and forScore’s Services panel allows you to access content from third-party cloud storage services and content providers. If you choose to use these features, information essential to their use will be transmitted to servers we don’t control. Read our complete (and short) privacy policy here.
Dual Page mode with the Cue app
When using Dual Page mode with forScore 12.0.4 or later, pages sent to the Cue app use either Standard or Best Fit display mode (depending on your current forScore settings). Due to the way aspect ratio is handled, this can cause certain landscape-oriented pages to appear smaller than normal when you’re using Standard display mode. Switching to Best Fit mode ensures that you’ll see similar results as before; learn more about display modes and how to switch between them on this page.
Note: we highly recommend using Best Fit display mode in general, even when not using Dual Page mode. It’s currently the default display mode for new users and will become the default choice for all users in the future.
Zooming in on a page
If you’d like to quickly see part of a page up close, place two fingers on the screen and move them farther apart to zoom in, or closer together (pinch) to zoom out. Page turning is disabled when the page is zoomed in.
Learn more about cropping and margin adjustment for more permanent options.
Downloading scores from VirtualSheetMusic.com
With forScore 11.2 or later you can access your VirtualSheetMusic.com purchases and download them as standard PDF files into your forScore library. To begin, choose “Services” from forScore’s Tools menu and tap “Virtual Sheet Music” in the list. Log in when prompted, if necessary, and your list of purchases will appear.
Purchases can be sorted by title, composer, date purchased, or by key. Tap any single item to download it or swipe from right to left and choose “Download…” to download the item and add it to a specific setlist. You can use Edit mode to select multiple files and download them at once.
Notes: The “…” button in the Services list will open the Virtual Sheet Music website in a full-screen view to allow you to manage your account. Sharing is disabled for files imported from Virtual Sheet Music.
Education pricing
forScore is a great tool for classrooms of any size, and we’ve made it available for discounted educational pricing through Apple’s Volume Purchase Program, which they manage on our behalf. More information about the program can be found on Apple’s website. Or, if your institution is already part of the volume purchase program, contact your program administrator for details.
Automatic backups are not working
The size of backup files largely depends on the volume and complexity of any annotations that you’ve added to your scores. If your device repeatedly runs out of memory while trying to create a backup file and crashes, forScore will deactivate the automatic backup feature to prevent further crashes.
If you’re experiencing this issue, you might consider removing or exporting any unnecessary or seldom-used scores as 4SC files (so they’ll include your annotations and metadata) and save them to your computer or to a file service through the Tools menu. That way you can re-add them easily when necessary while keeping your backup contents minimized.
If you’re not planning on making any changes to a score that you’ve annotated, consider archiving it using the Share or Services functions in the tools menu. These export options can create a PDF with permanent annotations that cannot be changed and won’t need to be backed up separately.
Downloading scores from Noteflight.com
With forScore 11.0 or later you can access your Noteflight Marketplace purchases and download them as standard PDF files into your forScore library. To begin, choose “Services” from forScore’s Tools menu and tap “Noteflight” in the list. Log in when prompted, if necessary, and your list of purchases will appear.
Purchases can be sorted by title, composer, date purchased, or by key. Tap any single item to download it or swipe from right to left and choose “Download…” to download the item and add it to a specific setlist. You can use Edit mode to select multiple files and download them at once.
Notes: The “…” button in the Services list will open the Noteflight website in a full-screen view to allow you to manage your account. Sharing is disabled for files imported from Noteflight.
Using Drag and Drop with scores and bookmarks
You can drag scores and bookmarks from many of forScore’s list views, including the Score menu, the Bookmarks menu, the contents of a setlist in the Setlist menu, search results in the Search panel, and you can drag the current item out of the main view’s title display.
Opening Items
Drop a single score or bookmark into the main view’s title display to open it, or drag one or more items into the Tab bar to open them in tabs. If the Tab bar isn’t already visible, it will slide out when you drag an item over the page so you can access it if needed.
Setlists
Use Drag and Drop to create or update setlists in several different ways: Drop one or more items into the Setlists menu to create a new setlist with those items. Drop them onto an existing setlist to add them to the end of it, or hover over a setlist for a few moments to open it. Drop items into a setlist’s contents to add them to that setlist at a specific point.
Services
While viewing a directory in the Services panel, drop one or more scores into the list to upload them. You’ll be asked to choose which format you’d like to use (PDF, annotated PDF, or 4SC file) before the upload begins.
Cue Modes & Compatibility
Cue 2 is a new version of the Cue remote control protocol that offers greater stability and performance. Cue 2 is compatible with forScore 14.4 or later and the standalone Cue app, version 2.4 or later. To continue to use Cue with older versions of these apps, you can switch back to the original Cue protocol using the following instructions for each app:
forScore 14.4: Access the Cue panel by opening tools menu and choosing “Cue” or by tapping the Cue icon in the Display Options overlay and selecting “Open Panel.” Tap the circled ellipsis button in the top left-hand corner of the panel and select which mode you’d like to use.
Cue 2.4: Use the title bar menu (tap the word “Cue” at the top of the window) and choose “Mode” and select which mode you’d like to use.
Bulk Purchasing
If you manage a large music group and would like to deploy forScore across all your players, you might consider enrolling in Apple’s Volume Purchase Program for Business. Learn more at Apple’s Website.
Looking for educational pricing? Learn more about Apple’s Volume Purchase Program for Education.
Deleting bookmarks
If you need to remove a bookmark, you can delete it either from the main score menu or from within the bookmark menu itself without removing or changing the bookmark’s source file.
Using Drag and Drop with services
In the Services panel, use Drag and Drop to move files between folders. Tap and hold to begin dragging a file, then select any other files you want to move (from the current directory or from other directories) if necessary. Drop them onto a folder to move them into it, or into the list to move them to the current directory.
Drop one or more scores, setlists, audio files, backups, or CSV files into the Services panel to upload them to the currently visible directory. You’ll be asked to choose which format you’d like to use, if applicable, before the upload begins.